Aller au contenu principal
Dell Inspiron 15R SE 7520 Hard Drive Replacement

Dell Inspiron 15R SE 7520 Hard Drive Replacement

Terrence15

Terrence15 et un autre contributeur

Dernière mise à jour le November 24, 2019

5 - 7 minutes
Facile
Tutoriel réalisé par la communauté

In this guide, we will be showing you how to remove and replace the Hard Drive.

Ce dont vous avez besoin

Outils

  1. Dell Inspiron 15R SE 7520 Hard Drive Replacement, Remove the Screws: étape 1, image 1 de 1
    • WARNING: Before working inside your computer, read the safety information that shipped with your computer and follow the steps in "Before You Begin".

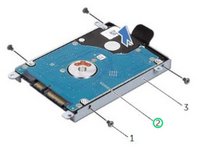
    • Remove the screws that secure the hard-drive assembly to the computer base.

  2. Dell Inspiron 15R SE 7520 Hard Drive Replacement, Sliding the Hard Drive: étape 2, image 1 de 1
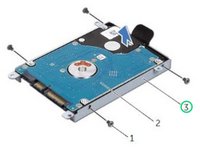
    • Using the pull-tab, slide the hard-drive assembly toward the back of the computer to disconnect the hard-drive assembly from the connector on the system board.

  3. Dell Inspiron 15R SE 7520 Hard Drive Replacement, Lifting the Hard-Drive Assembly: étape 3, image 1 de 1
    • Lift the hard-drive assembly out of the computer base.

  4. Dell Inspiron 15R SE 7520 Hard Drive Replacement, Remove the Screws: étape 4, image 1 de 1
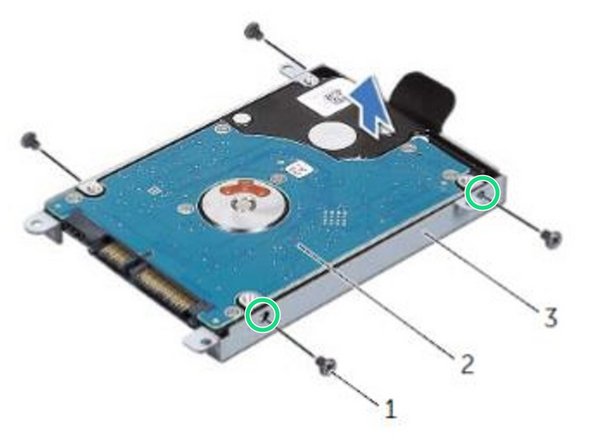
    • Remove the screws that secure the hard-drive bracket to the hard drive.

  5. Dell Inspiron 15R SE 7520 Hard Drive Replacement, Lifting the Hard Drive: étape 5, image 1 de 2 Dell Inspiron 15R SE 7520 Hard Drive Replacement, Lifting the Hard Drive: étape 5, image 2 de 2
    • Lift the hard drive off the hard-drive bracket.

  6. Dell Inspiron 15R SE 7520 Hard Drive Replacement, Align the Screw Holes: étape 6, image 1 de 1
    • Align the screw holes on the hard drive-bracket with the screw holes on the NEW hard drive.

  7. Dell Inspiron 15R SE 7520 Hard Drive Replacement, Replace the Screws: étape 7, image 1 de 1
    • Replace the screws that secure the hard-drive bracket to the hard drive.

  8. Dell Inspiron 15R SE 7520 Hard Drive Replacement, Place the Hard-Drive Assembly: étape 8, image 1 de 1
    • Place the hard-drive assembly on the computer base.

  9. Dell Inspiron 15R SE 7520 Hard Drive Replacement, Sliding the Hard Drive Assembly: étape 9, image 1 de 1
    • Using the pull-tab, slide the hard-drive assembly toward the front of the computer, to connect the hard-drive assembly to the connector on the system board.

  10. Dell Inspiron 15R SE 7520 Hard Drive Replacement, Replace the Screws: étape 10, image 1 de 1
    • Replace the screws that secure the hard-drive assembly to the computer base.

Ligne d'arrivée

Une autre personne a terminé cette réparation.

Terrence15

Membre depuis le 12/18/17

79 555 Réputation

441 tutoriels rédigés

Équipe

RampUP America, Inc. Membre de l'équipe RampUP America, Inc.

Community

43 membres

1 985 tutoriels rédigés

0 commentaires

Ajouter un commentaire

Nombre de vues :

Dernières 24 heures : 0

7 derniers jours : 5

30 derniers jours : 10

Total : 1,065