Aller au contenu principal
Dell Inspiron 17" 7786 2-in-1 Internal Battery Replacement

Dell Inspiron 17" 7786 2-in-1 Internal Battery Replacement

Antonio Franco

Antonio Franco et 3 autres contributeurs

Dernière mise à jour le May 7, 2024

5 minutes
Facile

This guide is for the Dell Inspiron 17" 7786 2-in-1 internal battery replacement.

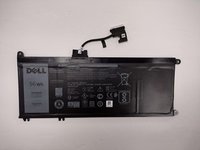
Over time, maximum power on the batteries will decrease or even begin developing issues for the user. It may be necessary to replace the battery if it has not been changed in some time. If your battery does not seem to keep or hold power even after a charging, the battery may need to be replaced.

Click here to validate and compare symptoms.

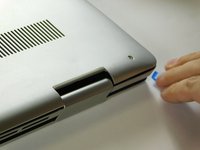
Before using this guide, please check to make sure there is no debris in the charging port and that your charger is working correctly.

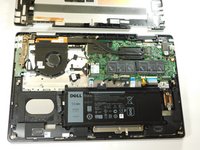
This guide instructs how to open the device's shell and properly remove the battery. Replacement of this component is not too complex, nor does it take much time to do so.

Ce dont vous avez besoin

Outils

Afficher plus…

  1. Dell Inspiron 17" 7786 2-in-1 Internal Battery Replacement, Base Cover: étape 1, image 1 de 2 Dell Inspiron 17" 7786 2-in-1 Internal Battery Replacement, Base Cover: étape 1, image 2 de 2
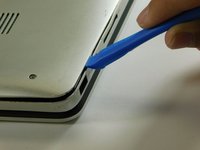
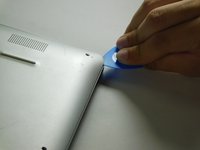
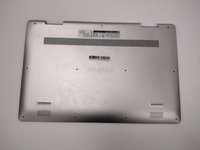
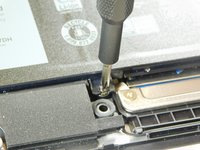
    • Remove the eight M2 5mm screws that secure the base cover using a Phillips #0 screwdriver.

  2. Dell Inspiron 17" 7786 2-in-1 Internal Battery Replacement: étape 2, image 1 de 2 Dell Inspiron 17" 7786 2-in-1 Internal Battery Replacement: étape 2, image 2 de 2
    • Loosen the three captive screws that secure the base closer to the hinges.

    • Do not attempt to remove the three captive screws! You need only to loosen them. They're supposed to stay on the base cover.

  3. Dell Inspiron 17" 7786 2-in-1 Internal Battery Replacement: étape 3, image 1 de 3 Dell Inspiron 17" 7786 2-in-1 Internal Battery Replacement: étape 3, image 2 de 3 Dell Inspiron 17" 7786 2-in-1 Internal Battery Replacement: étape 3, image 3 de 3
    • Carefully pry the base cover using an iFixit opening tool in the crevice near the hinges. Guide the pick along the edges and slightly lift upwards as you go along.

    • Do not start from the speaker end of the edges when opening, or you may cause further damage to your device!

  4. Dell Inspiron 17" 7786 2-in-1 Internal Battery Replacement: étape 4, image 1 de 3 Dell Inspiron 17" 7786 2-in-1 Internal Battery Replacement: étape 4, image 2 de 3 Dell Inspiron 17" 7786 2-in-1 Internal Battery Replacement: étape 4, image 3 de 3
    • Carefully remove the base cover from the laptop.

  5. Dell Inspiron 17" 7786 2-in-1 Internal Battery Replacement, Internal Battery: étape 5, image 1 de 3 Dell Inspiron 17" 7786 2-in-1 Internal Battery Replacement, Internal Battery: étape 5, image 2 de 3 Dell Inspiron 17" 7786 2-in-1 Internal Battery Replacement, Internal Battery: étape 5, image 3 de 3
    Outil utilisé dans cette étape :
    Tweezers
    $4.99
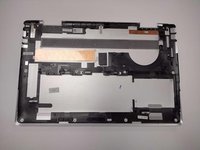
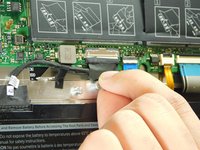
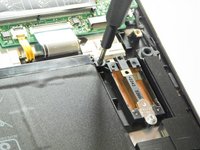
    • Detach the tab connecting the battery to the system board using your fingers or a pair of tweezers.

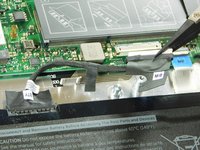
    • Peel off the adhesive tab holding the cable to the device.

  6. Dell Inspiron 17" 7786 2-in-1 Internal Battery Replacement: étape 6, image 1 de 1
    • Flip the device over. Press and hold the power button for a few seconds to discharge any leftover electrical current.

    • You may leave the screen open if further repair is needed, or close it if you are only replacing the battery.

  7. Dell Inspiron 17" 7786 2-in-1 Internal Battery Replacement: étape 7, image 1 de 3 Dell Inspiron 17" 7786 2-in-1 Internal Battery Replacement: étape 7, image 2 de 3 Dell Inspiron 17" 7786 2-in-1 Internal Battery Replacement: étape 7, image 3 de 3
    • Dell's official service manual does not mention of the 5th screw located near the middle edge of the battery closer to the touchpad.

    • Flip the device back over.

    • Remove five 3 mm screws that are securing the battery using a Phillips #0 screwdriver.

    • Lift the battery upwards to remove it completely.

Conclusion

To reassemble your device, follow these instructions in reverse order.

2 autres ont terminé cette réparation.

Antonio Franco

Membre depuis le 08/25/22

1 025 Réputation

10 tutoriels rédigés

Équipe

Gateway, Team 1-3, Class Fall 2022 Membre de l'équipe Gateway, Team 1-3, Class Fall 2022

GCC-CLASS-F22S1G3

4 membres

15 tutoriels rédigés

5 commentaires

Looks good , where I can get Battery Replacement from ?

ilan magen - Réponse

Hello! You can look at newegg com, amazon.com or ebay.com. That's where you can get a bunch of great used parts!

Delia Padilla -

THANK YOU, THANK YOU, THANK YOU! I replaced the battery following your instructions. The only thing I did differently is that I couldn't get the plug out with the battery still screwed down, so I unscrewed the battery then unplugged it. After unplugging, then I held down the power key for a few seconds to discharge before plugging in the new battery and screwing it down. My computer will be like new now! Blessings to all of you at IFixIt!

I bought my new replacement battery from the store at IFixIt.com.

Brenda McCurdy Cable - Réponse

You're welcome! I'm glad our project could help you!

Delia Padilla -

After I've ''discharged any leftover power" by holding the power button down. What do I do ? Do I leave it until the laptop turns off by itself ? Or do I hold down the power button to force shutdown ?

Kalafinwë - Réponse

Ajouter un commentaire

Nombre de vues :

Dernières 24 heures : 3

7 derniers jours : 9

30 derniers jours : 35

Total : 912