Aller au contenu principal
Dell Inspiron 3148 Keyboard Replacement

Dell Inspiron 3148 Keyboard Replacement

Wesley Taylor

Wesley Taylor et 2 autres contributeurs

Dernière mise à jour le August 6, 2024

Aucune estimation
Modérée
Photos d’action
Étapes manquantes
Meilleure introduction

This guide is intended to demonstrate the removal and replacement of the keyboard in the Dell Inspiron 3148. The procedure may be missing some steps. In Step 21, most of the components have been removed from the keyboard/case assembly. However, the speakers and trackpad still remain, and can be replaced on the keyboard/case assembly if salvageable. Furthermore, it is possible the keyboard can be removed from the case and replaced independently. If you find this to be the situation, consider revising this guide to include the additional steps. Thanks!

Ce dont vous avez besoin

Outils

Afficher plus…

  1. Dell Inspiron 3148 Keyboard Replacement, Back Panel: étape 1, image 1 de 2 Dell Inspiron 3148 Keyboard Replacement, Back Panel: étape 1, image 2 de 2
    • Ensure the device is powered off and unplugged. Close the device and orient it face up, with the hinges further away from you.

    • Flip the device over so the backside is facing you.

  2. Dell Inspiron 3148 Keyboard Replacement: étape 2, image 1 de 1
    • Using the Phillips #1 screwdriver, remove all nine 7mm screws.

  3. Dell Inspiron 3148 Keyboard Replacement: étape 3, image 1 de 2 Dell Inspiron 3148 Keyboard Replacement: étape 3, image 2 de 2
    • Using the plastic opening tool, pull the back panel upward. Move the opening tool along the edge of the device and lift the panel off of your device.

    • Be aware, the back panel is kept in place by magnetic clips. They will offer some resistance, but continue to gently leverage upwards.

  4. Dell Inspiron 3148 Keyboard Replacement, Battery: étape 4, image 1 de 1
    • Remove the three 4mm screws holding battery in place using the Phillips #0 screwdriver.

  5. Dell Inspiron 3148 Keyboard Replacement: étape 5, image 1 de 1
    • Using the iFixit opening tools, lift the battery out of its housing.

  6. Dell Inspiron 3148 Keyboard Replacement: étape 6, image 1 de 1
    • Once loosened, use your fingers to lift the battery up and out of its housing.

    • There is a small cable which sits in a rut in the top of the battery. Ensure that it is pushed out of the way before removing completely.

  7. Dell Inspiron 3148 Keyboard Replacement: étape 7, image 1 de 1
    • Remove the battery completely.

  8. Dell Inspiron 3148 Keyboard Replacement, RAM: étape 8, image 1 de 1
    • Locate the RAM chips on the motherboard.

  9. Dell Inspiron 3148 Keyboard Replacement: étape 9, image 1 de 1
    • There are two tabs on either side of the RAM chip. Pull them away from the chip.

  10. Dell Inspiron 3148 Keyboard Replacement: étape 10, image 1 de 2 Dell Inspiron 3148 Keyboard Replacement: étape 10, image 2 de 2
    • The RAM chip will pop up out of the slot.

    • Pinch the RAM between two fingers, making minimal contact. Gently pull away from its port.

    • Remove the RAM from the device.

  11. Dell Inspiron 3148 Keyboard Replacement, Hard Drive: étape 11, image 1 de 3 Dell Inspiron 3148 Keyboard Replacement, Hard Drive: étape 11, image 2 de 3 Dell Inspiron 3148 Keyboard Replacement, Hard Drive: étape 11, image 3 de 3
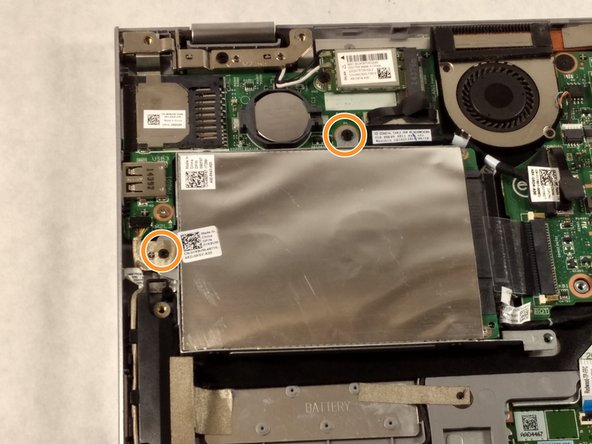
    • If there is a piece of tape connecting the hard drive and a small power cord, remove the tape.

    • Using the Phillips #0 screwdriver, remove the two 4mm screws.

  12. Dell Inspiron 3148 Keyboard Replacement: étape 12, image 1 de 3 Dell Inspiron 3148 Keyboard Replacement: étape 12, image 2 de 3 Dell Inspiron 3148 Keyboard Replacement: étape 12, image 3 de 3
    • Notice: there is a small data cable connecting the hard drive to the motherboard. Do not attempt to lift the hard drive all the way out before removing this cable.

    • Lift the hard drive slightly out of the device.

    • Grasp the head of the cable, not the cable itself.

    • Pull away from the hard drive, removing the data cable. The hard drive may now be fully removed.

  13. Dell Inspiron 3148 Keyboard Replacement, Fan: étape 13, image 1 de 3 Dell Inspiron 3148 Keyboard Replacement, Fan: étape 13, image 2 de 3 Dell Inspiron 3148 Keyboard Replacement, Fan: étape 13, image 3 de 3
    • If there is tape on your fan, remove the tape.

    • Remove the two 2mm screws on the fan enclosure using the Phillips #00 screwdriver.

  14. Dell Inspiron 3148 Keyboard Replacement: étape 14, image 1 de 2 Dell Inspiron 3148 Keyboard Replacement: étape 14, image 2 de 2
    • Unscrew the three 4mm screws holding down the heat sink of the fan using the Phillips #00 screwdriver.

    • The three 4mm screws found in the heat sink will remain attached to the heat sink. This is okay as long as they are detached from the motherboard.

  15. Dell Inspiron 3148 Keyboard Replacement: étape 15, image 1 de 1
    Outil utilisé dans cette étape :
    Tweezers
    $4.99
    • Use the tweezers to gently pull the power supply cable from its port.

  16. Dell Inspiron 3148 Keyboard Replacement: étape 16, image 1 de 1
    • Grasp the fan and lift upward. Remove the fan from the device.

  17. Dell Inspiron 3148 Keyboard Replacement, CMOS Battery: étape 17, image 1 de 3 Dell Inspiron 3148 Keyboard Replacement, CMOS Battery: étape 17, image 2 de 3 Dell Inspiron 3148 Keyboard Replacement, CMOS Battery: étape 17, image 3 de 3
    Outil utilisé dans cette étape :
    Tweezers
    $4.99
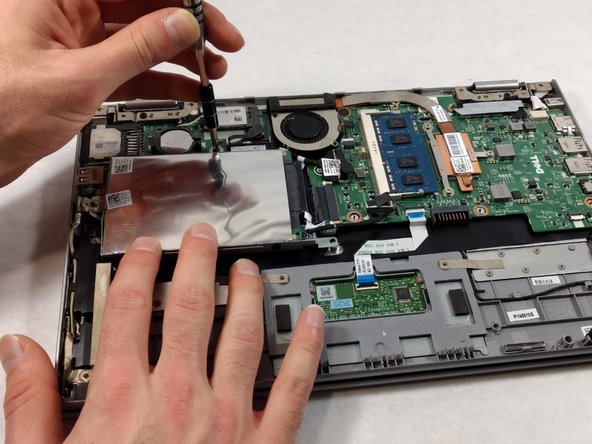
    • Using a pair of tweezers, lift the exposed edge of the CMOS battery upward.

    • Once the CMOS battery has been loosened, remove it from the device.

  18. Dell Inspiron 3148 Keyboard Replacement, Motherboard: étape 18, image 1 de 1
    • Remove the keyboard cable from its ZIF connector by flipping up the locking tab on the connector and then pulling the cable out.

  19. Dell Inspiron 3148 Keyboard Replacement: étape 19, image 1 de 1
    • Remove the touch pad cable from its ZIF connector.

  20. Dell Inspiron 3148 Keyboard Replacement: étape 20, image 1 de 1
    • Remove one 3.41mm screw using a Phillips #000 screwdriver.

    • Remove the two 3.41mm screws using a Phillips #000 screwdriver.

    • Remove motherboard.

  21. Dell Inspiron 3148 Keyboard Replacement, Keyboard: étape 21, image 1 de 2 Dell Inspiron 3148 Keyboard Replacement, Keyboard: étape 21, image 2 de 2
    • Using a Phillips #000 screwdriver, remove single 4.1mm screw from the SD card reader board.

    • Remove the SD card reader board.

    • Remove the keyboard.

Conclusion

To reassemble your device, follow these instructions in reverse order.

Une autre personne a terminé cette réparation.

Un commentaire

This guide is a joke - the last step leaves out the part about removing the paper insulation (black sheet), and then you have about 25 plastic welded posts that hold the metal shield over the keyboard. To "Remove the keyboard" as the purported author states, you'll have to break the posts, remove the shield, then hope you can get it all back in place without damage. I would have never ordered a replacement keyboard knowing this. Pure BS.....

Matty Klem - Réponse

Ajouter un commentaire

Nombre de vues :

Dernières 24 heures : 0

7 derniers jours : 0

30 derniers jours : 4

Total : 298