Aller au contenu principal
Dell Inspiron 3542 LCD screen replacement

Dell Inspiron 3542 LCD screen replacement

Ruben Debbaudt

Ruben Debbaudt et un autre contributeur

Dernière mise à jour le February 26, 2021

20 - 40 minutes
Facile
Puces !
Tutoriel réalisé par la communauté

In this tutorial you will learn how to remove and replace the screen of a Dell Inspiron 3542

Always be careful with electronic devices!

Ce dont vous avez besoin

Pièces

Outils

Afficher plus…

  1. Dell Inspiron 3542 LCD screen replacement, Remove the battery: étape 1, image 1 de 2 Dell Inspiron 3542 LCD screen replacement, Remove the battery: étape 1, image 2 de 2
    • Remove the battery by pushing both clips out.

    • Remove the power supply.

  2. Dell Inspiron 3542 LCD screen replacement, Bezel removal: étape 2, image 1 de 2 Dell Inspiron 3542 LCD screen replacement, Bezel removal: étape 2, image 2 de 2
    Outil utilisé dans cette étape :
    Jimmy
    $7.95
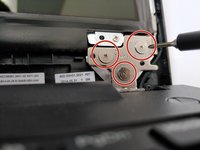
    • Use Jimmy or another opening tool to remove the screen bezel. Be careful not to damage the bezel.

  3. Dell Inspiron 3542 LCD screen replacement, Screen removal: étape 3, image 1 de 2 Dell Inspiron 3542 LCD screen replacement, Screen removal: étape 3, image 2 de 2
    • Loosen the marked screws.

  4. Dell Inspiron 3542 LCD screen replacement, Screen removal: étape 4, image 1 de 1
    • Remove the marked screws.

  5. Dell Inspiron 3542 LCD screen replacement, Screen removal: étape 5, image 1 de 1
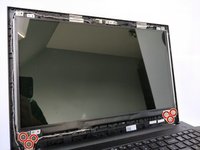
    • The screen can now be removed safely. You can put it screen down at your keyboard.

    • Be careful with the screen.

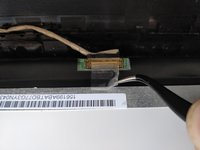
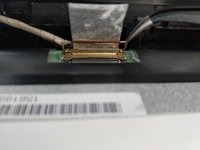
    • Be careful you don't break the cable connecting the screen.

  6. Dell Inspiron 3542 LCD screen replacement, Cable removal: étape 6, image 1 de 3 Dell Inspiron 3542 LCD screen replacement, Cable removal: étape 6, image 2 de 3 Dell Inspiron 3542 LCD screen replacement, Cable removal: étape 6, image 3 de 3
    Outil utilisé dans cette étape :
    Tweezers
    $3.99
    • Remove the sticker holding the cable in place.

    • Use Tweezer to remove the safety holding the cable in place.

    • Use Spudger to remove the cable connecting the screen. Be careful whilst removing it.

Conclusion

Grab your new screen and do all the steps in reverse order.

4 autres ont terminé cette réparation.

Merci à ces traducteurs :

nl en

100%

Ces traducteurs nous aident réparer le monde ! Vous voulez contribuer ?
Commencez à traduire ›

Ruben Debbaudt

Membre depuis le 06/05/18

279 Réputation

1 tutoriel rédigé

0 commentaires

Ajouter un commentaire

Nombre de vues :

Dernières 24 heures : 0

7 derniers jours : 9

30 derniers jours : 39

Total : 3,257