Aller au contenu principal
Dell Inspiron M5010 Hard Drive Replacement

Dell Inspiron M5010 Hard Drive Replacement

Sydney Moseley

Sydney Moseley et 4 autres contributeurs

Dernière mise à jour le July 19, 2018

10 - 20 minutes
Modérée
Outils incorrects

Ce dont vous avez besoin

Outils

  1. Dell Inspiron M5010 Hard Drive Replacement, Battery: étape 1, image 1 de 2 Dell Inspiron M5010 Hard Drive Replacement, Battery: étape 1, image 2 de 2
    • Make sure laptop is powered off before removing the battery.

    • Slide both arrow tabs towards the outer edge of the computer to release the battery.

    • Battery is not shown.

  2. Dell Inspiron M5010 Hard Drive Replacement, Remove keyboard retaining screw: étape 2, image 1 de 1
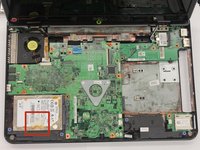
    • Remove Keyboard retaining screw from bottom of laptop.

  3. Dell Inspiron M5010 Hard Drive Replacement: étape 3, image 1 de 3 Dell Inspiron M5010 Hard Drive Replacement: étape 3, image 2 de 3 Dell Inspiron M5010 Hard Drive Replacement: étape 3, image 3 de 3
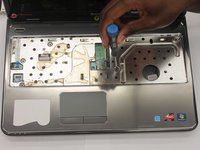
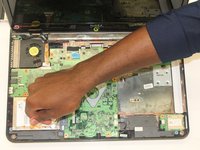
    • Insert the 6 inch metal ruler, or another flat object into the holes in the top left of the keyboard, the top middle of the keyboard, and the top right of the keyboard to release the keyboard from the computer.

    • There are a number of screws on the bottom that required to be removed prior to the keyboard being able to be lifted up.

    "There are a number of screws on the bottom that required to be removed prior"

    That's a very unhelpful step! What are they and which ones?!? I'm following two YouTube videos that show this stage and both have a single screw that holds the keyboard im place which my N5010 simply doesn't have. So my keyboard is held in place and I can't lift it.

    Melvyn Mildiner - Réponse

    Melvyn, I agree. This not up to iFixit's standards.

    David Maag - Réponse

    I have only discovered one screw that releases the keyboard. It is under the RAM access panel

    David Maag - Réponse

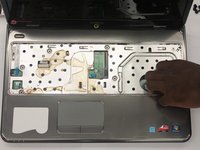
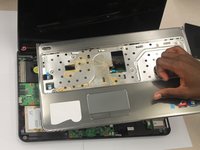
    Some versions of this model have a bit of double-sided sticky tape that holds down the left side of the keyboard quite firmly. If you are sure you have removed all of the screws from the back of the laptop then gently pull up up the keyboard keeping it as flat as possible until it unsticks. No idea why they would do that when there are screws holding it down but it is what it is.

    ParGellen - Réponse

    It was also only the one screw for me, and no double-sided tape. I had to use a small flathead screwdriver to gently pry up the right corner of the keyboard while holding the closest tab in with the flat end of a spudger.

    Nick - Réponse

  4. Dell Inspiron M5010 Hard Drive Replacement: étape 4, image 1 de 1
    • Lift the keyboard up slightly and push forward in order to release bottom tabs.

  5. Dell Inspiron M5010 Hard Drive Replacement: étape 5, image 1 de 1
    • Pull the black tab up and then pull left on keyboard plug to release keyboard.

  6. Dell Inspiron M5010 Hard Drive Replacement, Palm Rest: étape 6, image 1 de 1
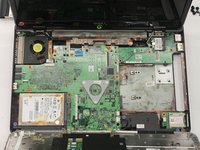
    • Flip the laptop, so the bottom of the laptop is facing up.

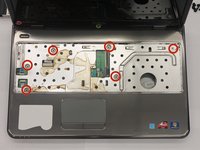
    • Remove the seven 6.0mm Phillip #000 screws indicated using the Phillips #000 screwdriver.

  7. Dell Inspiron M5010 Hard Drive Replacement: étape 7, image 1 de 2 Dell Inspiron M5010 Hard Drive Replacement: étape 7, image 2 de 2
    • Flip the laptop back over, so that the top of the laptop is facing up.

    • Open the laptop.

    • Remove all of the indicated 6.0 mm screws with the Phillips #000 screwdriver.

  8. Dell Inspiron M5010 Hard Drive Replacement: étape 8, image 1 de 1
    • Unplug the palm rest cables by lifting the black tab up and then pulling on the blue tabs.

  9. Dell Inspiron M5010 Hard Drive Replacement: étape 9, image 1 de 3 Dell Inspiron M5010 Hard Drive Replacement: étape 9, image 2 de 3 Dell Inspiron M5010 Hard Drive Replacement: étape 9, image 3 de 3
    • Carefully unsnap and remove the palm rest.

    • Place your fingers inside the large circle in the lower right corner to get a good grip.

  10. Dell Inspiron M5010 Hard Drive Replacement, Hard Drive: étape 10, image 1 de 1
    • Remove the 4 mm Hard Drive screws with the Phillips #000 screwdriver.

  11. Dell Inspiron M5010 Hard Drive Replacement: étape 11, image 1 de 2 Dell Inspiron M5010 Hard Drive Replacement: étape 11, image 2 de 2
    • Flip laptop over.

    • Open lap top.

    • Pull the clear tab attached to the hard drive and gently lift up the hard drive.

Conclusion

To reassemble your device, follow these instructions in reverse order.

12 autres ont terminé cette réparation.

Sydney Moseley

Membre depuis le 10/13/14

452 Réputation

1 tutoriel rédigé

Équipe

Clemson, Team 1-5, Benson Fall 2014 Membre de l'équipe Clemson, Team 1-5, Benson Fall 2014

CLEM-BENSON-F14S1G5

4 membres

11 tutoriels rédigés

Un commentaire

Thank you it was very helpful.

John Peel - Réponse

Ajouter un commentaire

Nombre de vues :

Dernières 24 heures : 0

7 derniers jours : 2

30 derniers jours : 9

Total : 9,546