Aller au contenu principal

Dell XPS 15 9510 SSD Replacement

Ce dont vous avez besoin

  1. Dell XPS 15 9510 SSD Replacement, Rear Panel: étape 1, image 1 de 1
    • Make sure the laptop is powered off and unplug all cables before beginning any repair.

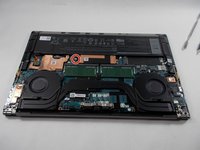
    • Remove eight 3 mm screws from the underside of the case using a T5 Torx screwdriver.

  2. Dell XPS 15 9510 SSD Replacement: étape 2, image 1 de 1
    • The metal case of the XPS 15 9510 is extremely sharp, so be careful not to run your fingers along the edge when disassembling the laptop.

    • Wedge the case apart with a nylon spudger.

    • If the plastic one isn't possible to insert, use the metal spudger to carefully create a small gap first.

    • Slide spudger along each side of the laptop

  3. Dell XPS 15 9510 SSD Replacement: étape 3, image 1 de 1
    • The metal case of the XPS 15 9510 is extremely sharp, so be careful not to run your fingers along the edge when disassembling the laptop.

    • Lift the back panel of the laptop off and set it aside.

  4. Dell XPS 15 9510 SSD Replacement, SSD: étape 4, image 1 de 2 Dell XPS 15 9510 SSD Replacement, SSD: étape 4, image 2 de 2
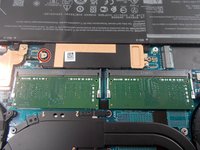
    • Remove the single screw from the left side of the SSD using a Phillips #00 screwdriver.

    • The SSD is spring-released; it will pop up after removing the screw.

  5. Dell XPS 15 9510 SSD Replacement: étape 5, image 1 de 1
    • Use your fingers to carefully remove the SSD from the laptop.

Conclusion

To reassemble your device, follow these instructions in reverse order.

3 autres ont terminé cette réparation.

Austin Sa

Membre depuis le 03/30/22

432 Réputation

3 tutoriels rédigés

Équipe

UMass Dartmouth, Team 1-3, Mellen Spring 2022 Membre de l'équipe UMass Dartmouth, Team 1-3, Mellen Spring 2022

UMASSD-MELLEN-S22S1G3

3 membres

5 tutoriels rédigés

0 commentaires

Ajouter un commentaire

Nombre de vues :

Dernières 24 heures : 2

7 derniers jours : 13

30 derniers jours : 63

Total : 3,531