Aller au contenu principal
Disassembling Nokia 1110i (RH-93) made in Hongrie

Disassembling Nokia 1110i (RH-93) made in Hongrie

JDU TV

JDU TV et 7 autres contributeurs

Dernière mise à jour le August 5, 2024

5 minutes
Très facile
Texte bizarre
Tutoriel réalisé par la communauté
Meilleure introduction

This is a disassembly guide for NOKIA 1110i(RH-93).

Ce dont vous avez besoin

Outils

Afficher plus…

  1. Disassembling Nokia 1110i (RH-93) made in Hongrie, Phone: étape 1, image 1 de 3 Disassembling Nokia 1110i (RH-93) made in Hongrie, Phone: étape 1, image 2 de 3 Disassembling Nokia 1110i (RH-93) made in Hongrie, Phone: étape 1, image 3 de 3
    • Switch off the device to avoid shocks while disassembling.

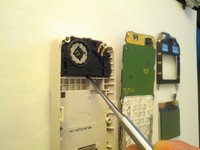
    • Turn the device face down and press on the small button at the bottom . Slide the back case down.

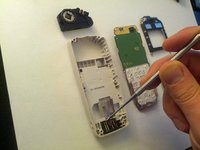
    • To remove the battery, use your finger to insert it in the groove and pull the battery out.

  2. Disassembling Nokia 1110i (RH-93) made in Hongrie: étape 2, image 1 de 3 Disassembling Nokia 1110i (RH-93) made in Hongrie: étape 2, image 2 de 3 Disassembling Nokia 1110i (RH-93) made in Hongrie: étape 2, image 3 de 3
    • To remove the protective cover, use the tool shown and press the grey button at the left bottom.

    • The front cover ejects as shown. Remove it carefully to avoid damage.

    • The keypad case can be removed easily. Pull it up off the device.

    • Use a T6 Torx screwdriver to remove the screws.

  3. Disassembling Nokia 1110i (RH-93) made in Hongrie: étape 3, image 1 de 3 Disassembling Nokia 1110i (RH-93) made in Hongrie: étape 3, image 2 de 3 Disassembling Nokia 1110i (RH-93) made in Hongrie: étape 3, image 3 de 3
    Outil utilisé dans cette étape :
    Tweezers
    $4.99
    • Find this channel at the top of your device.

    • Use a pair of tweezers to remove it carefully without harming the surroundings.

    • Insert the spudger into the section to remove the module.

  4. Disassembling Nokia 1110i (RH-93) made in Hongrie: étape 4, image 1 de 2 Disassembling Nokia 1110i (RH-93) made in Hongrie: étape 4, image 2 de 2
    • Use the spudger to remove the module casing safely.

    • Your device is successfully disassembled.

Conclusion

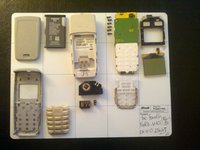
To reassemble your device, follow these instructions in reverse order.

14 autres ont terminé cette réparation.

JDU TV

Membre depuis le 09/15/13

3 327 Réputation

5 tutoriels rédigés

0 commentaires de tutoriel

Ajouter un commentaire

Nombre de vues :

Dernières 24 heures : 0

7 derniers jours : 7

30 derniers jours : 27

Total : 3,970