Aller au contenu principal
Disassembling Nokia 3100b Microphone

Disassembling Nokia 3100b Microphone

Sterling Fuentes

Sterling Fuentes et 4 autres contributeurs

Dernière mise à jour le March 26, 2025

25 - 40 minutes
Modérée
Photos d’action
Étudiant en action

This step-by-step guide is designed to help you disassemble the Nokia 3100b to access and replace or inspect its microphone. The microphone is a crucial component of the phone, as it captures the sound you produce during calls, ensuring clear communication. Whether you're troubleshooting audio issues or replacing a faulty microphone, this guide will provide clear and concise instructions to navigate the process with ease.

This task is categorized as moderately difficult and is suitable for individuals with some experience in handling small electronic components. The entire procedure should take approximately 15-20 minutes to complete, provided you have the right tools and follow the steps carefully.

Before beginning, ensure you have a clean, well-lit workspace and are equipped with the necessary tools for disassembly. With this guide, you'll be able to access the microphone confidently and efficiently. Good luck!

Ce dont vous avez besoin

Outils

  1. Disassembling Nokia 3100b Microphone, Battery: étape 1, image 1 de 1
    • Make sure your phone is turned off.

  2. Disassembling Nokia 3100b Microphone: étape 2, image 1 de 1
    • Press the button on the back of the phone and slide the back panel off.

    • Remove the battery by pulling it from the phone.

  3. Disassembling Nokia 3100b Microphone, SIM Card: étape 3, image 1 de 1
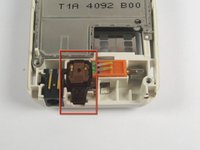
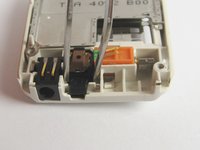
    • Gently pull back the small metal frame holding the SIM card into place, and lift open the frame.

  4. Disassembling Nokia 3100b Microphone: étape 4, image 1 de 1
    • Retrieve your SIM card.

  5. Disassembling Nokia 3100b Microphone, Microphone: étape 5, image 1 de 1
    • Press the black tabs to release the front cover from the phone.

  6. Disassembling Nokia 3100b Microphone: étape 6, image 1 de 1
    • Remove the front cover from the phone.

    • Set the front cover as indicated, aside.

  7. Disassembling Nokia 3100b Microphone: étape 7, image 1 de 2 Disassembling Nokia 3100b Microphone: étape 7, image 2 de 2
    • Remove the screws as they are indicated in the order of the colors of the rainbow. (Red, Orange, Yellow, Green, Blue, Purple.)

    • Remove the screen assembly from the phone base.

    • Set the screen assembly aside.

  8. Disassembling Nokia 3100b Microphone: étape 8, image 1 de 3 Disassembling Nokia 3100b Microphone: étape 8, image 2 de 3 Disassembling Nokia 3100b Microphone: étape 8, image 3 de 3
    Outil utilisé dans cette étape :
    Tweezers
    $4.99
    • Note the location of the microphone.

    • Use tweezers to remove the microphone from the phone's base.

Conclusion

To reassemble your device, follow these instructions in reverse order.

Une autre personne a terminé cette réparation.

Sterling Fuentes

Membre depuis le 04/09/10

130 Réputation

8 tutoriels rédigés

Équipe

Cal Poly, Team 29-64, Johann Spring 2010 Membre de l'équipe Cal Poly, Team 29-64, Johann Spring 2010

CPSU-JOHANN-S10S29G64

3 membres

8 tutoriels rédigés

0 commentaires de tutoriel

Ajouter un commentaire

Nombre de vues :

Dernières 24 heures : 0

7 derniers jours : 1

30 derniers jours : 11

Total : 2,136