Aller au contenu principal
Fitbit Charge HR Vibration Motor Replacement

Fitbit Charge HR Vibration Motor Replacement

Aekchanin Iamborisut

Aekchanin Iamborisut et 4 autres contributeurs

Dernière mise à jour le June 7, 2023

35 minutes - 1 heure
Modérée
Nécessite plus d'images

Has your Fitbit Charge HR stopped vibrating? Perhaps your Fitbit vibration motor has gone bad. This guide is a tear-down of the Fitbit Charge HR demonstrating how to replace the Vibration Motor for the Fitbit Charge HR.

Ce dont vous avez besoin

Pièces

Outils

Afficher plus…

  1. Fitbit Charge HR Vibration Motor Replacement, Vibration Motor: étape 1, image 1 de 1
    • Remove the four 2.9 mm screws from the back of the display using a Torx screwdriver.

    • Remove the back cover from the device.

  2. Fitbit Charge HR Vibration Motor Replacement: étape 2, image 1 de 3 Fitbit Charge HR Vibration Motor Replacement: étape 2, image 2 de 3 Fitbit Charge HR Vibration Motor Replacement: étape 2, image 3 de 3
    • Remove the two 2.9 mm Torx screws holding the circuit board in place.

    • Carefully pry the board out using an opening tool.

  3. Fitbit Charge HR Vibration Motor Replacement: étape 3, image 1 de 1
    • Remove the motherboard assembly from the device by gently lifting.

  4. Fitbit Charge HR Vibration Motor Replacement: étape 4, image 1 de 2 Fitbit Charge HR Vibration Motor Replacement: étape 4, image 2 de 2
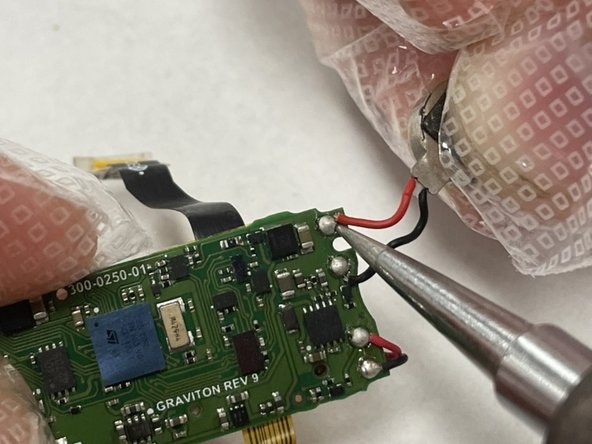
    • Locate the vibration motor on the motherboard.

    • Desolder the red and black wires connected to the motherboard from the vibration motor.

    • Red wire is located closer to the outside. Black wire is closer to the inside of the motherboard.

    • Replace with new vibration motor.

Conclusion

To reassemble your device, follow these instructions in reverse order.

0 commentaires de tutoriel

Ajouter un commentaire

Nombre de vues :

Dernières 24 heures : 1

7 derniers jours : 2

30 derniers jours : 10

Total : 492