Aller au contenu principal
Front and Back Panel Disassembly

Front and Back Panel Disassembly

Natalie Meert

Natalie Meert et un autre contributeur

Dernière mise à jour le March 14, 2022

6 minutes
Facile
Conditions préalables uniquement
Ce tutoriel est uniquement destiné à être utilisé comme prérequis d'autres tutoriels. Il ne se suffit pas à lui-même.

To replace anything in the paper shredder, the front and back panel needs to be removed to access the shredding component. Screws will be removed and the panels will be easily taken off.

Ce dont vous avez besoin

Outils

  1. Front and Back Panel Disassembly, Front and Back Panel Disassembly: étape 1, image 1 de 2 Front and Back Panel Disassembly, Front and Back Panel Disassembly: étape 1, image 2 de 2
    • The unit head needs to be switched to the off position and unplugged before any disassembly.

    • When removing screws in the following steps, make sure the unit is resting on a flat surface because pieces will easily come apart.

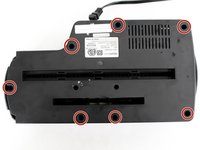
    • Remove seven 11 mm Phillips #1 screws from the underside of the head unit.

  2. Front and Back Panel Disassembly: étape 2, image 1 de 2 Front and Back Panel Disassembly: étape 2, image 2 de 2
    • Upon removal of the next screws, the front panel and the shredding component attached to it will fall apart from the back panel so have the unit resting on a flat surface.

    • Remove two 50 mm Phillips #1 screws from the middle of the underside of the head unit.

  3. Front and Back Panel Disassembly: étape 3, image 1 de 1
    • Lay the back panel away from the front panel on a flat surface.

    • The back panel will be light because it is only the plastic, while the front panel will be heavy with the shredding component attached to it.

  4. Front and Back Panel Disassembly: étape 4, image 1 de 2 Front and Back Panel Disassembly: étape 4, image 2 de 2
    • Find the green control board that is located next to the shredding motor.

    • Remove two 11 mm Phillips #1 screws located on opposite sides of the control board.

    • You may need to move wires over to find the screws.

Conclusion

To reassemble your device, follow these instructions in reverse order.

Natalie Meert

Membre depuis le 02/11/16

678 Réputation

4 tutoriels rédigés

Équipe

IUPUI, Team 2-4, Baechle Spring 2016 Membre de l'équipe IUPUI, Team 2-4, Baechle Spring 2016

IUPUI-BAECHLE-S16S2G4

4 membres

8 tutoriels rédigés

0 commentaires

Ajouter un commentaire

Nombre de vues :

Dernières 24 heures : 0

7 derniers jours : 9

30 derniers jours : 19

Total : 73