Aller au contenu principal
Game Boy Micro Battery Replacement

Game Boy Micro Battery Replacement

SonoSooS

SonoSooS et 2 autres contributeurs

Dernière mise à jour le April 3, 2025

1 - 3 minutes
Facile
Images incohérentes
Tutoriel réalisé par la communauté

This guide will show how to safely replace the battery without damaging other parts of the board, or the battery itself.

Ce dont vous avez besoin

Outils

Afficher plus…

  1. Game Boy Micro Battery Replacement, Remove the Cover: étape 1, image 1 de 2 Game Boy Micro Battery Replacement, Remove the Cover: étape 1, image 2 de 2
    • Remove the Phillips #00 screw on the side of the Game Boy closest to the directional pad.

    • Once the screw has been loosened, lift the cover off the back of the device.

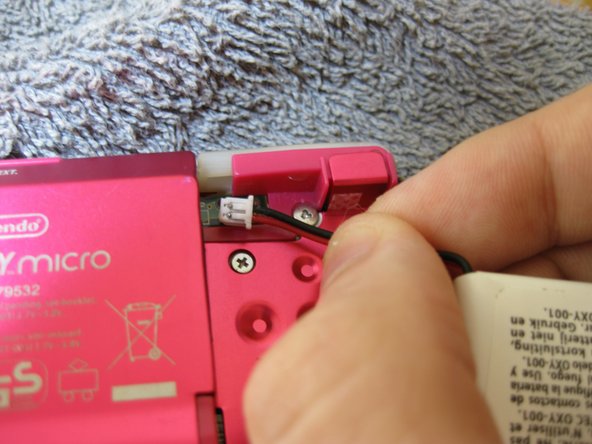
  2. Game Boy Micro Battery Replacement, Remove battery: étape 2, image 1 de 3 Game Boy Micro Battery Replacement, Remove battery: étape 2, image 2 de 3 Game Boy Micro Battery Replacement, Remove battery: étape 2, image 3 de 3
    • Grip, and gently pull outwards on the cable as close to the battery connector as you can

    • Pull in level with the back cover in the direction as indicated by the arrow (not upwards, and not sideways), otherwise you could damage the connector, the cable, or just rip everything off.

    • When plugging the battery back in, make sure to use a non-conductive tool with a flat head to push the battery plug back into the connector, to avoid shorting the battery pins in the plug.

Conclusion

To reassemble your device, follow these instructions in reverse order.

Une autre personne a terminé cette réparation.

SonoSooS

Membre depuis le 07/30/24

212 Réputation

2 tutoriels rédigés

0 commentaires de tutoriel

Ajouter un commentaire

Nombre de vues :

Dernières 24 heures : 1

7 derniers jours : 27

30 derniers jours : 120

Total : 778