Aller au contenu principal

HP Envy 23-d060qd TouchSmart Motherboard Replacement

Ce dont vous avez besoin

  1. HP Envy 23-d060qd TouchSmart Motherboard Replacement, Back Panel: étape 1, image 1 de 1
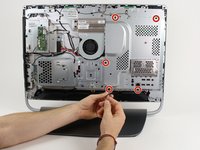
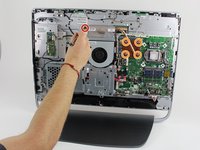
    • Use your hands to unclip the plastic snaps on the back panel of the device.

  2. HP Envy 23-d060qd TouchSmart Motherboard Replacement: étape 2, image 1 de 1
    • Remove the three 11.5mm PH2 screws from the back panel.

    • The screws will not fall out of the back panel, but they will unscrew to release the back panel.

  3. HP Envy 23-d060qd TouchSmart Motherboard Replacement: étape 3, image 1 de 1
    • Now, take the back panel off by pulling at it gently with your hands.

  4. HP Envy 23-d060qd TouchSmart Motherboard Replacement, Motherboard: étape 4, image 1 de 2 HP Envy 23-d060qd TouchSmart Motherboard Replacement, Motherboard: étape 4, image 2 de 2
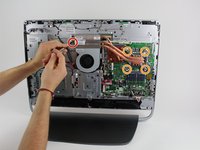
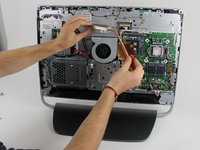
    • Remove the five 7.5mm T15 screws from the cover plate.

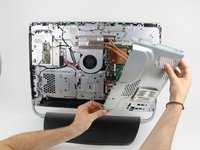
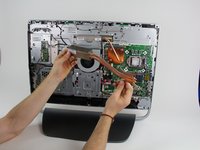
    • Remove the cover plate.

  5. HP Envy 23-d060qd TouchSmart Motherboard Replacement: étape 5, image 1 de 2 HP Envy 23-d060qd TouchSmart Motherboard Replacement: étape 5, image 2 de 2
    • Remove the 7.5mm T15 screw on the left side of the first heatsink.

    • Remove the four 15mm T15 screws on the right side of the first heatsink.

    • Use your hands to pull the first heatsink free from the computer.

  6. HP Envy 23-d060qd TouchSmart Motherboard Replacement: étape 6, image 1 de 2 HP Envy 23-d060qd TouchSmart Motherboard Replacement: étape 6, image 2 de 2
    • Remove the 7.5mm T15 screw on the left side of the second heatsink.

    • Remove the four 8mm PH1 screws on the right side of the second heatsink.

    • Pull the second heatsink free from the computer.

  7. HP Envy 23-d060qd TouchSmart Motherboard Replacement: étape 7, image 1 de 1
    • Slowly work your way across the bottom of the motherboard, disconnecting all of the labeled connections. Use your hands to gently pull the plastic piece at the ends of the wires.

    • Be very gentle with all of the critical connections, some of them may be very fragile. Pulling on the wires can damage them.

  8. HP Envy 23-d060qd TouchSmart Motherboard Replacement: étape 8, image 1 de 1
    • Slowly work your way along the left side of the motherboard, disconnecting all labeled connections. Use your hands to gently pull the plastic piece at the ends of the wires.

    • Be very gentle with all of the critical connections, some of them may be very fragile. Pulling on the wires can damage them.

  9. HP Envy 23-d060qd TouchSmart Motherboard Replacement: étape 9, image 1 de 1
    • Slowly work your way along the top of the motherboard, disconnecting the labeled connection. Use your hands to gently pull the plastic piece at the end of the wire.

    • Be very gentle with all of the critical connections, some of them may be very fragile. Pulling on the wire can damage it.

  10. HP Envy 23-d060qd TouchSmart Motherboard Replacement: étape 10, image 1 de 1
    • Gently remove the two labeled connections.

    • Be very gentle with these connections. They are only a single wire.

  11. HP Envy 23-d060qd TouchSmart Motherboard Replacement: étape 11, image 1 de 1
    • Remove the ten 7mm T15 screws from the motherboard.

  12. HP Envy 23-d060qd TouchSmart Motherboard Replacement: étape 12, image 1 de 1
    • Use your hands to gently remove the motherboard from the computer.

    • Be careful of wires in the way. If you realize something is still connected, put the motherboard back, remove the connection, and try again.

Conclusion

To reassemble your device, follow these instructions in reverse order.

7 autres ont terminé cette réparation.

Zachary Dicks

Membre depuis le 10/01/15

1 117 Réputation

7 tutoriels rédigés

Équipe

Cal Poly, Team 5-10, Maness Fall 2015 Membre de l'équipe Cal Poly, Team 5-10, Maness Fall 2015

CPSU-MANESS-F15S5G10

4 membres

14 tutoriels rédigés

0 commentaires

Ajouter un commentaire

Nombre de vues :

Dernières 24 heures : 1

7 derniers jours : 5

30 derniers jours : 31

Total : 5,013