
HP ProBook 4540s Optical Drive Replacement
Introduction
Passez à l'étape 1This guide will help you replace the optical drive, otherwise known as the CD drive. Be sure that no disks are within the drive before replacing the drive.
Ce dont vous avez besoin
Outils

-
-
Slide the two release latches on either side of the battery.
-
Gently tilt the battery upward and remove it from its socket.
-
-
-
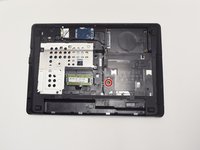
Turn the computer so the bottom is facing towards you.
-
Remove the one 3.0 mm Phillips PM2.0x3.0 security screw.
-
Slide the release latches then pull the door towards you. Lift the door away to completely remove it.
-
-
-
-
Remove one 6.0 mm Phillips PM2.5x6.0 screw that is securing the optical drive.
-


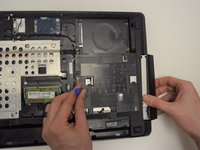

To reassemble your device, follow these instructions in reverse order.
To reassemble your device, follow these instructions in reverse order.
Annulation : je n'ai pas terminé ce tutoriel.
3 autres ont terminé cette réparation.
Équipe

UW Tacoma, Team 1-5, Rose Fall 2016 Membre de l'équipe UW Tacoma, Team 1-5, Rose Fall 2016
UWT-ROSE-F16S1G5
4 membres
6 tutoriels rédigés