Aller au contenu principal
Honeywell HY-204 Control Panel Replacement

Honeywell HY-204 Control Panel Replacement

Nolan Ernotte

Nolan Ernotte et 3 autres contributeurs

Dernière mise à jour le December 19, 2014

10 - 15 minutes
Modérée

This guide is necessary to complete before many of our other replacement guides, but it can also stand alone as a replacement guide for the control panel. This is a really simple guide and should only take you a few minutes!

Ce dont vous avez besoin

Outils

  1. Honeywell HY-204 Control Panel Replacement, Case: étape 1, image 1 de 2 Honeywell HY-204 Control Panel Replacement, Case: étape 1, image 2 de 2
    • Before you begin, be sure to unplug the fan.

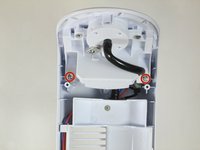
    • Remove the four 14 mm screws from the back of the device using the Phillips #0 Screwdriver.

  2. Honeywell HY-204 Control Panel Replacement: étape 2, image 1 de 2 Honeywell HY-204 Control Panel Replacement: étape 2, image 2 de 2
    • Pull the front and back parts of the case away from each other until the back is free from the front. This may require a large amount of force.

  3. Honeywell HY-204 Control Panel Replacement, Control Panel: étape 3, image 1 de 2 Honeywell HY-204 Control Panel Replacement, Control Panel: étape 3, image 2 de 2
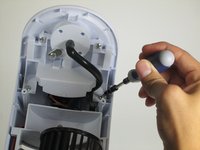
    • Remove the two 3mm screws found just below the top of the device using the Phillips #0 Screwdriver.

  4. Honeywell HY-204 Control Panel Replacement: étape 4, image 1 de 1
    • Pry off the control panel by forcefully lifting the tab located inside the front of the fan with the plastic opening tool.

Conclusion

To reassemble your device, follow these instructions in reverse order.

Nolan Ernotte

Membre depuis le 10/14/14

384 Réputation

3 tutoriels rédigés

Équipe

Cal Poly, Team 10-40, Amido Fall 2014 Membre de l'équipe Cal Poly, Team 10-40, Amido Fall 2014

CPSU-AMIDO-F14S10G40

3 membres

7 tutoriels rédigés

0 commentaires

Ajouter un commentaire

Nombre de vues :

Dernières 24 heures : 4

7 derniers jours : 8

30 derniers jours : 8

Total : 545