If your deck is warped, broken, or just need style change, then use this guide to replace your deck.
The deck is the part of the board that you stand on, and with time it is subject to wear and tear. Sometimes, it just snaps in half on you after very heavy and intense use.
Be sure to first obtain the new deck, and purchase grip to go with it. Decks do not come with grip pre-applied, which we will cover how to apply it in this guide.
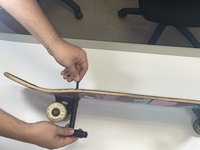
Use the 3/8" socket to take off the nut
Use the phillips side to hold the screw in place.
Remove the nut
Repeat for all four nuts on the truck
Repeat for the second truck
Line up the grip with the board
Ensure it covers the entirety of the board and hangs over the edge
Peel the back off at one end enough to reveal the sticky side.
Expose about four inches
Attach the peeled side to one end of the board
Press the grip onto the board slowly and work your way across the board
Ensure that there is no air bubbles forming when applying the grip
Trim the grip along the trace you made with the box cutter
Use long and smooth motions for straight trims
Trim up the jagged edges left on the grip on the edge of the board
Poke a hole with the screw from the bottom of the deck
Remove the screw
Insert it through the top on the deck
Repeat for all 4 holes
Repeat on the opposite side with the other truck
Use the 3/8" socket to screw on the nut
Use the phillips side to hold the screw in place
The hangar should face outwards
Tighten them until they're snug
Overtightening can damage the deck
Intégrer ce tutoriel
Choisissez une taille et copiez le code ci-dessous pour intégrer ce tutoriel sous la forme d'un petit widget sur votre site / forum.
Étape unique
Tutoriel complet
Petit - 600 px
Moyen - 800 px
Grand - 1200 px
Aperçu