Aller au contenu principal
Insignia NS-F12R6-SS Oscillation Arm Replacement

Insignia NS-F12R6-SS Oscillation Arm Replacement

Hank

Hank et un autre contributeur

Dernière mise à jour le December 20, 2018

5 - 10 minutes
Modérée

The oscillation arm controls the back and forth motion of the fan. A broken or compromised oscillation arm will inhibit the fan oscillation function.

Ce dont vous avez besoin

iFixit touche une commission lorsque vous achetez par l'intermédiaire de ces liens.
  1. Insignia NS-F12R6-SS Oscillation Arm Replacement, Front Cage: étape 1, image 1 de 2 Insignia NS-F12R6-SS Oscillation Arm Replacement, Front Cage: étape 1, image 2 de 2
    • Unplug your fan.

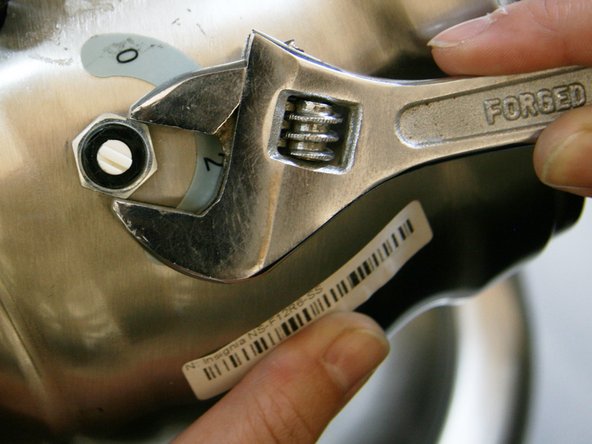
    • Remove the 20 mm bolt that fastens the fan ring located at the bottom of the fan cage with a Phillips #3 screwdriver.

  2. Insignia NS-F12R6-SS Oscillation Arm Replacement: étape 2, image 1 de 1
    • Remove the ring that runs around the edge of the fan cage.

  3. Insignia NS-F12R6-SS Oscillation Arm Replacement: étape 3, image 1 de 1
    • Remove the front of the fan cage.

  4. Insignia NS-F12R6-SS Oscillation Arm Replacement, Fan Blade: étape 4, image 1 de 1
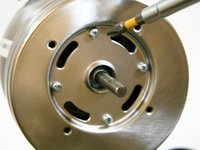
    • Remove the 8 mm bolt fastening the fan blades to the rotor with a Phillip #3 screwdriver.

  5. Insignia NS-F12R6-SS Oscillation Arm Replacement: étape 5, image 1 de 1
    • Take caution when removing the fan blades. They can be sharp!

    • Slide the fan blade off the end of the rotor.

  6. Insignia NS-F12R6-SS Oscillation Arm Replacement, Back Cage: étape 6, image 1 de 1
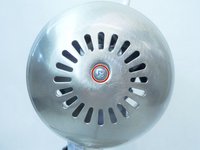
    • Unscrew the four 8 mm bolts that fasten the back of the fan cage back to the motor housing with a Phillips #3 screwdriver.

  7. Insignia NS-F12R6-SS Oscillation Arm Replacement: étape 7, image 1 de 1
    • Pull the back cage off.

  8. Insignia NS-F12R6-SS Oscillation Arm Replacement, Oscillation Button: étape 8, image 1 de 2 Insignia NS-F12R6-SS Oscillation Arm Replacement, Oscillation Button: étape 8, image 2 de 2
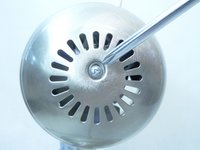
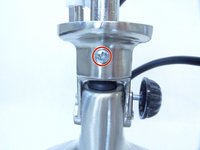
    • Unscrew the 10 mm screw in the center hole of the oscillation knob with a Phillips #3 screwdriver.

  9. Insignia NS-F12R6-SS Oscillation Arm Replacement: étape 9, image 1 de 1
    • Remove the oscillation knob.

  10. Insignia NS-F12R6-SS Oscillation Arm Replacement, Motor Housing: étape 10, image 1 de 1
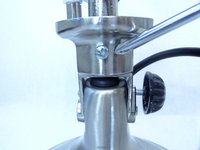
    • Use your fingers to gently pull the power knob directly away from the motor housing.

  11. Insignia NS-F12R6-SS Oscillation Arm Replacement: étape 11, image 1 de 1
    • Unscrew the flat 17 mm nut fastened at the bottom of the power knob with a small crescent wrench.

  12. Insignia NS-F12R6-SS Oscillation Arm Replacement: étape 12, image 1 de 2 Insignia NS-F12R6-SS Oscillation Arm Replacement: étape 12, image 2 de 2
    • Remove the four 6 mm bolts and small washers that secure the front face of the motor housing with a Phillips #3 screwdriver and remove the washers.

  13. Insignia NS-F12R6-SS Oscillation Arm Replacement: étape 13, image 1 de 1
    • Pull the front face of the motor housing off toward the front of the rotor.

  14. Insignia NS-F12R6-SS Oscillation Arm Replacement: étape 14, image 1 de 2 Insignia NS-F12R6-SS Oscillation Arm Replacement: étape 14, image 2 de 2
    • Remove the 10 mm triangular-headed bolt with a Phillips #3 screwdriver.

  15. Insignia NS-F12R6-SS Oscillation Arm Replacement: étape 15, image 1 de 1
    • Slide the back end of the motor housing away from the front of the rotor.

  16. Insignia NS-F12R6-SS Oscillation Arm Replacement: étape 16, image 1 de 1
    • Remove the small piece of paper hanging on the power button.

  17. Insignia NS-F12R6-SS Oscillation Arm Replacement, Oscillation Arm: étape 17, image 1 de 2 Insignia NS-F12R6-SS Oscillation Arm Replacement, Oscillation Arm: étape 17, image 2 de 2
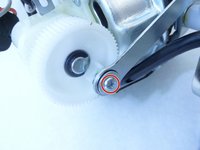
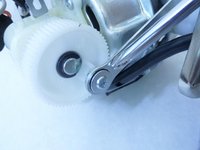
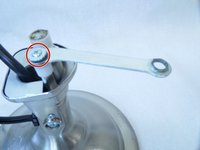
    • Using a Phillips #3 screwdriver, unscrew the the 16 mm long screw fastening the oscillation arm to the lower oscillation gear screw.

  18. Insignia NS-F12R6-SS Oscillation Arm Replacement: étape 18, image 1 de 2 Insignia NS-F12R6-SS Oscillation Arm Replacement: étape 18, image 2 de 2
    • Using a Phillips #3 screwdriver, unscrew and remove the 4 mm long bolt on the front face of the base that fastens the motor assembly to the base bolt.

  19. Insignia NS-F12R6-SS Oscillation Arm Replacement: étape 19, image 1 de 1
    • Remove the fan motor assembly from the base.

  20. Insignia NS-F12R6-SS Oscillation Arm Replacement: étape 20, image 1 de 2 Insignia NS-F12R6-SS Oscillation Arm Replacement: étape 20, image 2 de 2
    • Using a Phillips #3 screwdriver, unscrew the 15 mm long bolt fastening the oscillation arm to the fan base bolt.

  21. Insignia NS-F12R6-SS Oscillation Arm Replacement: étape 21, image 1 de 1
    • Remove the oscillation arm.

Conclusion

To reassemble your device, follow these instructions in reverse order.

Une autre personne a terminé cette réparation.

Hank

Membre depuis le 09/17/18

1 142 Réputation

8 tutoriels rédigés

Équipe

CSU Fullerton, Team S2-G1, Bruce Fall 2018 Membre de l'équipe CSU Fullerton, Team S2-G1, Bruce Fall 2018

CSUF-BRUCE-F18S2G1

4 membres

8 tutoriels rédigés

0 commentaires

Ajouter un commentaire

Nombre de vues :

Dernières 24 heures : 0

7 derniers jours : 0

30 derniers jours : 0

Total : 461