
JBL Xtreme 3 Speaker Replacement

Introduction
Passez à l'étape 1Use this for a step-to-step guide on how to replace either 1 or both speakers on the JBL Xtreme 3.
Please be careful with the small screws as they are easily lost and pose a choking hazard.
Ce dont vous avez besoin
Outils


Afficher plus…
-
-
Find the seam on the speaker and position it upwards.
-
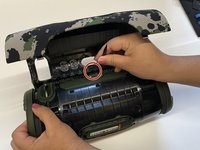
Begin by turning the device to where the bottom side with groves are facing towards you, using the (5) spudger carefully pry open the side of the outer shell where the red indicators are to unlatch outer shell. After they are unlatched you should be able to open the shell by hand.
-
-
-
-
To continue to remove the shell use a (5) spudger to slowly pop the shell off.
-
There is one nudge in the center below the power and bluetooth button that should pop off.
-
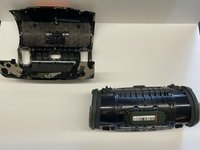
Once you have unlatched this piece correctly the shell will remove itself from the speaker itself. As it is shown in the following figure.
-
-
-
Once the shell has been romved use a #2 phillip's screwdriver to remove the 8 screws on the two speaker.
-
Repeats the first step for the second speaker.
-


To reassemble your device, follow these instructions in reverse order.
To reassemble your device, follow these instructions in reverse order.
Annulation : je n'ai pas terminé ce tutoriel.
3 autres ont terminé cette réparation.

Équipe

Western Carolina University, Team 1-2, Virtue Fall 2022 Membre de l'équipe Western Carolina University, Team 1-2, Virtue Fall 2022
WCU-VIRTUE-F22S1G2
4 membres
5 tutoriels rédigés