Aller au contenu principal

LG UD501KOJ5 Dehumidifier Sensor Replacement

Ce dont vous avez besoin

  1. LG UD501KOJ5 Dehumidifier Sensor Replacement, Humidity Sensor: étape 1, image 1 de 2 LG UD501KOJ5 Dehumidifier Sensor Replacement, Humidity Sensor: étape 1, image 2 de 2
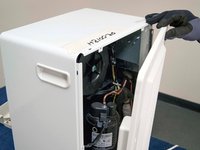
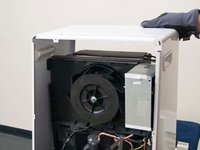
    • Unplug the dehumidifier then put on work gloves to protect your hands.

    • Remove the water collection bucket and set it aside.

    • Remove the air filter from the bottom of the front grille.

  2. LG UD501KOJ5 Dehumidifier Sensor Replacement: étape 2, image 1 de 2 LG UD501KOJ5 Dehumidifier Sensor Replacement: étape 2, image 2 de 2
    • Using your Phillips #0 screwdriver, remove the two screws which are attached at the bottom of the front grille.

    • Lift the front grille up and off the front of the frame, carefully set it in front of the dehumidifier.

    • The control board wire harness is still attached to the back of the front grille.

  3. LG UD501KOJ5 Dehumidifier Sensor Replacement: étape 3, image 1 de 3 LG UD501KOJ5 Dehumidifier Sensor Replacement: étape 3, image 2 de 3 LG UD501KOJ5 Dehumidifier Sensor Replacement: étape 3, image 3 de 3
    • Remove the screws that secure the back panel to the dehumidifier.

    • Carefully remove the back panel from the dehumidifier.

    • Remove the screws at the side.

  4. LG UD501KOJ5 Dehumidifier Sensor Replacement: étape 4, image 1 de 3 LG UD501KOJ5 Dehumidifier Sensor Replacement: étape 4, image 2 de 3 LG UD501KOJ5 Dehumidifier Sensor Replacement: étape 4, image 3 de 3
    • Remove the screws located at both sides of the back panel.

    • Remove the screws on the top left and top right which are connected to the control box.

    • Carefully remove the outer case.

  5. LG UD501KOJ5 Dehumidifier Sensor Replacement: étape 5, image 1 de 3 LG UD501KOJ5 Dehumidifier Sensor Replacement: étape 5, image 2 de 3 LG UD501KOJ5 Dehumidifier Sensor Replacement: étape 5, image 3 de 3
    • Disconnect the sensor wire harness from the electronic control board.

    • Disconnect the wire harness from the collection bucket float switch.

    • Pull the evaporator thermistor out of the copper sleeve on the side of the evaporator coil.

  6. LG UD501KOJ5 Dehumidifier Sensor Replacement: étape 6, image 1 de 2 LG UD501KOJ5 Dehumidifier Sensor Replacement: étape 6, image 2 de 2
    • Remove the humidity sensor from the evaporator fins.

    • Pull the sensor assembly out of the dehumidifier.

    • Remove any dust build-up with a dry cloth.

    • Push the new humidity sensor in place on the front of the evaporator fins.

Conclusion

To reassemble your device, follow these instructions in reverse order.

Gabrielle Campbell

Membre depuis le 05/12/21

133 Réputation

1 tutoriel rédigé

Équipe

York University, Team S1-G3, O'Regan Summer 2021 Membre de l'équipe York University, Team S1-G3, O'Regan Summer 2021

YORK-O'REGAN-SU21S1G3

1 membre

1 tutoriel rédigé

Un commentaire

Ajouter un commentaire

Nombre de vues :

Dernières 24 heures : 1

7 derniers jours : 19

30 derniers jours : 59

Total : 2,033