Aller au contenu principal
LeapFrog LeapPad 32400 Camera Replacement

LeapFrog LeapPad 32400 Camera Replacement

Aubra Sharp

Aubra Sharp et 3 autres contributeurs

Dernière mise à jour le June 2, 2023

10 - 15 minutes
Modérée

This guide will show you how to replace the rear camera in your LeapFrog LeapPad #32400.

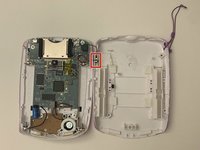
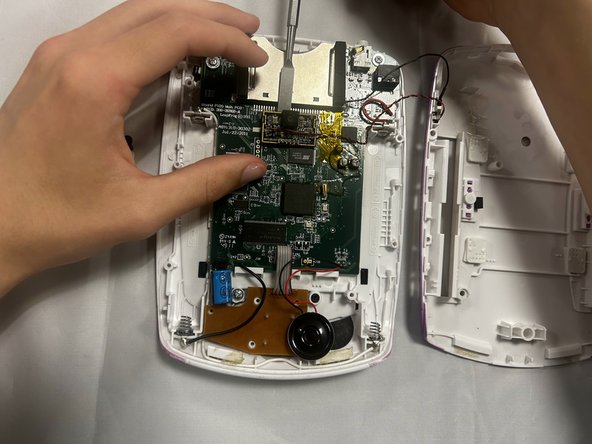
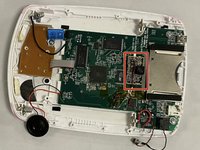
In this guide you will be removing the cover to replace the camera hardware piece which is located on top of the motherboard.

Check the troubleshooting page for symptoms to make sure this guide is the best route: LeapFrog LeapPad #32400 Troubleshooting Page

Ce dont vous avez besoin

Outils

  1. LeapFrog LeapPad 32400 Camera Replacement, Battery: étape 1, image 1 de 2 LeapFrog LeapPad 32400 Camera Replacement, Battery: étape 1, image 2 de 2
    • Turn the tablet so the back is facing up.

    • Remove the battery covers by sliding the covers towards the sides and away from the center of the device.

  2. LeapFrog LeapPad 32400 Camera Replacement: étape 2, image 1 de 1
    • Take out the AA batteries from both battery compartments of the device.

    • Replace batteries as needed.

  3. LeapFrog LeapPad 32400 Camera Replacement, Back Panel: étape 3, image 1 de 1
    • Remove three 7 mm screws using a Phillips #1 screwdriver.

    • Remove the single 6 mm screw using a Phillips #1 screwdriver.

    • Remove the single 10 mm screw using a Phillips #1 screwdriver.

  4. LeapFrog LeapPad 32400 Camera Replacement: étape 4, image 1 de 3 LeapFrog LeapPad 32400 Camera Replacement: étape 4, image 2 de 3 LeapFrog LeapPad 32400 Camera Replacement: étape 4, image 3 de 3
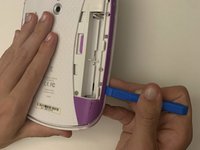
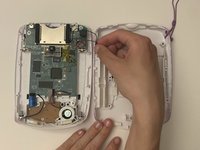
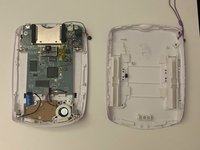
    • Use a small plastic opening tool to separate the colored front cover from the white rear cover of the device.

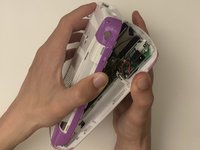
    • With one hand on the front cover and one hand on the rear cover, start from the bottom of the device and pull the pieces apart.

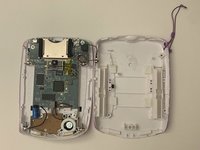
    • Once only the top edge remains connected, pull the rear cover backwards away from the front cover and upwards towards the top of the device. This should release the last remaining tabs holding the pieces front and rear cover together.

    • The most stubborn tabs holding the front and rear together are along the top edge of the tablet around the game cartridge slot. This will most likely be the last area that separates, and it may require a moderate amount of force.

  5. LeapFrog LeapPad 32400 Camera Replacement: étape 5, image 1 de 3 LeapFrog LeapPad 32400 Camera Replacement: étape 5, image 2 de 3 LeapFrog LeapPad 32400 Camera Replacement: étape 5, image 3 de 3
    • Separate the motherboard from the back side of the device by detaching the black and red wire connection from the back cover.

    • The two pieces that hold the pen in place will become loose. Remove and set aside for reassembly.

  6. LeapFrog LeapPad 32400 Camera Replacement, Camera: étape 6, image 1 de 2 LeapFrog LeapPad 32400 Camera Replacement, Camera: étape 6, image 2 de 2
    • Use an opening tool to lift up the camera body.

    • Prying out the camera body requires a little force, however excessive force can damage other components in the motherboard.

Conclusion

To reassemble your device, follow these instructions in reverse order.

Aubra Sharp

Membre depuis le 03/01/23

457 Réputation

5 tutoriels rédigés

Équipe

0 commentaires

Ajouter un commentaire

Nombre de vues :

Dernières 24 heures : 0

7 derniers jours : 0

30 derniers jours : 1

Total : 101