Aller au contenu principal
Lenovo ThinkPad X260 Back Cover Replacement

Lenovo ThinkPad X260 Back Cover Replacement

Alexander Webb

Alexander Webb et 3 autres contributeurs

Dernière mise à jour le March 25, 2024

30 secondes - 2 minutes
Modérée

This guide is designed as a prerequisite guide to internal repairs of the Lenovo ThinkPad X260. Its simplicity will make the process of removing the bottom cover of the laptop easier.

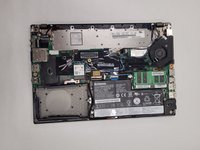
The main reason that people will take off the back cover is to work on the internals of the laptop. Some examples of internal repairs are:

  • Replacing internal battery
  • Replacing cooling fan
  • Replacing motherboard
  • etc.

Make sure the computer is completely turned off before starting this guide.

Ce dont vous avez besoin

Pièces

Outils

Afficher plus…

  1. Lenovo ThinkPad X260 Back Cover Replacement, External Battery: étape 1, image 1 de 2 Lenovo ThinkPad X260 Back Cover Replacement, External Battery: étape 1, image 2 de 2
    • Make sure that the device is unplugged and turned off.

    • Flip the laptop from the front to the back.

  2. Lenovo ThinkPad X260 Back Cover Replacement: étape 2, image 1 de 3 Lenovo ThinkPad X260 Back Cover Replacement: étape 2, image 2 de 3 Lenovo ThinkPad X260 Back Cover Replacement: étape 2, image 3 de 3
    • Start by pinching the switches on either side of the battery outwards.

    • At the same time push the external battery, located in the back, upwards.

    • Remove the external battery from the laptop.

  3. Lenovo ThinkPad X260 Back Cover Replacement, Back Cover: étape 3, image 1 de 3 Lenovo ThinkPad X260 Back Cover Replacement, Back Cover: étape 3, image 2 de 3 Lenovo ThinkPad X260 Back Cover Replacement, Back Cover: étape 3, image 3 de 3
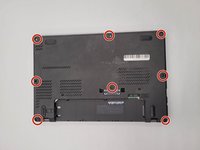
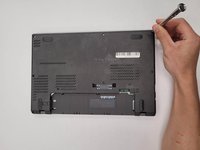
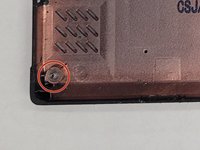
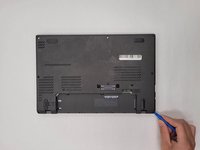
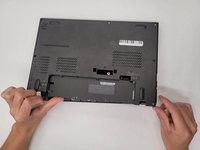
    • Loosen the eight 4.2 mm screws holding the back cover on using a Phillips #1 screwdriver.

    • These screws should be held in place by a small plastic washer which secures them to the cover and should not be loosened. This is illustrated in the third image.

  4. Lenovo ThinkPad X260 Back Cover Replacement: étape 4, image 1 de 3 Lenovo ThinkPad X260 Back Cover Replacement: étape 4, image 2 de 3 Lenovo ThinkPad X260 Back Cover Replacement: étape 4, image 3 de 3
    • Gently pull the cover off and set aside.

    • An iFixit opening tool may make it easier to gently remove the cover.

Conclusion

To reassemble your device, follow these instructions in reverse order.

Une autre personne a terminé cette réparation.

Alexander Webb

Membre depuis le 12/06/21

210 Réputation

2 tutoriels rédigés

Équipe

IUPUI, Team 1-3, Harley Summer 2023 Membre de l'équipe IUPUI, Team 1-3, Harley Summer 2023

IUPUI-HARLEY-SU23S1G3

3 membres

4 tutoriels rédigés

0 commentaires

Ajouter un commentaire

Nombre de vues :

Dernières 24 heures : 7

7 derniers jours : 27

30 derniers jours : 55

Total : 673