Aller au contenu principal
Lenovo ThinkPad X390 Touchpad Replacement

Lenovo ThinkPad X390 Touchpad Replacement

Curtis Kubacka

Curtis Kubacka et 2 autres contributeurs

Dernière mise à jour le December 20, 2021

10 - 20 minutes
Facile
A besoin de meilleures images
Meilleure introduction

If you need to access your laptops touchpad please refer to this guide. This guide does not require any difficult or complicated steps. Do exercise caution before beginning this guide by ensuring that the laptop is unplugged and turned off. To complete the replacement of your touchpad, you will need a plastic opening tool, a Phillips #0 screwdriver, a pair of tweezers, and a plastic scalpel.

Ce dont vous avez besoin

Outils

Afficher plus…

  1. Lenovo ThinkPad X390 Touchpad Replacement, Back Cover: étape 1, image 1 de 1
    • Turn off and power down the laptop before proceeding with the guide.

    • Flip your laptop over and place on a flat surface so you can access the screws on the base cover.

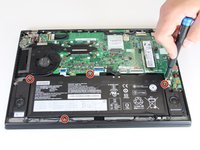
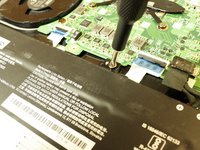
    • Using a Phillips #0 screwdriver, unscrew the five screws on the base cover.

    • The screws are not removable.

  2. Lenovo ThinkPad X390 Touchpad Replacement: étape 2, image 1 de 2 Lenovo ThinkPad X390 Touchpad Replacement: étape 2, image 2 de 2
    • Remove the base cover by inserting a plastic opening tool in between the cover and the rest of the laptop.

    • Once the tool is inserted, slide the tool along the edges of the case and push down on the opening tool to detach the case.

    • You may need to move the tool to different locations to fully release the back cover.

  3. Lenovo ThinkPad X390 Touchpad Replacement, Battery: étape 3, image 1 de 2 Lenovo ThinkPad X390 Touchpad Replacement, Battery: étape 3, image 2 de 2
    Outil utilisé dans cette étape :
    Tweezers
    $4.99
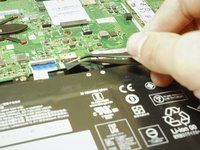
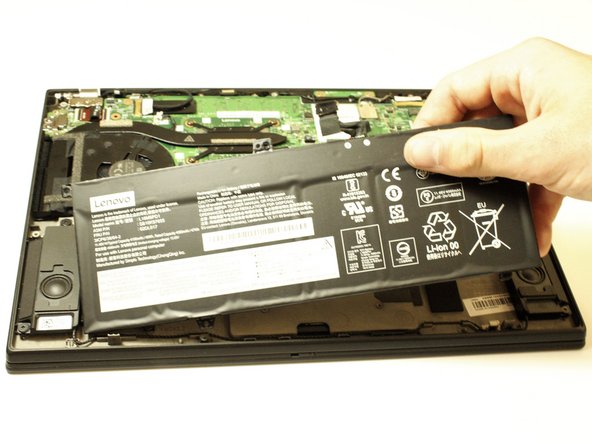
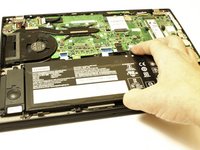
    • Using tweezers, unplug the battery from the laptops motherboard by pulling on the cable that attaches it.

  4. Lenovo ThinkPad X390 Touchpad Replacement: étape 4, image 1 de 2 Lenovo ThinkPad X390 Touchpad Replacement: étape 4, image 2 de 2
    • Using a Phillips #0 screwdriver, remove the four 5.2 mm screws holding the battery in place.

  5. Lenovo ThinkPad X390 Touchpad Replacement: étape 5, image 1 de 2 Lenovo ThinkPad X390 Touchpad Replacement: étape 5, image 2 de 2
    • Using your hands, remove the battery from the laptop.

  6. Lenovo ThinkPad X390 Touchpad Replacement, Touchpad: étape 6, image 1 de 2 Lenovo ThinkPad X390 Touchpad Replacement, Touchpad: étape 6, image 2 de 2
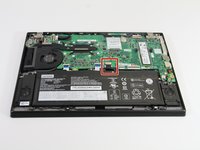
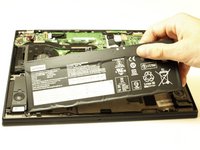
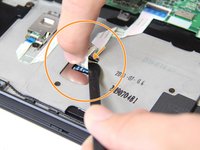
    • After removing the battery, disconnect the trackpad from the laptop's motherboard

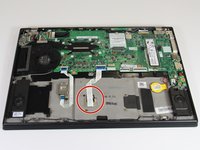
    • Using a plastic spudger, flip up the black plastic cover to release the cable.

    • Use a finger to hold back the cable to make accessing the connection easier.

  7. Lenovo ThinkPad X390 Touchpad Replacement: étape 7, image 1 de 1
    • Using a Phillips #0 screwdriver, unscrew the four 2.0 mm screws securing the touchpad to the device.

  8. Lenovo ThinkPad X390 Touchpad Replacement: étape 8, image 1 de 1
    • Lift up the bottom portion of the laptop and remove the trackpad.

Conclusion

To reassemble your device, follow these instructions in reverse order.

Curtis Kubacka

Membre depuis le 09/28/21

261 Réputation

2 tutoriels rédigés

Équipe

Clemson, Team 5-1, Hunter Fall 2021 Membre de l'équipe Clemson, Team 5-1, Hunter Fall 2021

CLEM-HUNTER-F21S5G1

5 membres

5 tutoriels rédigés

0 commentaires

Ajouter un commentaire

Nombre de vues :

Dernières 24 heures : 2

7 derniers jours : 16

30 derniers jours : 45

Total : 1,570