Aller au contenu principal

Mac mini Late 2012 PRAM Battery Replacement

Ce dont vous avez besoin

  1. Mac mini Late 2012 PRAM Battery Replacement, Bottom Cover: étape 1, image 1 de 2 Mac mini Late 2012 PRAM Battery Replacement, Bottom Cover: étape 1, image 2 de 2
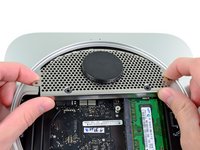
    • Place your thumbs in the depressions cut into the bottom cover.

    • Rotate the bottom cover counter-clockwise until the white dot painted on the bottom cover is aligned with the ring inscribed on the outer case.

    • You do not need to apply much downward pressure while turning.

  2. Mac mini Late 2012 PRAM Battery Replacement: étape 2, image 1 de 1
    • Tilt the mini enough to allow the bottom cover to fall away from the outer case.

    • Remove the bottom cover and set it aside.

  3. Mac mini Late 2012 PRAM Battery Replacement, Fan: étape 3, image 1 de 1
    • Remove the two 11.3 mm T6 Torx screws securing the fan to the logic board near the antenna plate.

  4. Mac mini Late 2012 PRAM Battery Replacement: étape 4, image 1 de 1
    • Lift the ear of the fan nearest the RAM up off the standoff secured to the outer case.

    • Removing the standoff screw is not necessary to remove the fan. You need only raise the fan enough to lift it off the standoff screw.

  5. Mac mini Late 2012 PRAM Battery Replacement: étape 5, image 1 de 3 Mac mini Late 2012 PRAM Battery Replacement: étape 5, image 2 de 3 Mac mini Late 2012 PRAM Battery Replacement: étape 5, image 3 de 3
    • Lift the fan out of the mini for enough clearance to access its connector.

    • Grab all the wires at once and gently pull straight up to disconnect the fan from the logic board.

    • Do not pry at the socket, or you may rip it from the logic board.

    • Remove the fan.

  6. Mac mini Late 2012 PRAM Battery Replacement, Cowling: étape 6, image 1 de 1
    • Remove the single 3.5 mm T6 Torx screw securing the cowling to the heat sink.

  7. Mac mini Late 2012 PRAM Battery Replacement: étape 7, image 1 de 1
    • Lift the cowling from the end nearest the antenna plate.

    • Rotate the cowling away from the outer case and remove it from the mini.

  8. Mac mini Late 2012 PRAM Battery Replacement, Antenna Plate: étape 8, image 1 de 1
    • Remove the following screws securing the antenna plate to the mini:

    • Two 6.6 mm T8 Torx screws

    • Two 5.0 mm T8 Torx or 2.0 mm Hex screws (either screwdriver will work)

    • When putting back together:

    • It can be difficult to get the hard drive seated correctly such that the antenna plate fits in place correctly. If the screw holes don't line up with those on the hard drive, make sure that the two pins that are in the back of the hard drive are properly seated in the holes at the back of the case, above the housing for the second hard drive.

    • The antenna attaches directly to the hard drive (red markers), therefore attaching the antenna can move the hard drive around and loosen the connection of the hard drive cable to the logic board.

  9. Mac mini Late 2012 PRAM Battery Replacement: étape 9, image 1 de 2 Mac mini Late 2012 PRAM Battery Replacement: étape 9, image 2 de 2
    • Slightly lift the antenna plate from the end closest to the RAM.

    • Carefully pull the antenna plate away from the circular rim of the outer case.

    • Do not remove the antenna plate yet. It is still attached to the AirPort/ Bluetooth board.

  10. Mac mini Late 2012 PRAM Battery Replacement: étape 10, image 1 de 1
    • Use the tip of a spudger to carefully pry the antenna connector up from its socket on the AirPort/Bluetooth board.

  11. Mac mini Late 2012 PRAM Battery Replacement: étape 11, image 1 de 1
    • Remove the antenna plate from the mini.

  12. Mac mini Late 2012 PRAM Battery Replacement, Logic Board: étape 12, image 1 de 2 Mac mini Late 2012 PRAM Battery Replacement, Logic Board: étape 12, image 2 de 2
    • Use the flat end of a spudger to pry the hard drive connector up from its socket on the logic board.

  13. Mac mini Late 2012 PRAM Battery Replacement: étape 13, image 1 de 1
    • Use the tip of a spudger to lift the IR sensor connector up and out of its socket on the logic board.

    • Make sure to pry up from beneath the wires and not underneath the socket.

  14. Mac mini Late 2012 PRAM Battery Replacement: étape 14, image 1 de 1
    • Remove the following three screws:

    • One 5.0 mm T8 Torx or 2.0 mm Hex screw (either screwdriver will work)

    • One 16.2 mm T6 Torx screw

    • One 26 mm T6 Torx standoff

  15. Mac mini Late 2012 PRAM Battery Replacement: étape 15, image 1 de 3 Mac mini Late 2012 PRAM Battery Replacement: étape 15, image 2 de 3 Mac mini Late 2012 PRAM Battery Replacement: étape 15, image 3 de 3
    Outil utilisé dans cette étape :
    Mac mini Logic Board Removal Tool
    $4.99
    J'achète
    • To remove the logic board, the two cylindrical rods of the Mac mini Logic Board Removal Tool must be inserted into the holes highlighted in red. Inserting instruments into any logic board holes other than the ones highlighted in red may destroy the logic board.

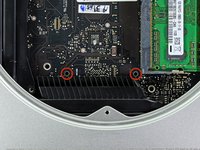
    • Insert the Mac mini Logic Board Removal Tool into the two holes highlighted in red. Be sure it makes contact with the top side of outer case below the logic board before proceeding.

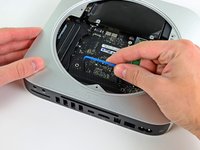
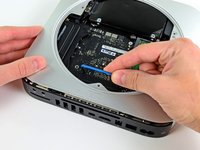
    • Carefully pull the tool toward the I/O board. The logic board and I/O board assembly should slightly slide out of the outer case.

    • Cease prying when the I/O board is visibly separated from the outer case.

    • Remove the Mac mini Logic Board Removal tool.

  16. Mac mini Late 2012 PRAM Battery Replacement: étape 16, image 1 de 1
    • Pull the I/O board/logic board assembly out of the outer case enough to access the power connector.

    • Use your fingers to disconnect the DC-In cable from the logic board.

    • Pull the power cable connector toward the front side of the mini.

  17. Mac mini Late 2012 PRAM Battery Replacement: étape 17, image 1 de 1
    • Carefully slide the logic board assembly out of the mini, minding any cables that may get caught.

  18. Mac mini Late 2012 PRAM Battery Replacement, PRAM Battery: étape 18, image 1 de 1
    • The PRAM battery is located on the top side of the logic board.

    • Use the tip of a spudger to carefully pry the PRAM battery up and out of its holder on the logic board.

  19. Mac mini Late 2012 PRAM Battery Replacement: étape 19, image 1 de 1
    • Remove the PRAM battery from the logic board.

    • The PRAM battery is a commonly available BR2032 coin-cell.

Conclusion

To reassemble your device, follow these instructions in reverse order.

14 autres ont terminé cette réparation.

Andrew Optimus Goldheart

Membre depuis le 10/17/09

502 109 Réputation

407 tutoriels rédigés

Équipe

iFixit Membre de l'équipe iFixit

Staff

135 membres

16 476 tutoriels rédigés

5 commentaires

Surprising that this is rated 'difficult', while the dual hard drive kit that also requires to take the logic board out (and hence could easily change the battery at the same time) is rated 'moderate'.

Marvin - Réponse

"Parts: No parts required. “ This is not true, since a new battery is needed to replace the old battery.

Felix The Cat - Réponse

BR2032 are hard to find.

shafiq rahman - Réponse

CR2032 also work

Carlos Morales -

I got mine recently from Amazon for $4.

ccfman2004 - Réponse

Ajouter un commentaire

Nombre de vues :

Dernières 24 heures : 5

7 derniers jours : 76

30 derniers jours : 271

Total : 24,047