Aller au contenu principal
Nikon Coolpix P530 LCD  Replacement

Nikon Coolpix P530 LCD Replacement

Alan Weihe

Alan Weihe et 4 autres contributeurs

Dernière mise à jour le May 7, 2024

3 minutes
Facile
Tutoriel étudiant vedette

This guide will provide instructions on replacing the LCD screen for the camera. This guide can be followed if the LCD screen has been cracked or broken.

Ce dont vous avez besoin

Outils

Afficher plus…

  1. Nikon Coolpix P530 LCD  Replacement, Battery: étape 1, image 1 de 1
    • Identify the battery chamber found at the bottom of the device.

    • Ensure the camera is turned off before conducting any maintenance on the device.

  2. Nikon Coolpix P530 LCD  Replacement: étape 2, image 1 de 3 Nikon Coolpix P530 LCD  Replacement: étape 2, image 2 de 3 Nikon Coolpix P530 LCD  Replacement: étape 2, image 3 de 3
    • Slide the switch to the left to open the battery chamber using your fingertip or plastic opening tools.

    • The spring loaded battery chamber door will swing open after the switch is moved.

  3. Nikon Coolpix P530 LCD  Replacement: étape 3, image 1 de 3 Nikon Coolpix P530 LCD  Replacement: étape 3, image 2 de 3 Nikon Coolpix P530 LCD  Replacement: étape 3, image 3 de 3
    • Depress the yellow spring loaded tab holding the battery in place using your fingertip or plastic opening tools.

    • After the yellow tab is depressed, the battery should partially eject from the camera.

  4. Nikon Coolpix P530 LCD  Replacement: étape 4, image 1 de 2 Nikon Coolpix P530 LCD  Replacement: étape 4, image 2 de 2
    • Gently remove the battery from the chamber.

  5. Nikon Coolpix P530 LCD  Replacement, Back Cover: étape 5, image 1 de 3 Nikon Coolpix P530 LCD  Replacement, Back Cover: étape 5, image 2 de 3 Nikon Coolpix P530 LCD  Replacement, Back Cover: étape 5, image 3 de 3
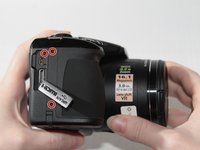
    • Remove the six 4mm screws highlighted in red with the Phillips #000 screwdriver.

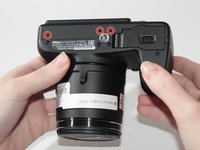
    • Remove the 5mm screw highlighted in orange with the Phillips #000 screwdriver.

  6. Nikon Coolpix P530 LCD  Replacement: étape 6, image 1 de 3 Nikon Coolpix P530 LCD  Replacement: étape 6, image 2 de 3 Nikon Coolpix P530 LCD  Replacement: étape 6, image 3 de 3
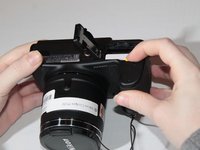
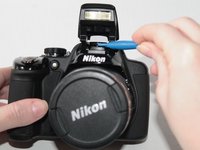
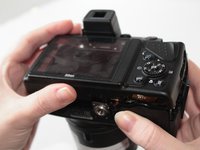
    • Pop up the camera flash using the button below the lightning bolt on the left side of the camera.

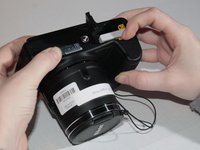
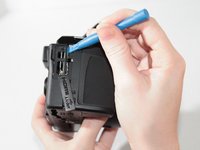
    • Identify the small notch below the camera flash where the body of the camera and the back cover join.

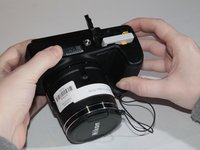
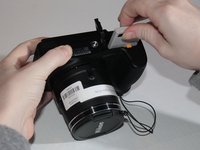
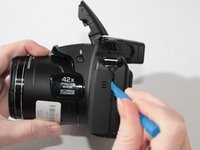
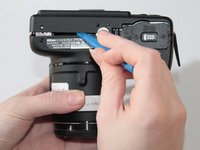
    • Use plastic opening tools to pry the darker plastic piece under the camera flash from the lighter plastic camera body.

  7. Nikon Coolpix P530 LCD  Replacement: étape 7, image 1 de 3 Nikon Coolpix P530 LCD  Replacement: étape 7, image 2 de 3 Nikon Coolpix P530 LCD  Replacement: étape 7, image 3 de 3
    • Gently pry with a plastic opening tool around the perimeter of the camera.

    • The plastic HDMI cover can become loose and fall off during this step. Once the back cover is free from the camera you may remove this piece to store in a safe place.

  8. Nikon Coolpix P530 LCD  Replacement: étape 8, image 1 de 3 Nikon Coolpix P530 LCD  Replacement: étape 8, image 2 de 3 Nikon Coolpix P530 LCD  Replacement: étape 8, image 3 de 3
    Outil utilisé dans cette étape :
    Tweezers
    $4.99
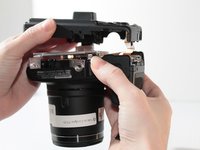
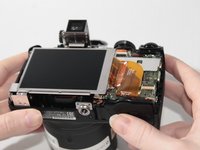
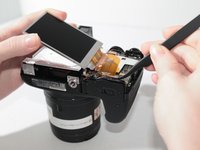
    • Gently lift the back cover away from the camera body.

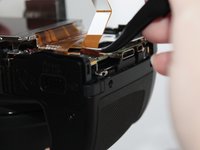
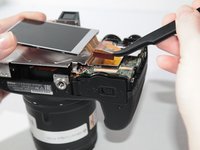
    • A gold ribbon cable will join the back cover of the camera to the internal electronic components. Be careful not to remove the back cover without removing the cable since this part can easily break.

    • To remove the ribbon cable, gently pull the connector from the camera's internal electronic components using a pair of tweezers.

    • Flip the orange bar securing the ribbon cable upwards to allow for safe removal.

  9. Nikon Coolpix P530 LCD  Replacement: étape 9, image 1 de 1
    • After the ribbon cable is removed from the camera body, the cover can be completely removed.

  10. Nikon Coolpix P530 LCD  Replacement, LCD: étape 10, image 1 de 2 Nikon Coolpix P530 LCD  Replacement, LCD: étape 10, image 2 de 2
    • Lift the LCD screen upwards.

  11. Nikon Coolpix P530 LCD  Replacement: étape 11, image 1 de 2 Nikon Coolpix P530 LCD  Replacement: étape 11, image 2 de 2
    Outil utilisé dans cette étape :
    Tweezers
    $4.99
    • Tilt the screen towards the ribbon cable.

    • Remove the ribbon cable by gently pulling the cable away from the motherboard using tweezers.

    • Flip the orange bar securing the ribbon cable upwards to allow for safe removal.

Conclusion

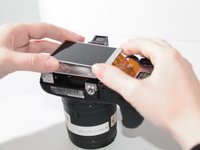
To reassemble your device, follow these instructions in reverse order.

2 autres ont terminé cette réparation.

Alan Weihe

Membre depuis le 02/01/16

998 Réputation

7 tutoriels rédigés

Équipe

0 commentaires

Ajouter un commentaire

Nombre de vues :

Dernières 24 heures : 0

7 derniers jours : 3

30 derniers jours : 11

Total : 2,097