Introduction
Si votre écran iPhone XS Max est fissuré, ne réagit plus au toucher, ou n'affiche rien quand votre téléphone est allumé, suivez ce tutoriel pour refaire fonctionner votre iPhone à l'aide d'un nouvel écran complet.
Le module haut-parleur interne + capteurs fixé au rétro de l'écran est couplé individuellement à votre iPhone en usine, vous devez donc transférer celui de votre ancien écran sur le nouveau lors du remplacement de l'écran. Il comprend l'illuminateur qui fait partie intégrante de la fonctionnalité de sécurité Face ID. En cas de dommage ou de remplacement, Face ID ne fonctionnera plus. Faites donc extrêmement attention à n'endommager aucun composant lors de la réparation. Autrement seul Apple pourra restaurer la fonctionnalité Face ID.
Remarque : la fonctionnalité True Tone est désactivée après le remplacement de l'écran, même si vous utilisez un écran Apple d'origine.
Ce dont vous avez besoin
Vidéo d'introduction
-
-
Éteignez votre iPhone avant de commencer à le démonter.
-
Dévissez les deux vis Pentalobe longues de 6,9 mm en bas de l'iPhone.
-
Ouvrir l'écran de l'iPhone va endommager ses joints étanches. Pensez à vous procurer des joints de remplacement avant de vous lancer dans une réparation, ou bien faites attention à ne plus exposer votre iPhone à des liquides si vous le remontez sans changer les joints.
-
-
-
Mesurez 3 mm à partir de la pointe et tracez une ligne sur le médiator avec un marqueur permanent.
Got to step 2 and realized the fix kit doesn't include an opening pick! Looks like a guitar pick, and I have those lying around. Is that expected? Looks like the pick is used in many steps below. There's a little blue crowbar that isn't mentioned in the instructions. Perhaps that replaces the opening pick?
Hi! I can't see which guide you were using when writing this comment. Can you reply here with which guide and fix kit you used?
I see you posted this in Meta. I hope it's resolved soon! In the meantime, a guitar pick may work well enough for your repair.
what fix kit?
My fix kit didn't include an opening pick either
My AliExpress refurbished screen came with a pick that has a coin-like circle that pops out, so no modification was necessary
It's not an Ifixit KIT if it doesn't include everything. You'll need to order the opening pic separately. Or head to Walmart like myself and look for guitar pics. Hopefully, this will work just as well.
No pick in mine as well. It’s really not clear that you have to order this separately when ordering an IPhone SE 202/2022 screen repair kit. Is this the case?
Frustrated, I ordered a compact package where everything was encapsulated. Useless suction tools could not separate the screen. If it is unable to decouple the screen, then why sucking suction tools you have provided.
For my kit the triangle pick was stuck inside the box with the screen not with the other tools maybe it's also there for you
Y’all are getting far, FAR too detailed with some of this stuff…. Measuring and marking the pick that you won’t actually use to open the device?!? lol that’s kinda funny. Just heat it up, grab a spudger, and the back just pops right off! The iFixit tech need to stick to the KISS method more often, you know KEEP IT SIMPLE STUPID!!! Like l, for reals, I’ve been doing this stuff for YEARS and using iFixit guides regularly and this is just ridiculous at this point!
Will the phone still work if the sensor assembly on the back of the screen is damaged?
-
-
-
Recouvrez l'écran de bandes de ruban adhésif, qui se chevauchent, jusqu'à ce que toute la surface soit couverte.
-
Si la ventouse n'adhère pas au cours des étapes suivantes, pliez un morceau de ruban adhésif épais (du ruban adhésif toilé p.e.) pour former une poignée et soulevez l'écran de cette façon.
-
-
Outil utilisé dans cette étape :Clampy - Anti-Clamp$24.95
-
Tirez la poignée bleue vers l'arrière pour débloquer les bras de l'Anti-Clamp.
-
Insérez le côté droit ou gauche de votre iPhone entre les bras.
-
Positionnez les ventouses en bas de l'écran : une devant, une derrière.
-
Appuyez sur les ventouses pour faire pression à l'endroit désiré.
-
-
-
Tirez la poignée bleue vers l'avant pour bloquer les bras.
-
Tournez la poignée dans le sens horaire, de 360 degrés ou jusqu'à ce que les ventouses commencent à s'étirer.
-
Vérifiez que les ventouses restent bien alignées entre elles. Si elles commencent à se décaler, détachez-les pour les réaligner.
-
-
-
Chauffez un iOpener et faites-le passer à travers les bras de l'Anti-Clamp.
-
Pliez l'iOpener de façon qu'il repose sur le bord inférieur de l'iPhone.
-
Attendez une minute que l'adhésif se ramollisse et qu'un espace s'ouvre.
-
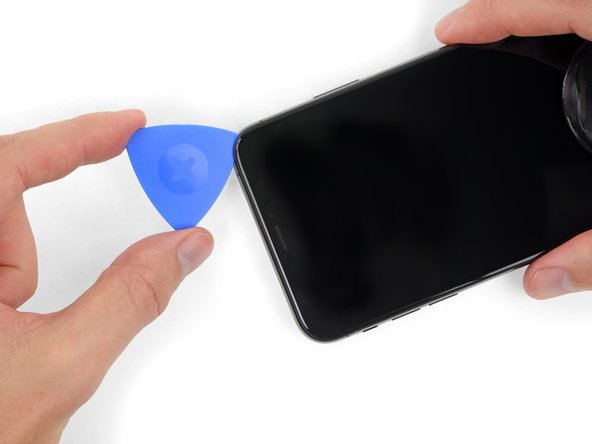
Insérez un médiator dans l'espace sous l'écran et le joint en plastique, et non dans l'écran.
-
Passez les trois étapes suivantes.
-
-
-
Servez-vous d'un sèche-cheveux ou d'un pistolet à air chaud. Ou bien préparez un iOpener et posez-le sur le bord inférieur de l'iPhone pendant environ une minute afin de ramollir l'adhésif qui se trouve en dessous.
besteht da die Gefahr das sich das Displayglas vom lcd löst?
Besteht da die Gefahr das sich der Kleber vom Displayglas löst?
-
-
-
Tirez fermement et constamment sur la ventouse pour ouvrir un léger interstice entre le panneau frontal et la coque arrière.
-
Insérez un médiator dans l'interstice sous l'écran et le joint en plastique, pas dans l'écran lui-même.
-
-
-
-
Réinsérez votre médiator dans le bord inférieur de l'iPhone et faites-le glisser le long du bord droit pour continuer à faire céder l'adhésif.
Comment répare un Face ID XS max
Bonjour @jenkeydany62670 Les capteurs Face ID était appairés à la carte mère en usine, il n'est possible de les remplacer qu'avec une nouvelle "paire". Ou bien, il faut se tourner vers un centre de réparation Apple officiel.
-
-
-
Retirez les quatre vis Y000 de différentes longueurs, qui fixent le cache de la fixation de la carte mère :
-
Deux vis de 1,1 mm
-
Une vis de 1,5 mm
-
Une vis de 3,7 mm
Hi i'm Daniel, the guide is perfect!!! I'm enjoying my brand new ifixit Battery!!!
-
-
-
Prenez une spatule (spudger) ou un ongle propre pour soulever le connecteur de la batterie de sa prise sur la carte mère.
-
Repliez légèrement le connecteur pour l'éloigner de la carte mère. Cela évitera qu'il touche accidentellement sa prise et alimente le téléphone pendant votre réparation.
-
-
-
Dévissez les trois vis Y000 qui maintiennent le cache du connecteur de l'écran :
-
Deux vis de 1,5 mm
-
Une vis de 1,1 mm
I am replacing the screen for the 2nd time - the first repair was done by someone else, and the first 2 screws are 1.5mm and the last screw is 1.1mm… If I put the screw back in am I risking Long Screw Damage?
Thanks for all your comments! I'll amend this step.
Hi, I just changed the screen on my XS Max and for this bracket I used 2 x 1.1 mm and 1 x 1.5 mm.
Starting from left to right:
- left 1.1 mm (I tried with 1.5 mm like in the above picture but I felt that it didn't wanted to go deeper so I didn't forced and I tried it in the middle and it fit perfectly)
- middle 1.5 mm
- right 1.1 mm
For the two brackets I had 7 screws, I aligned them on the desk by length and I had 2 x 1.5 mm, 4 x 1.1 mm and 1 x 3.7 mm.
Good luck and I hope it will help someone!
-
-
-
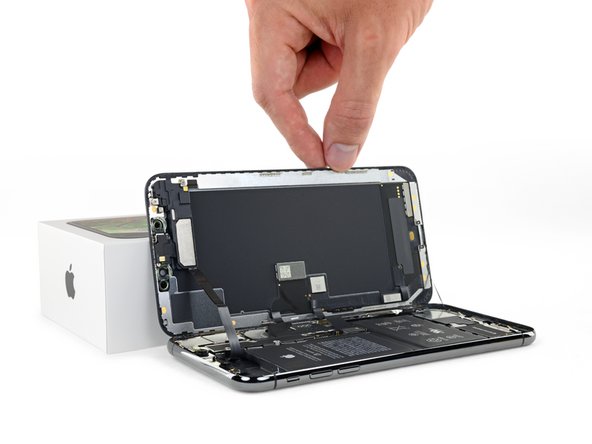
Soulevez délicatement la nappe jusqu'à ce que l'adhésif cède.
-
-
-
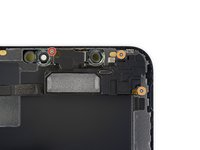
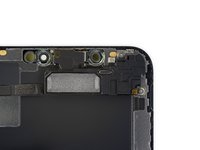
Dévissez les trois vis Y000 qui fixent l'ensemble haut-parleur/capteurs :
-
Une vis de 1,4 mm
-
Deux vis de 1,5 mm
Ciao @max94949 Quale lunghezza stai cercando? Il passo menziona che si tratta di una vite Y000 da 1,4 mm e di due vite Y000 da 1,5 mm.
-
-
-
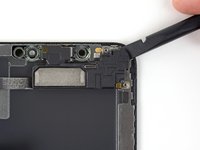
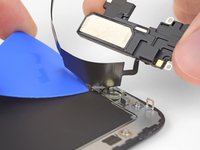
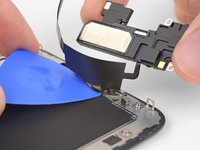
Avec une spatule (spudger), faites délicatement levier sous le bord supérieur de l'ensemble haut-parleur et faites-le pivoter vers le bas en l'éloignant du bord supérieur de l'écran.
If you are using a refurbished display, check for dirt in the earpiece speaker cutout.
If you have poor quality or low sound after changing the display, use a cotton bud and isopropyl alcohol to clean the earpiece cutout.
-
-
-
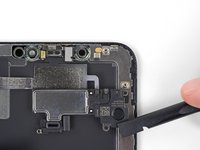
Servez-vous d'un sèche-cheveux ou d'un pistolet à air chaud ou bien préparez un iOpener que vous posez ensuite sur la partie supérieure de l'écran pendant 1 à 2 minutes pour faire ramollir l'adhésif qui fixe les capteurs.
-
-
-
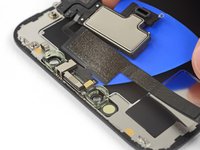
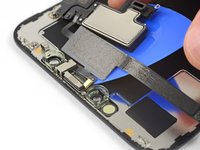
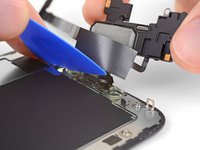
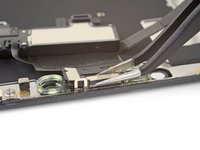
Faites délicatement glisser le bord de votre médiator sous la nappe en dessous du microphone.
-
Faites-le délicatement pivoter pour décoller le microphone en veillant à ni forcer ni endommager la nappe.
-
Si nécessaire, prenez la pointe de la spatule pour finir de dégager le microphone de son encoche dans le panneau frontal.
-
-
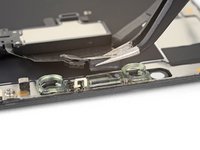
Outil utilisé dans cette étape :Tweezers$4.99
-
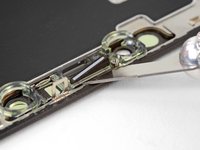
Prenez une pincette pour soulever le capteur de luminosité ambiante hors de son encoche dans l'écran.
This was the most difficult part for me so i erred on the side of caution. I reheated the display in the oven at 85 degrees celsius. Like in the third picture in the next step, i got a razor into the slot below, to get the diffuser a little loose before wiggling the sensor out. I didn't understand the wiggling until i simply rocked it like a boat would side to side like to the top of the display to the bottom on the display, and voila, all came out easy and in one piece with the diffuser still attached.
-
-
-
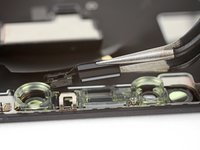
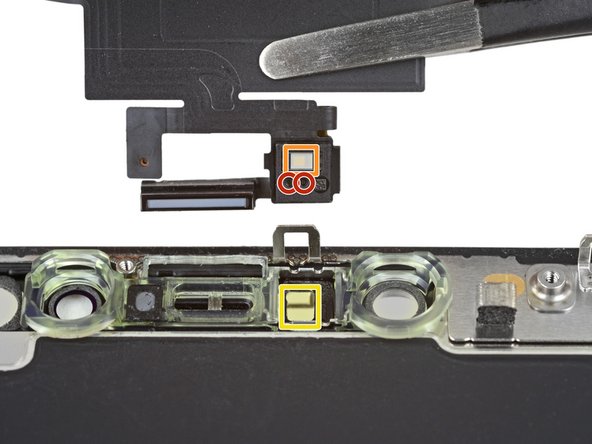
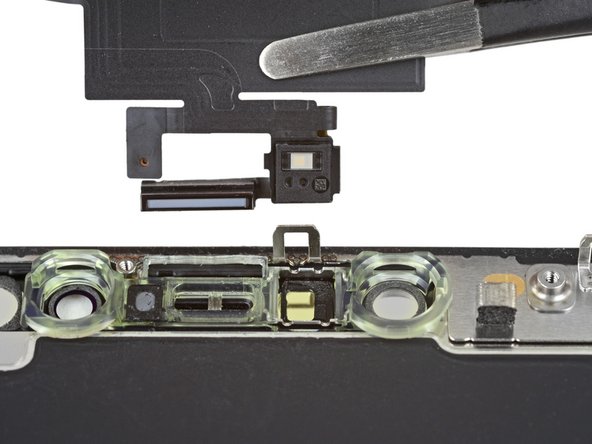
Si vous avez réussi à retirer tout le capteur de luminosité ambiante comme illustré sur la première photo, allez directement à l'étape suivante.
-
Si la bande blanche du diffuseur s'est détachée et est restée coincée dans l'écran, comme illustré sur la deuxième photo, vous allez devoir faire levier avec une fine lame ou un outil de levier tout le long du bord supérieur pour l'enlever. Refaites chauffer d'abord le tout, la tâche sera peut-être un peu plus facile ensuite.
I have accidentally damaged flood illuminator will it affect the face id also or if I just replace the Earpiece Speaker and Sensor Assembly it will get fixed.
-
-
-
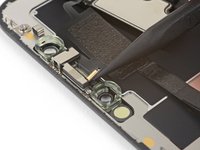
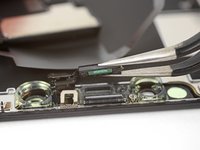
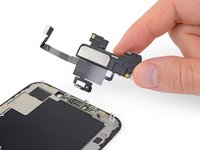
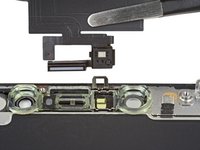
Retirez l'ensemble haut-parleur interne et capteurs avant.
-
Capteur de proximité
-
Illuminateur infrarouge
-
Le module doit être positionné de sorte que ces composants ne sont pas bouchés par de la colle.
Do you have to remove the earpiece speaker and front sensor assembly. If you are taking a screen from another Xs max with it already attached?
The front sensor assembly is part of Face ID, so you must transfer the original assembly to the replacement screen in order to maintain Face ID functionality.
No, you just take the whole unit. Warm it up and remove the glued sensors like described. Handle it carefully, the speaker cable is quite thin. If damaged, you might loose your face-ID functionality.
Does the screen need a reprogamation onto the new screen?
if the pentalope screws are rusted and the driver can’t fit in it to remove them is there any other way to remove them to replace screen?
-


Comparez votre nouvelle pièce de remplacement avec celle d'origine. Il vous faut transférer les composants restants et retirer les films adhésifs de la nouvelle pièce avant de la monter.
Pour remonter votre appareil, suivez les instructions ci-dessus en sens inverse.
Déposez vos déchets électroniques dans un centre de recyclage certifié.
La réparation ne s'est pas déroulée comme prévu ? Consultez notre communauté de réponses pour obtenir de l'aide au diagnostic.
Annulation : je n'ai pas terminé ce tutoriel.
184 autres ont terminé cette réparation.
Merci à ces traducteurs :
100%


Ces traducteurs nous aident réparer le monde ! Vous voulez contribuer ?
Commencez à traduire ›


37 commentaires
Nice guide. I could be wrong but for the first time in a while, changing a display on an Apple phone looks like it’s not anymore difficult than previous models.
John K
the-screen-savers.com
If you remove the screen but then apply the same screen back on the phone, will True Tone still be disabled?
@onslivion Nope! It'll continue to work fine, so long as you didn’t damage anything.
Hi i broke the Flex cable of the Part.
what i can do now.
is their some Parts for sale?
I just switched the screens from 2 phones and both are unresponsive, if put them back to its original logic board the work again, any idea why they dont work? both are original.
Why is True Tone disabled afterwards? Even with an Original Screen how is that possible?
That's normal. There's a chip in the screen that has info that is specific to the original logic board so unless you have a special machine to read/write to that chip, truetone will not work.
This was perfect. It definitely helped me replace the screen on a friend IPhone XS Max!
Every authoritative source (such as Apple Support, Wikipedia) that I read about the iPhone XS Max display states that it has an OLED display - not an AMOLED display, and not an LCD display (such as on the XR model). Yet the parts associated with this guide are LCD (website quirk?) and the written text for XS Max mention AMOLED. Isn’t this important to get right when replacing? The model I have is A1921.
Hi Mark,
The iPhone XS Max uses an AMOLED display. Active Matrix OLED (AMOLED) is a subcategory of the general OLED tech—AMOLED displays contain circuitry which allows them to switch each OLED pixel on or off. Compared to Passive Matrix OLED, AMOLED displays have a higher refresh rate and are more energy efficient . However AMOLED displays are complex, difficult to source, and very expensive to replace (think $200-400 for the part!) Hardware manufacturers sought to resolve this problem by producing LCD replacement screens. These screens are made to be completely compatible with the iPhone XS Max, but are significantly cheaper to replace. They do look slightly different compared to the original screen. Check this link out for a more in-depth review of the differences.
Where is the INSTALL GUIDE this is just removal? And don’t tell me it’s the reverse. I have a small gasket that’s not mentioned in this and it doesn’t explain how to remove the main old gasket or install the new gasket
Where is the installation guide? This is just a removal guide. Don’t tell me that it’s the opposite of removal to install because I have a small gasket that is not mentioned in the YouTube video or on this site in my package
I would like to echo this comment. It is extremely disappointing to see a guide this comprehensive and detailed stop short of reassembly. Especially because some parts need to be transferred from the original display to the replacement one.
Completed the Repair with the more Expensive alternative - the OLED display.
The guide is very comprehensive and covered all the points including looking out for bits left behind!
- I noticed a tiny piece of conductive foam on the old display which i moved to the new one.
The OLED display is top quality, but a little darker due to losing the “True Tone” no doubt.
The Adhesive kit is very good, but separating the two films was a little difficult and messed up the alignment slightly, however I managed to recover!
One more addition I had to make after undertaking this repair.
I had noted that after swapping the display the earpiece was very quiet. I thought that I had missed a gasket, misaligned the earpiece speaker or not plugged in the leads correctly.
Nope. Much simpler than that. CLEAN THE EAR PIECE CUTOUT! *Eeeewwww* After putting up with this for about 4 weeks, I happened to get out the Cotton Buds. A quick wipe revealed someone elses EAR GUNK was clogging up the ear piece cutout !
Disgusted, I got out the Isopropyl and cleaned it (carefully) about 10 times, the audio is now crystal clear.
@ifixit - Please ensure your “Refurbished displays” have a clean earhole. It was pretty gross that it was clogged to the point that I could not HEAR!
Great guide, completely worked for me!
This guide worked perfectly for my iPhone Max XS screen replacement. This is only my second “project” from iFixit (the first was a replacement display screen for my Canon 6D) and both times, miraculously, everything worked. I’m really not sure if it is my skills or the details in the guides (it’s definitely the latter and a tiny bit of the former). The replacement parts are reasonably priced and the toolkits are VERY GOOD in quality.
For this iPhone screen fix, I used a previously purchased toolkit and “borrowed” suction handles (yes, definitely makes a difference and better than the tape alternative—I tried both) from a bathroom rack.
It took me about 3 hours to get this done. I rushed on step one and stripped the first pentalobe screw. Luckily, one stripped pentalobe screw is still OK. I managed to pull it apart by wiggling the screen around (without too much force). I used a hair dryer to heat the frame/adhesive.
Follow the instructions closely and don’t lose the tiny screws. A magnetic screwdriver helped.
I have accidentally damaged flood illuminator will it affect the face id also or if I just replace the Earpiece Speaker and Sensor Assembly it will get fixed.
Step 1: Remove pentalobe screws…is very careful to NOT STRIP THE SCREW…tools provided/metal is not hard enough and is unable to take out the screw in Step 1 and am now currently going out to buy better pentalobe screw driver. THANKS. Why don’t you just provide better tools and increase the cost……………………………………………
for me at least once you get use to repairing this it can take around 30 min too an hour but i also repair all devices even phones for living so i do have experience with repairing these
Changing just the glass screen on my iphone xs max and the black part behind the screen is cracked what do I do ?
Executed this repair almost flawlessly. The FaceID flex cable is very fragile and glued down very well. I advise you be careful when removing is as not much pressure at all can cause it to break (Speaking from experience). Other than that the guide was very easy to follow.
This was an incredible guide! With the video, it was the perfect guide and I managed to complete the fix in less than 2 hours.
Can water damaged iphone be restored by replacing screen?
Hey Team iFixit, vielen dank für diese ausführliche Anleitung. Einfach richtig lesen dann macht man auch keine Fehler haha
Last month I ordered and received a new screen/digitizer for my iPhone XS max. Installation was easy and the phone was back on-line in half ah hour. Not for long unfortunately. A week after the replacement, the digitizer became irresponsive. I had to let the battery die and subsequently reboot my phone.
It fixed the problem for one day. Then the digitizer froze up again. I decided I was going to open the phone to check the ribbon cables for faulty connection. Alas, when opening the iPhone,one of the cables between the screen and the main board tore.
I resorted to re-installing my old cracked screen that now has been working flawlessly for one week.
Is there a fix for the broken ribbon cable, or can I return the screen for credit or repair?
Hey, I'm thinking on fixing up my Iphone Xsmax screen will the Face Id still function after replacement
Hello oguntayo tosin, as mentioned in the introduction, for Face ID to work you have to transfer the earpiece speaker + sensor assembly as they are paired to your individual iPhone.
I cant put the display on the iPhone and I dont know why.It just doesn't fit right and rises about 2mm higher than it should.What can I do?
Hello Robin, did you already go through the recommended troubleshooting steps? It sounds like it could be a bracket or elements of the earpiece speaker and front sensor assembly that are not seated correctly or that there is some issue with the clips holding the display. You could also try checking whether your replacement part deviates from the original screen as discussed here. Hope this helps!
If purchasing the OLED option from here, would I be able to use a programmer to enable back True Tone?
There's a couple extra chips near the bottom of the original screen that aren't on the replacement. Are they surplus to requirement?
after re assembly the screen is loose I attempted to open it and re sitting but still loose!!! why???
PLEASE HELP! I have an IPhone XS Max with a cracked screen. It has loads of irreplaceable information on it. I can’t afford to buy a screen right now but I have a brand new screen for a IPhone 6 Plus, I don’t want to install it onto the XS but I was wondering if it could be hooked up long enough to type the passcode and trust a computer so I can download the phone’s contents? Pretty much I just need to know if the cables for the display are compatible.
This is the only thing I could think of that might possibly work and not cost me a bunch of money. I was recently attacked, robbed and assaulted. The IPhone XS Max was recording during the assault but couldn’t back up because I didn’t have any Icloud storage available. If anyone has any other suggestions please help me out. P.s. I have went to the police and they couldn’t care less, I live in a small town and my abuser is a prominent member of the community so I am on my own.