Introduction
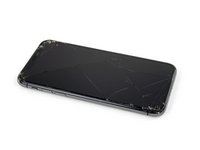
Si votre écran iPhone XS est fissuré, ne réagit plus au toucher, ou n'affiche rien quand votre téléphone est allumé, suivez ce tutoriel pour refaire fonctionner votre iPhone à l'aide d'un nouvel écran complet.
Le module haut-parleur interne + capteurs fixé au rétro de l'écran est couplé individuellement à votre iPhone en usine, vous devez donc transférer celui de votre ancien écran iPhone XS sur le nouveau lors du remplacement de l'écran. Il comprend l'illuminateur qui fait partie intégrante de la fonctionnalité de sécurité Face ID. En cas de dommage ou de remplacement, Face ID ne fonctionnera plus. Faites donc extrêmement attention à n'endommager aucun composant lors de la réparation. Autrement seul Apple pourra restaurer la fonctionnalité Face ID.
Remarque : la fonctionnalité True Tone est désactivée après le remplacement de l'écran, même si vous utilisez un écran Apple d'origine.
Ce dont vous avez besoin
Vidéo d'introduction
-
-
Éteignez votre téléphone avant de commencer le démontage.
-
Dévissez les deux vis Pentalobe de 6,9 mm de long en bas de l'iPhone.
-
-
-
Mesurez 3 mm à partir de la pointe et tracez une ligne sur le médiator avec un marqueur permanent.
-
-
-
Recouvrez l'écran de bandes de ruban adhésif, qui se chevauchent, jusqu'à ce que toute la surface soit couverte.
-
Si la ventouse n'adhère pas au cours des étapes suivantes, pliez un morceau de ruban adhésif épais (du ruban adhésif toilé p.e.) pour former une poignée et soulevez l'écran de cette façon.
-
-
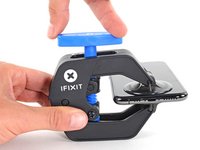
Outil utilisé dans cette étape :Clampy - Anti-Clamp$24.95
-
Tirez la poignée bleue vers l'arrière pour débloquer les bras de l'Anti-Clamp.
-
Insérez le côté droit ou gauche de votre iPhone entre les bras.
-
Positionnez les ventouses près du bord inférieur de l'iPhone, une devant et une derrière.
-
Appuyez sur les ventouses pour les faire adhérer à l'endroit désiré.
-
-
-
Tirez la poignée bleue vers l'avant pour bloquer les bras.
-
Tournez la poignée dans le sens des aiguilles d'une montre, de 360 degrés ou jusqu'à ce que les ventouses commencent à s'étirer.
-
Vérifiez que les ventouses restent bien alignées entre elles. Si elles commencent à se décaler, détachez-les pour les réaligner.
-
-
-
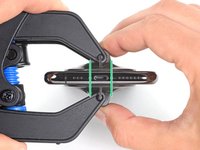
Chauffez un iOpener et faites-le passer à travers les bras de l'Anti-Clamp.
-
Pliez l'iOpener de façon qu'il repose sur le bord inférieur de l'iPhone.
-
Attendez une minute que l'adhésif se ramollisse et qu'un espace s'ouvre.
-
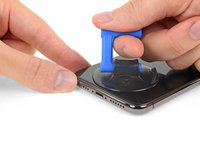
Insérez un médiator dans l'espace sous l'écran et le joint en plastique, et non dans l'écran.
-
Passez les trois étapes suivantes.
-
-
-
Servez-vous d'un sèche-cheveux ou d'un pistolet à air chaud. Ou bien préparez un iOpener et posez-le sur le bord inférieur de l'iPhone pendant environ une minute afin de ramollir l'adhésif qui se trouve en dessous.
-
-
-
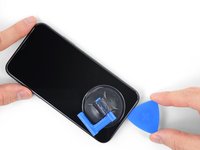
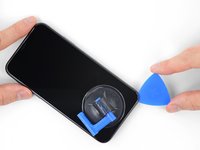
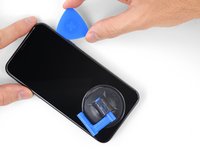
Tirez fermement et constamment sur la ventouse pour ouvrir un léger interstice entre le panneau frontal et la coque arrière.
-
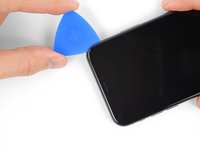
Insérez un médiator dans l'interstice sous l'écran et le joint en plastique, pas dans l'écran lui-même.
It seems like I need a third hand to do this. To hold the phone; hold the suction cup; and push the pick in the space.
-
-
-
-
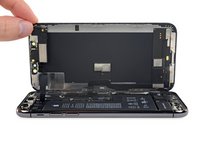
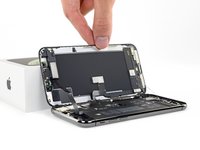
Ouvrez l'iPhone en faisant pivoter le bord gauche de l'écran, comme la couverture arrière d'un livre.
-
Appuyez l'écran contre un objet pour le maintenir à la verticale pendant que vous travaillez sur le téléphone.
-
-
-
Dévissez les cinq vis de différentes longueurs, qui fixent le cache du connecteur de la carte mère :
-
Trois vis Y000 de 1 mm
-
Une vis Y000 de 1,3 mm
-
Une vis cruciforme de 3,7 mm
FYI: I used a tiny piece of scotch tape to hold those 1mm screws in place while aligning the magnetic screwdriver. Otherwise they are so tiny the magnetic bit pulls them right out the hole.
-
-
-
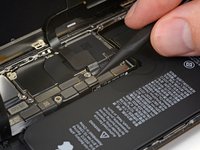
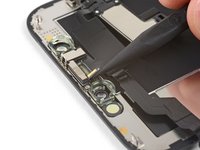
Faites levier avec une spatule (spudger) ou un ongle propre pour soulever le connecteur de la batterie hors de sa prise sur la carte mère.
-
Repliez et écartez légèrement le connecteur de la carte mère pour éviter qu'il touche accidentellement sa prise et que le téléphone soit alimenté pendant la réparation.
-
-
-
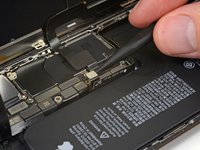
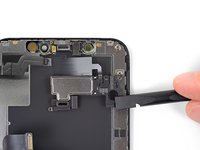
Servez-vous d'une spatule ou d'un ongle pour soulever et débrancher le connecteur de la nappe des capteurs du panneau frontal.
In my phone the connector made poor contact with the socket resulting in no sound audible through the phone receiver/headset. There was an overhang of insulation close to the socket which I believe may have prevented a good connection. So if you have these kinds of audio problems you might see if this is the problem.
-
-
-
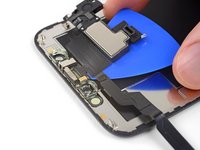
Avec une spatule on un ongle, débranchez le connecteur de la nappe du panneau OLED.
-
-
-
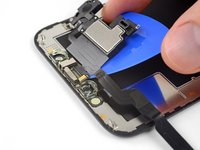
Prenez une spatule ou un ongle pour débrancher le connecteur de la nappe de la vitre tactile de sa prise.
Reassembly: reconnecting the press connectors upon reassembly was so hard, even for the ones not seated in a recessed location !! It took me two days to get them reconnected. What helped me was to shine bright lights on all sides of the iPhone and then hold the iPhone vertically like a book and press it in that way. They are now all in, but the touchscreen functionality has disappeared :( so I will need to reconnect that one.
-
-
-
Soulevez délicatement la nappe pour la décoller.
Will replacing camera and sensors fix damaged face I'd
No, FaceID will be disabled because the original sensors are paired with the logic board.
-
-
-
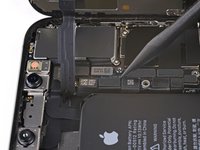
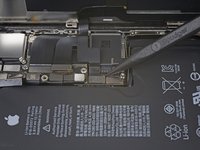
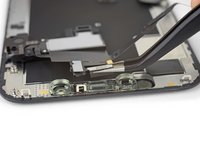
Sur le dos de l'ensemble écran, décollez et retirez le ruban adhésif qui recouvre la vis cachée dans le coin inférieur droit du logement du haut-parleur.
-
-
-
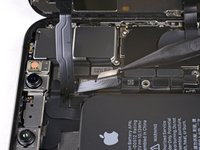
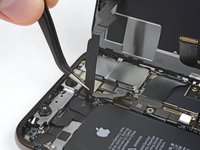
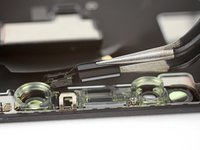
Dévissez les trois vis Y000 qui fixent l'ensemble haut-parleur/capteurs :
-
Une vis de 1,3 mm
-
Une vis de 1,4 mm
-
Une vis de 1,9 mm
-
-
-
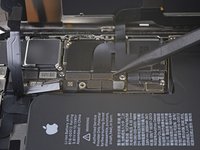
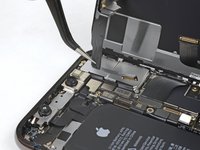
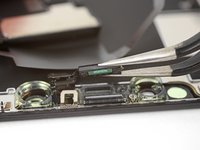
Servez-vous d'un sèche-cheveux ou d'un pistolet à air chaud, ou bien préparez un iOpener et appliquez-le sur la partie supérieure de l'écran pendant environ une minute pour faire ramollir l'adhésif fixant les capteurs.
-
-
-
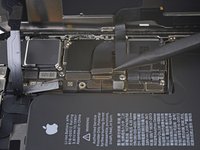
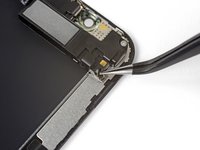
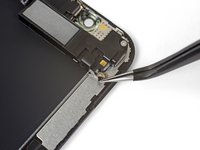
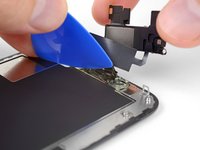
Faites soigneusement glisser le bord d'un médiator sous la nappe en dessous du microphone.
-
Faites-le délicatement pivoter pour séparer le microphone tout en veillant à ni forcer ni endommager la nappe.
-
Si nécessaire, prenez la pointe de la spatule pour finir de détacher le microphone de son encoche dans le panneau frontal. Si vous avez de mal à décoller le microphone, faites chauffer une fois de plus.
-
-
-
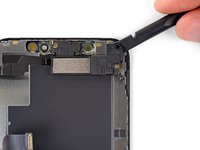
Si vous avez réussi à retirer tout le capteur de luminosité ambiante, comme illustré sur la première photo, continuez à la prochaine étape.
-
Si la bande blanche du diffuseur s'est détachée et est restée coincée dans l'écran, comme illustré sur la deuxième photo, vous allez devoir faire levier avec une fine lame ou un outil de levier tout le long du bord supérieur pour l'enlever. Refaites chauffer d'abord le tout, la tâche sera peut-être un peu plus facile ensuite.
-
-
-
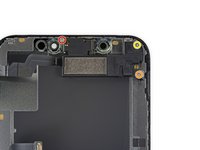
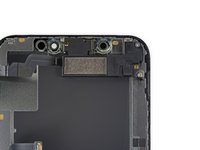
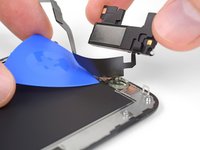
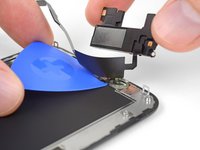
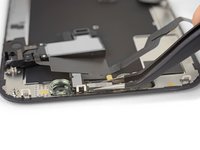
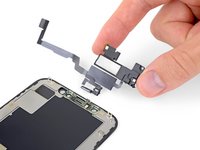
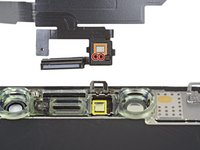
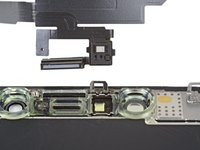
Retirez l'ensemble haut-parleur interne et capteurs avant.
-
Capteur de proximité
-
Illuminateur infrarouge
-
Le module doit être positionné de sorte que ces composants ne sont pas bouchés par de la colle.
What is that hole that is on the opposite side of the proximity sensor? Is it necessary any adhesives or special filter to put it back on the bracket?
Hi Rafael! The hole is for the front-facing microphone. You should be able to reuse the existing adhesive on the screen. If you're transferring it, you can cut a square of double-sided tape such as Tesa tape, poke a generous hole in the center of the square, and apply it to the cable with the hole.
-


Comparez votre nouvelle pièce de remplacement avec celle d'origine. Il vous faut transférer les composants restants et retirer les films adhésifs de la nouvelle pièce avant de la monter.
Pour remonter votre appareil, suivez les instructions ci-dessus en sens inverse.
Déposez vos déchets électroniques dans un centre de recyclage certifié.
La réparation ne s'est pas déroulée comme prévu ? Consultez notre communauté de réponses pour obtenir de l'aide au diagnostic.
Annulation : je n'ai pas terminé ce tutoriel.
239 autres ont terminé cette réparation.
Merci à ces traducteurs :
100%


Ces traducteurs nous aident réparer le monde ! Vous voulez contribuer ?
Commencez à traduire ›


47 commentaires
It would be better if you provided some guidance on moving the iPhone XS Front Camera and Sensor Holder from the old display to the new one since the part you deliver does not include it. In order to remove it I ended up having to use my heat gun which warped the plastic and ultimately caused me to have to buy a replacement. Does it require adhesive? I still don’t know and it gets conveniently ignored in your guide and repair videos on YouTube. I’m quite frustrated.
Sorry about that! That’s no fun at all. iFixit’s replacement screens are meant to include that component; I’ll ask for someone to check and make sure it’s not left out in the future. However, it’s normally pretty easy to remove using mild heat and/or a few drops of isopropyl alcohol, with some gentle wiggling and prying. Then you carefully position it on your new screen. Adhesive is helpful, but once you screw down the earpiece speaker over the top, it should be perfectly secure regardless.
My phone screen feels a little loose after reassembly. Mostly in the top left area if I push it.. is this normal?
Short answer: Yes. Long answer: If you have adhesive on it that can hold the screen down. If you don’t it’s $5 and super easy to put on. It is kind of normal for the screen to be a little warped, I have done replacements on iPhones without reapplying adhesive and when applying heat it can warp it a tiny bit. The adhesive can help with this a lot. I strongly recommend you get it to hold your screen down.
Thanks a lot for this great instruction!
Sorry for a stupid question, is the digitizer and lcd screen one unit? Long story short, the screen is not cracked but the lcd somehow got damaged.
Hi Reggie,
The digitizer and OLED panel are pretty intricately attached to each other and are sold together as one unit. You may be able to replace the OLED panel without replacing the digitizer, but that would require specialty tools.
Bello, Después que tengas un buen ojo y buen pulso.
Se ve y se siente igual que el original.
Lo mega recomiendo!
Hi, I have one problem and I really hope to find somebody with answers. I need to replace an iPhone XS screen but…. My original screen doesnt have these metallic parts you use to clip it to the rest of the phone. The screen I have ordered had them and also was a tiny bit too long for my phone. This is all so very weird because I can't find any other types of screen online. Seems almost like my phone is a problem. Have you ever encountered such problem? You can reach me by email roza.francois@gmail.com
Hi. i also have the problem like fracois. Could you help me please?! You can reach me by email under dcs.privat@gmail.com
Greetings,
Daniel
Where are you guys ordering parts from? Try taking pictures of both your phone and the old/new screens and post your question in our Answers forum—you’re more likely to get help there.
It seems to me that the European models of the iPhone XS do not have the clips you mentioned (at least, I have mt9e2b/a and it has no clips). The display is much easier to replace since the earpiece speaker + sensor assembly is not fixed to the display; you can stop at around step 17 and reassemble. BUT you need the correct display module (without clips), or it won't go back together. So really the title of this guide should mention the specific iPhone XS models for which it's suitable.
Thanks for the replacement and instructions, since I replaced the screen of my previous iPhone 6 and iPhone 4 and several more for friends, it just took me around 10 minutes.
Luckily I bought the complete set with the tools, I did not know they used Y000 screws and would not have had a screwdriver for it if there wasn’t one included.
Hello, thank you for the guide and kit, everything was great but there was a problem: the space where the square part with the Proximity sensor and Flood illuminator go, originally on the original Iphone screen had a square little mirror like part (like in your tut pictures), in your Oled replacement screen set it is round and much bigger. Is this a problem?
I ask this cause now the auto-brightness is finnicky, the Iphone dims hard like (brightness auto drops), i don’t think i damaged the ambient light sensor , i was extremely slow and methodical, removed the glue carefully from the two near parts before, didn’t strain the cable, the ambient light sensor came out easily enough, slowly but steadily. Also i think if it would be broken, it would not work and dim the brightness. Could it be related to the fact that the sensor is not glued down like it was before? The screws were carefully put back in the exact order and no glue fell into/onto the sensors. Thank you
Hello. After replacing the display every many while I use it it turns black screen, then I have to lock and unlock it and it lights up again. Could you advise me something? Or is the display faulty? With the original it does not. Thanks.
The install went ok - 2 things should be mentioned….1. does the blue film on the replacement screen need to be removed Yes or No, 2. IF the touch sensor is not working mention trying a hard restart 1st it would have saved me a ton of time and frustration… I assembled, reinstalled the old screen since it was working before, since it didn’t work either, disassembled, and reassembled the replacement part several times to troubleshoot why it wasn’t working. Those screws are sooo small its a wonder I didn’t lose any. None the less, after a hard restart, the touch sensor is working great and the phone is operating as designed. I was going to replace the back glass & ordered the part but there’s no way I am going into that after doing this- its not my phone. I put packing tape over the glass and put it back into the cover. A few hours of time is way cheaper than purchasing a new phone :)
Thanks for the suggestion about the hard restart! If the blue film is lightly adhered to the replacement screen, it is a liner and should be removed.
The two screen connection modules with pins closest to the bottom are impossible to connect. They keep popping out making it impossible to put the cover on. Any tips?
The screen replacement went flawlessly. All the functions work perfectly. I have no problems with 3D Touch, nor with FaceID. The only thing that doesn’t work any more is True Tone. Thank you for the guide.
Just replaced a cracked screen. Took some time but finally managed to do it. Now have a beautiful screen and and a perfectly working device.
Paul L.
Great guide! Unfortunately I now have stripes across the screen (left-right). They are only visible on even grey backgrounds, so it’s not a big issue. Guess I bought a cheap screen, https://www.phone-parts.dk/iphone-xs-ska...
I replaced my screen yesterday and the guides were perfect. Unfortunately, when I went to bed and had my screen on its dimmest setting I noticed that the colors were massively distorted toward the red end of the spectrum. I’m worried that I received a faulty product. The screen otherwise functions perfectly and colors are all normal at any other brightness setting. Please help!
These are not authentic apple screen replacements. I’ve received two different replacement screens now and they’ve both had issues. The first worked mostly fine except when the screen brightness was on its lowest setting the screen would have a strong reddish hue and the resolution would get noisy. The replacement that was sent has different problems, and now I wish I had just kept the original. This one is over saturated, struggles to have even dimming at the lowest brightness setting, the glass itself is not perfectly smooth, and the screen is somehow strangely sensitive, which makes typing and general use of the phone more difficult. At this point I wish I just took it to a certified apple repair shop.
When i lift my screen up and off. all the top mounted components are left behind still attached to the phone ( front camera etc)
also there is some sort of metal protection border in the inside around the perimeter of the phone. blocking access to some screws at the bottom.
has anyone come across this. i cant remove the protection plate.
that is the display frame when you took the old display off you must have accidentally gone between the display and display frame. you will have to buy a new display because the display frame holds the display on the phone
It would be really good to have some (shared) instructions on how to turn off the iPhone when the display and/or digitizer is not working; after all that's why we're doing this! Most guides I've seen say that the instructions are for turning off the phone, but actually they tell you how to force it to restart.
For iPhones without buttons, the sequence seems to be: briefly press volume up, briefly press volume down, press and hold the RH side button. Continue to hold when the display turns off... Continue to hold when the Apple logo shows, then the display will turn off again. Now release the side button. (This is similar to the restart sequence you'll find elsewhere, but those instructions will tell you to release the button when the Apple logo shows.) Clearly the display may be so damaged that you can't see the Apple logo, but you may well be able to tell when the display turns off entirely for the second time. If you can't see any visible change, try holding for about 20s altogether.
TOP!!!!! did it!!!
Hello, My name is Michael and I am in search of some assistance. I recently broke my Iphone XS screen, and I am looking to buy a new one as soon as I can find the exact parts I need. If you sell these products, Please send me a message. If you don't sell these products, But you still know the answer then please message me with a link for a listing for the items that I need. Thanks in advance!!
Also, I am a decent problem solver, But I have never ever changed a Iphone screen. Does anyone know if this sounds like a bad idea? I have background experience with computers and and mobile devices. Id you know of a good tutorial Please DM me with the link. Thanks in advance!
Hi Michael!
You're at the right place! This page contains detailed step-by-step instructions on how to replace the screen for your iPhone XS. I'd suggest that you read through the guide to assess whether it's something you'd feel comfortable doing or not. You can also find the proper part to buy in the "what you need" section in that page. Best of luck!
I have just replaced the screen on my iPhone Xs following this guide for disassembling and the youtube for reassembling without any issues. Great, clear and detailed description. Thank you for saving me from another expensive purchase!
Great post! I repaired my phone in an hour, and you can't tell. I would be careful removing anything near the camera as any damage will cause Face ID to no longer work.
Perfect, thank you. Instructions were very clear.
Geweldig duidelijk foto's en uitleg. Super!!!!!
These instructions where spot-on! Thanks! I managed to fix a 'ghost touch' by replacing the display! This saved me hundreds of euro's! (Repairshop: € 250,-, screen from Amazon: € 21,-)
Hi, I just swapped the screens on my kids phones becasue my daughters wasn't working on the top row, and my son had a new phone now. I have changed screens & batteries many times. Once I swapped the screen over, the 1,2 & 3 do not work on the keypad to log in to the phone. It looks like the whole top of the screen isn't responding. The top of the screen does respond to a tap to wake the phone though?
I have hard reset, I have removed and reconnected the digitizer cable. Any other ideas?
Der Original Akku ist codiert. Egal, ob man einen zweiten Apple Original Akku oder einen neuen Fremdakku einbaut erscheint bereits in den Einstellungen eine "Wichtige Batterienachricht" mit einem roten Punkt. "Unbekanntes Bauteil" und die "Informationen zum Batteriezustand" sind nicht verfügbar. Diese Nachricht verbleibt immer und nervt auf Dauer immens.
Der Akku muss angelernt werden und dieses können von jetzt an nur authorisierte Apple Servicebetriebe und diesen ist es durch Apple verboten die notwendige Info weiterzugeben.
Dies ist nicht zu verwechseln mit der bereits bekannten Rekalibrierung seit iOS 14.5.
Seit dieser neuen Codierung kostet der Akkutausch bei Apple auch nicht mehr 75 € sondern aktuell 99 € (Stand Novmber 2023 in Deutschland).
Damit sind künftig alle nicht authorisierten Servicebetriebe raus - denn wer will schon dauernd diese Mitteilung auf dem Bildschirm haben?
Überlegt vorher, ob unter diesen Bedingungen ein eigener Akkutausch noch sinnvoll ist .....
Manfred Wachtel - Réponse
Lieben Dank @manfredwachtel ! Mehr Infos dazu haben wir auch in unserem Blog zusammengefasst: https://de.ifixit.com/News/78890/teileko...
Sandra Hiller -