Introduction
Utilisez ce guide pour remplacer le bouton home physique en plastique. Suivez ce guide home button ribbon cable guide pour remplacer le bouton home mécanique même.
Voici le guide pour remplacer le support du bouton home.
Ce dont vous avez besoin
Vidéo d'introduction
-
-
Si la vitre de votre écran est fissurée, utilisez un adhésif pour éviter de l'endommager davantage ou de vous blesser lors de la réparation.
-
Appliquez des bandes d'un ruban adhésif transparent se chevauchant sur l'écran de votre iPhone jusqu'à ce qu'il soit entièrement recouvert.
-
-
-
Éteignez votre téléphone avant de commencer le démontage.
-
Retirez les deux vis Pentalobe 3,8 mm des deux côtés du connecteur de charge Lightning.
to keep screws in order, buy some double sided tape and then affix the tape in small pieces to a sheet of paper. As you take the screws out, you can affix them to the tape (which is on the paper) and then write a description of what they are and where they go. quick, cheap and easy.
I found that these screws did not remove easily. After turning several times and feeling the threads drop back, indicating they were loose, the heads did not extend far enough to grip with my fingernails to pull out. I had to use the tweezers and then it took a bit more force than expected to remove them.
My iPhone 5c has P1 Pentalobe screws, not P2. This guide caused me to buy wrong tools so I thought I would share my experience. Perhaps they vary.
@codycraven01 These guides are created using iFixit tools, and P2 is definitely the correct driver. If you’re using tools you bought somewhere else, then yes, results may vary.
-
-
Outil utilisé dans cette étape :iSclack$24.99
-
Serrez les poignées de l'iSclack et séparez ainsi les deux mâchoires avec les ventouses.
-
Posez la partie inférieure de votre iPhone entre les deux ventouses contre la jauge de profondeur en plastique.
-
Positionnez la ventouse supérieure juste au dessus du bouton home.
-
Ouvrez les poignées pour fermer les mâchoires de l'iSclack. Centrez les ventouses et posez-les fermement sur le dessus et le dessous le l'iPhone.
I just replaced my iPhone 5C battery today and only used the I fix it repair kit that came with the suction cup. Getting the glass screen out was not too difficult as I used a little bit of upward motion on the suction cup while at the same time prying gently with the flat end of the opening tool at the same time. If you have two people it makes it a little easier as someone can hold the phone. After getting the end open, I was able to go around the perimeter and gently pry up the edges with very little trouble.
Experienced immediate problem: there is s strap going from the home button to the screen, about 1-1/2 inch long. After removing 3-4 screws I saw no way to disconnect it from either end. My daughter came to help get the screws back (my 70 years have problems with very tiny screws). Slid a piece back and the strap came free of the home button ares. Screen could only open then 75-80 degrees. Tapr tore. Pried battery out. Replaced on original sticky tape. Restarted fine and about to recycle the charge. Thanks for the kit and all. But 6 demos and 3 inatructions never mentioned this strip! So careful opening it up, please!!
@mikamazn What you’re describing sounds like an iPhone 5s. This guide is for the 5c. Glad to hear things worked out for you.
-
-
-
Tenez bien votre iPhone et serrez les poignées de l'iSclack pour séparer les ventouses et enlever la vitre du boîtier arrière.
-
L'iSclack est conçu pour ouvrir suffisamment votre iPhone en toute sécurité, sans risquer d'endommager les nappes de l'écran.
-
Sautez les trois prochaines étapes et continuez à l'étape 8.
-
-
-
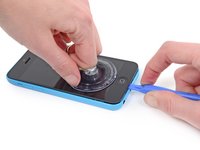
Posez une ventouse sur la vitre, juste au-dessus du bouton home.
cool i diden't now
very, very difficult to get a tight seal on tape. I removed the tape and still can't get a tight seal.
-
-
-
Tout en tenant l'iPhone avec une main, tirez sur la ventouse pour séparer légèrement l'écran du boîtier arrière.
-
A l'aide d'un outil en plastique, commencez à pousser le boîtier délicatement vers le bas tout en tirant sur la ventouse vers le haut.
Be sure not to use metal pry tools as they may crack the plastic.
-
-
-
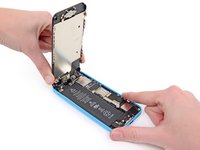
Soulevez la partie de l'écran avec le bouton home pour pouvoir accéder aux connecteurs près de la partie supérieure de l'iPhone.
-
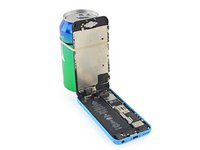
Ouvrez l'écran à un angle de 90° par rapport au boîtier et calez-le contre un support pendant que vous travaillez.
-
A la rigueur, une canette fermée peut vous dépanner.
-
Rajoutez un élastique pour bien maintenir l'écran lorsque vous travaillez. Ceci évite de forcer inutilement sur les nappes.
I use an old iPhone box to support the open phone. Set the box up on its end, and rubber band the screen side to the box. It works perfectly!
What do I do if it’s a little sticky and dirty inside?
-
-
-
-
Retirez les deux vis cruciformes #000 de 1,6 mm qui attachent le cache métallique du connecteur de la batterie à la carte mère.
These screws are very tiny and hard to manipulate. The screwdriver is magnetic; which is great to take them out, but makes it hard to put the screws back in, as the screwdriver pulls them from the hole. I solved this problem by using the pointed end of the spudger to put a tiny drop of Elmer's glue in the hole and then insert the screw. You can do this before putting the bracket in place if you want. Then the screw wont pull out by the magnetic driver and make lining up and fastening the screws much easier; at least for me!
I found that you don't need to disconnect the battery... why bother doing more fiddling with annoyingly tiny screws and obstinate cable connectors when you don't actually have to? Especially when you could only end up causing more damage. As a matter of fact, the original iFixit video didn't bother to disconnect the battery either, but they've since updated the video to include battery disconnection, I guess as a "belt and braces" approach in case the repair-hero forgets to power down the phone first?
Disconnecting the battery is a safety precaution, and yes it's worth doing. Even with the phone powered off, there is some danger of blowing the backlight filter fuse if you disconnect the display while the battery is connected. At that point you're no longer looking at a simple DIY repair. Even though it's possible to skip this step and still come out okay, my advice is not to risk it.
It’s a relatively junky phone, so if it breaks, what the heck. I’m not going to disconnect the battery.
-
-
-
A l'aide de l'extrémité plate d'une spatule (spudger), faites levier pour enlever le connecteur de batterie de la carte mère.
Instead of using a spudger, you can use your fingernails too. This is quicker and enables you to feel if you're not accidentally putting on too much pressure or lifting the connector instead of the cable.
Accidentally pulling out the logic board socket is no idle warning - exactly what I did without much effort. I think this shouldn’t be described as ‘prying’ up because it implies needing to use force - but these things actually pop off quite easily with a nudge, which you discover at later steps.
-
-
-
Retirez les vis cruciformes #000 suivantes qui attachent le cache de la nappe d'écran à la carte mère :
-
Deux vis de 1,3 mm
-
Une vis de 1,7 mm
-
Une vis de 3,25 mm
I didn't need to remove the front panel to replace the lightning connector. Just prop it up like in Step 8, then skip steps 12-16.
I always put my screws in a magnet tray and place the screws in the exact position they were taken out. The magnet tray holds the screws tight in the position I put them in. No chasing on the floor looking for small screws that you brushed off the table.
I always take a picture of the phone, print it out, then use scotch tape to tape the screws onto the picture in the location where they go. You don't lose the screws and you always know where they go for re-assembly
good tip! but instead of taking & printing a picture of your own phone, you probably could just print the color coded pic from this step (assuming everything on your phone is exactly the same).
When reassembling, the screw holder that the screws screw into came off the board. Is there a way to superglue that back in?
no, do not use super-glue. Quite some of these ‘screw-holders’ are screws themselves with e hollow tread in the head (didn’t find the correct naming for it) - just like the things you screw into a PC case and fasten the mainboard on.
did NOT remove the front entirely. its not necessary to do this to remove the battery. these are only precautionary steps in case your clumsy or you feel you might not be able to manage it without. as always, be cautious.
Agree. Step 12 is unnecessary if one is extremely careful.
*warning* … this connector assembly is very messy to re-build. Next time I change such a battery, I’ll try to get it out carefully *without* detaching the display unit. My resumée: *never* unscrew more things than necessary. These things are not M five (5 mm bolt diameter) like on a bike, these are M zero-point-five. Even for a smirf, this is tiny stuff.
Hi Ali,
You can choose to not remove those screws and still be able to take the battery out. Be very careful supporting the display, or you may tear the display cables and damage your screen.
-
-
-
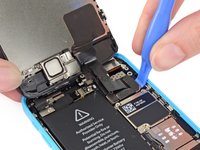
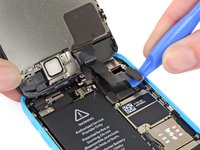
A l'aide d'un outil en plastique ou de votre ongle, déconnectez le connecteur de la nappe de la caméra avant et du capteur.
You might get a more “modernised” part from eBay (for this very model, iPhone 5c) which has an ENTIRE CABLE missing… if you look closely, it’s been re-directed into the middle cable. And it all works perfectly, touch screen, and display. So it’s a optimisation.
In summary - if you get this version of the screen, you only need to deal with 2 cables, not 3. The rightmost socket will remain empty.
-
-
-
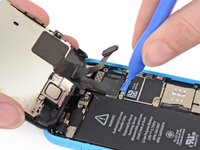
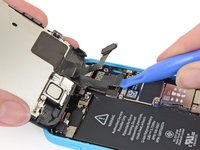
Assurez-vous que la batterie est déconnectée avant de déconnecter ou reconnecter les nappes de cette étape.
-
À l'aide d'un outil en plastique ou d'un ongle, déconnectez le connecteur de la nappe de l'écran LCD.
I replaced the broken front panel of the iPhone 5c and got the "famous white stripes" on the new screen. Reading about all kind of problems that the lcd/digitizer cable contacts may cause, I compared the cable connectors of the original Apple and the replacement part I bought online with a 35x magnifying glass. The quality difference was visible: The white description on the original part on the cable next to the connector is: 821-1784-A, while the inferior replacement part is: 821-1784-02. Check out the two numbers online and insist getting the "A" to avoid future troubles !!!
This person above is not knowledgeable. That number is a camera proxy part number, not the lcd or digitizer number. It changes with production date, both for original and aftermarket ones. A, B, D, 02, 04, 08 etc. Can all be either or.
vince -
Apple uses numerical revisions (-02) for pre-production parts, and alpha revisions (-A) for production revisions. It looks like you got a preproduction assembly, or a knock-off.
There are, in fact, three connectors in this step, not two. The front-facing camera and digitizer connector (Step 11) is really difficult to align when you put it back. Took me about 15 minutes before I succeeded.
Now I have a different problem. Everything works just dandy, EXCEPT:
Towards the bottom of the screen (in portrait) there is a horizontal line that is dead to the touch. For example, on the keyboard, I can use the spacebar, but not C V B N M, etcetera.
Three possibilities in my mind: One, when I dropped it, something else besides the glass and digitizer, etc, was damaged.
Two: I did not replace the cables correctly. This seems unlikely. They all "clicked" into place and stayed there.
Three: The digitizer supplied is faulty.
Comments? Which cable/connector could be causing this -- if it is that?
Take apart, Clean Connections, Put back together.... If same problem sounds like a fault part...
duston -
When reassembling the iPhone 5c, I used the flat end of the spudger to press on the connectors and maintain them while replacing the front panel on the body of the iPhone.
The third and "deepest" connector no longer slips out of its socket, which it did before holding the whole lot with the spudger.
If the ESD plate covering the connectors is properly re-attached to the phone, you should not have to do this. The cover holds all the connectors in place just fine.
iBroke -
I replaced the display assembly to resolve an issue with the phone not responding to any touch input. I assumed it was a bad digitizer. However, I have the same problem with the new display assembly—no touch response at all. The phone starts up fine and the screen works, I just can’t “slide to unlock”. This is also preventing me from downloading photos from the phone since I can’t enter the passcode. I have cleaned the connections and reseated the cables. Is it possible this is a problem on the logic board? If so, is there any way to get the photos off the phone since I can’t enter the passcode on the screen?
-
-
-
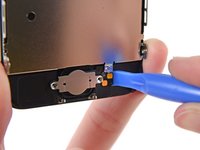
Enlevez le panneau frontal complet du boîtier arrière.
-
-
-
Retirez les deux vis cruciformes #000 de 1,3 mm qui maintiennent le cache du bouton home à l'écran.
Ok the screw are just the 2 highlighted in red. Note that if you fix them too tight the button will lose some space. I suggest to fix them tight and then to unscrew them of 180° just to remove some pressure. Then try the home button movement: if it’s ok go ahead otherwise if it has no freedom to move unscrew again a little bit
-
-
-
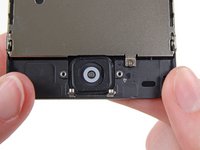
A l'aide d'un outil en plastique, faites levier sur le bord de la nappe du bouton home pour l'extraire de l'écran.
-
Commencez par les points de contact sur la droite et procédez vers la gauche.
If you have an iOpener, I STRONGLY suggest placing it on top to loosen the glue. Once I heated the surface, it came off with little difficulty.
-
-
-
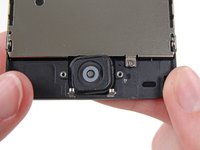
Retirez la nappe du bouton home de l'écran.
Wenn der Home Button nach dem Austausch immer noch nicht funktioniert, sollte man sich die beiden kleinen Kontakte anschauen, die auf der Platine an einem Flachbandkabel sind und auf die in dieser Anleitung zu sehenden messingfarbenen Kontakte drücken. Ist einer dieser beiden Kontakte defekt, muss man den Lightning Anschluss ersetzen. Kostet zwar unter 5€, ist aber ziemlich aufwändig, da der Akku ausgebaut werden muss.
-
-
-
En poussant délicatement, éloignez le coin supérieur droit du bouton home de l'écran.
-
-
-
Décollez le bouton home de l'écran en faisant délicatement levier avec une spatule (spudger).
Note that under the home button is a very thin adhesive “gasket” that attaches the button to the screen. The home button can easily separate from this adhesive band. If you are not careful you stretch or break it. I used heat fron a hair dryer to loosen it and get it off with the home button.
-


Pour remonter votre appareil, suivez les étapes dans l'ordre inverse.
Pour remonter votre appareil, suivez les étapes dans l'ordre inverse.
Annulation : je n'ai pas terminé ce tutoriel.
112 autres ont terminé cette réparation.
Merci à ces traducteurs :
100%


Ces traducteurs nous aident réparer le monde ! Vous voulez contribuer ?
Commencez à traduire ›

