Aller au contenu principal

Replacing Motorola Photon Q 4G LTE Front Glass Digitizer

Ce dont vous avez besoin

  1. Replacing Motorola Photon Q 4G LTE Front Glass Digitizer, Front Glass Digitizer: étape 1, image 1 de 2 Replacing Motorola Photon Q 4G LTE Front Glass Digitizer, Front Glass Digitizer: étape 1, image 2 de 2
    • Use the pry tool around edges of case where keyboard is located to take the back cover off. Be careful not to break the cover where the SD card slot is; the cover is very thin and fragile in that area. (I broke mine.)

  2. Replacing Motorola Photon Q 4G LTE Front Glass Digitizer: étape 2, image 1 de 3 Replacing Motorola Photon Q 4G LTE Front Glass Digitizer: étape 2, image 2 de 3 Replacing Motorola Photon Q 4G LTE Front Glass Digitizer: étape 2, image 3 de 3
    • Remove the black screws around the outer edges and the 4 silver screws. (You'll find a silver screw on each side of the vibrator motor and on each side of the rear camera.)

  3. Replacing Motorola Photon Q 4G LTE Front Glass Digitizer: étape 3, image 1 de 1
    • Now remove the circuit board's protective cover (the one you just unscrewed) by lifting it gently from the top. Three tabs need to be unclipped using the pry tool. Unclip at least 2 of the 3 clips and final tab should loosen on its own.

  4. Replacing Motorola Photon Q 4G LTE Front Glass Digitizer: étape 4, image 1 de 1
    • Now remove the 2 big silver screws in the battery ribbon cable that is attached to the circut board...

    • take pry tool and slide underneath the battery very very gently being careful not to damage the components underneath and gently lift up until the battery comes loose..Adhesive is whats under battery holding it scurely to circut board. ?

  5. Replacing Motorola Photon Q 4G LTE Front Glass Digitizer: étape 6, image 1 de 1
    • remove the one silver screw in the center of the circuit board which is holding it down

    • now remove the keyboard from the front LCD screen by slowly lifting the two apart and and remove snap on ribbon cables that are holding it LCD screen to keyboard

  6. Replacing Motorola Photon Q 4G LTE Front Glass Digitizer: étape 8, image 1 de 1
    • Remove the 7 screws ont the outer edge of the back lcd display

  7. Replacing Motorola Photon Q 4G LTE Front Glass Digitizer: étape 9, image 1 de 1
    • remove the back plate to the LCD screen being careful not to tear the ribbon cables and slide them through the slot.. then set it aside

  8. Replacing Motorola Photon Q 4G LTE Front Glass Digitizer: étape 10, image 1 de 1
    • remove the 3 screws that hold the top circuit board to the phone

  9. Replacing Motorola Photon Q 4G LTE Front Glass Digitizer: étape 11, image 1 de 1
    • remove the rubber on the back of digitizer and transfer it over to the new digitizer make sure to use a heat gun to eat the adhesive on the backside of rubber to get off easily

  10. Replacing Motorola Photon Q 4G LTE Front Glass Digitizer: étape 12, image 1 de 1
    • slowly pulled the speaker away from digitizer and transfer that over to your new digitizer is well.. be careful not to break your speaker I broke mine mine came apart and now it doesn't work at is my phone in speaker phone keep that in mind

  11. Replacing Motorola Photon Q 4G LTE Front Glass Digitizer, Attatching new digitizer: étape 13, image 1 de 3 Replacing Motorola Photon Q 4G LTE Front Glass Digitizer, Attatching new digitizer: étape 13, image 2 de 3 Replacing Motorola Photon Q 4G LTE Front Glass Digitizer, Attatching new digitizer: étape 13, image 3 de 3
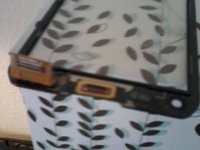
    • now get your new digitizer and take the plastic protective covering of it and put your rubber adhesive on new digitizer screen and put digitizer on phone and slide the ribbon cable through the slot provided and a attach ribbon cable to circut board

  12. Replacing Motorola Photon Q 4G LTE Front Glass Digitizer: étape 14, image 1 de 1
    • reverse all the steps to put your phone back together and then you have a new phone

Conclusion

To reassemble your device, follow these instructions in reverse order.

5 autres ont terminé cette réparation.

Braden Woods

Membre depuis le 04/05/14

247 Réputation

1 tutoriel rédigé

Équipe

Apple Service Centre Membre de l'équipe Apple Service Centre

Community

35 membres

23 tutoriels rédigés

0 commentaires

Ajouter un commentaire

Nombre de vues :

Dernières 24 heures : 1

7 derniers jours : 7

30 derniers jours : 29

Total : 5,504