Aller au contenu principal
Smartab STJR700 Charging Port Replacement

Smartab STJR700 Charging Port Replacement

Thi Le

Thi Le et 4 autres contributeurs

Dernière mise à jour le May 7, 2024

1 heure
Modérée
Découpez pour améliorer

This guide will show you how to replace the charging port in a Smartab STJR700 tablet. After determining all options have been attempted and the tablet still doesn't charge, then refer to this repair guide. Prior to fixing the device, ensure that there aren't any other hardware issues. Hardware issues include damages in the charger and faulty battery.

Ce dont vous avez besoin

Outils

Afficher plus…

  1. Smartab STJR700 Charging Port Replacement, Charging Port: étape 1, image 1 de 1
    • Power off the device by holding down the lock button. Remove the case from the tablet and place it face down.

  2. Smartab STJR700 Charging Port Replacement: étape 2, image 1 de 1
    • Unscrew all four corner screws using the PH000 screwdriver head found in the iFixit kit.

  3. Smartab STJR700 Charging Port Replacement: étape 3, image 1 de 1
    • CAUTION: Avoid touching the display.

    • Pry open the tablet using a metal spudger. Set aside the back panel.

  4. Smartab STJR700 Charging Port Replacement: étape 4, image 1 de 1
    • Locate the charging port.

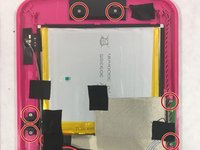
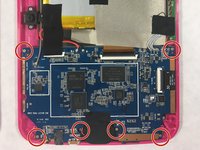
  5. Smartab STJR700 Charging Port Replacement: étape 5, image 1 de 2 Smartab STJR700 Charging Port Replacement: étape 5, image 2 de 2
    • Unscrew all the labeled screws using the PH000 screwdriver head.

  6. Smartab STJR700 Charging Port Replacement: étape 6, image 1 de 1
    Outil utilisé dans cette étape :
    Tweezers
    $4.99
    • Remove all pieces of tape using the tweezers provided in the iFixit kit.

    • Remove the two ribbon cables affixed to the camera.

  7. Smartab STJR700 Charging Port Replacement: étape 7, image 1 de 1
    • Remove the motherboard component from the screen and display.

    • Because the charging port is soldered onto the motherboard, the motherboard must be replaced by one specifically made for the Smartab STJR700.

Conclusion

To reassemble your device, follow these instructions in reverse order.

Thi Le

Membre depuis le 03/08/17

101 Réputation

1 tutoriel rédigé

Équipe

UMass Dartmouth, Team S3-G4, Botvin Spring 2017 Membre de l'équipe UMass Dartmouth, Team S3-G4, Botvin Spring 2017

UMASSD-BOTVIN-S17S3G4

4 membres

5 tutoriels rédigés

0 commentaires de tutoriel

Ajouter un commentaire

Nombre de vues :

Dernières 24 heures : 1

7 derniers jours : 1

30 derniers jours : 3

Total : 1,014