
TECHUP Bluetooth Speaker Motherboard Replacement
Introduction
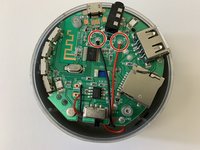
Passez à l'étape 1This guide will cover the replacement of the motherboard in a TECHUP Bluetooth speaker; model No. AR456.
If your TECHUP Bluetooth speaker has recently lost functionality, it is likely the motherboard is at fault. This guide will take you through how to replace the motherboard step-by-step. This process will involve disconnecting the internal battery, and although this device runs on low-power, there is a shock hazard anytime you are working with open wires from a battery. Take care when soldering/desoldering the battery wires.
If you do not know how to solder, you may use this guide.
Ce dont vous avez besoin


-
-
Pry the foam buffer from the speaker using a nylon spudger or flathead screwdriver (pictured).
-
-


To reassemble your device, follow these instructions in reverse order.
To reassemble your device, follow these instructions in reverse order.
Annulation : je n'ai pas terminé ce tutoriel.
4 autres ont terminé cette réparation.
Équipe

University of North Texas, Team 2-3, Raign Fall 2021 Membre de l'équipe University of North Texas, Team 2-3, Raign Fall 2021
UNT-RAIGN-F21S2G3
2 membres
2 tutoriels rédigés