Aller au contenu principal
Toshiba Satellite C675-S7106 Hard Drive Replacement

Toshiba Satellite C675-S7106 Hard Drive Replacement

Dinis Valcorba

Dinis Valcorba et 2 autres contributeurs

Dernière mise à jour le December 23, 2022

5 minutes
Facile
Tutoriel étudiant vedette

Faulty or corrupted storage drives can be the root of many computer issues. Replacing it is an especially simple process in this laptop - you’ll just need a PH0-head screwdriver.

Ce dont vous avez besoin

Outils

  • Phillips #0 Screwdriver
    Phillips #0 Screwdriver
  • Spudger
    Spudger
  1. Toshiba Satellite C675-S7106 Hard Drive Replacement, Battery: étape 1, image 1 de 1
    • Flip the laptop over, so that the "top" of the laptop is against your working surface.

    • Orient the laptop so that the silver label is in the bottom-left corner, with the battery facing you.

  2. Toshiba Satellite C675-S7106 Hard Drive Replacement: étape 2, image 1 de 2 Toshiba Satellite C675-S7106 Hard Drive Replacement: étape 2, image 2 de 2
    • On the right side of the battery, move the tab marked 1 to the right, unlocking the battery.

    • On the left side of the battery, hold the tab marked 2 to the left while pulling the battery towards you.

  3. Toshiba Satellite C675-S7106 Hard Drive Replacement, Hard Drive: étape 3, image 1 de 2 Toshiba Satellite C675-S7106 Hard Drive Replacement, Hard Drive: étape 3, image 2 de 2
    • Rotate the laptop so that the battery cavity faces away from you.

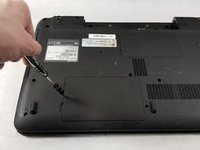
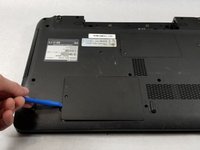
    • Remove the lower-left plastic panel by loosening the single PH0-head screw and prying it up with a plastic spudger.

    • The screw does not need to be completely removed, as it's permanently attached to the device.

  4. Toshiba Satellite C675-S7106 Hard Drive Replacement: étape 4, image 1 de 3 Toshiba Satellite C675-S7106 Hard Drive Replacement: étape 4, image 2 de 3 Toshiba Satellite C675-S7106 Hard Drive Replacement: étape 4, image 3 de 3
    • Remove the existing drive by sliding it towards the left until it's disconnected, and then lift it out of the device.

Conclusion

To reassemble your device, follow these instructions in reverse order.

Une autre personne a terminé cette réparation.

Dinis Valcorba

Membre depuis le 03/26/19

292 Réputation

3 tutoriels rédigés

Équipe

UMass Dartmouth, Team S1-G2, Simcock Spring 2019 Membre de l'équipe UMass Dartmouth, Team S1-G2, Simcock Spring 2019

UMASSD-SIMCOCK-S19S1G2

3 membres

12 tutoriels rédigés

0 commentaires

Ajouter un commentaire

Nombre de vues :

Dernières 24 heures : 0

7 derniers jours : 0

30 derniers jours : 2

Total : 416