Aller au contenu principal

Toshiba Satellite L305D-S5900 Optical Drive (Disk Drive) Replacement

Ce dont vous avez besoin

  1. Toshiba Satellite L305D-S5900 Optical Drive (Disk Drive) Replacement, Optical Drive (Disk Drive): étape 1, image 1 de 1
    • Power off your laptop before beginning disassembly.

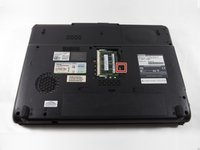
    • The 5.3 mm Phillips #1 screw boxed in red is located at the center on the underside of the computer.

  2. Toshiba Satellite L305D-S5900 Optical Drive (Disk Drive) Replacement: étape 2, image 1 de 2 Toshiba Satellite L305D-S5900 Optical Drive (Disk Drive) Replacement: étape 2, image 2 de 2
    • Remove the panel that houses the RAM chips by removing the screw that secures it into its spot.

  3. Toshiba Satellite L305D-S5900 Optical Drive (Disk Drive) Replacement: étape 3, image 1 de 2 Toshiba Satellite L305D-S5900 Optical Drive (Disk Drive) Replacement: étape 3, image 2 de 2
    • The 5.3 mm Phillips #1 screw boxed in red is located on the right panel that house the RAM on the underside of the computer.

    • Remove the screw securing the drive on the plastic edge.

  4. Toshiba Satellite L305D-S5900 Optical Drive (Disk Drive) Replacement: étape 4, image 1 de 1
    • Use a screwdriver or a metal spludgers to push the metal piece attached to the drive in the direction of the drive opens until the drive pops out of its socket.

  5. Toshiba Satellite L305D-S5900 Optical Drive (Disk Drive) Replacement: étape 5, image 1 de 1
    • Fully remove the drive by pulling it all the way out of its socket.

Conclusion

To reassemble your device, follow these instructions in reverse order.

Sing Yang Cheng

Membre depuis le 10/20/16

501 Réputation

5 tutoriels rédigés

Équipe

UMass Dartmouth, Team 3-6, Isaacson Fall 2016 Membre de l'équipe UMass Dartmouth, Team 3-6, Isaacson Fall 2016

UMASSD-ISAACSON-F16S3G6

2 membres

10 tutoriels rédigés

0 commentaires

Ajouter un commentaire

Nombre de vues :

Dernières 24 heures : 0

7 derniers jours : 1

30 derniers jours : 2

Total : 617