Aller au contenu principal
Toshiba Satellite L45-S7423 Optical Drive Replacement

Toshiba Satellite L45-S7423 Optical Drive Replacement

Stephen Sippel

Stephen Sippel et 4 autres contributeurs

Dernière mise à jour le June 14, 2023

5 - 10 minutes
Modérée
Tutoriel étudiant vedette

The optical drive reads the CD/DVD when inserted into the laptop. It is not unusual for the optical drive to go stop working or malfunction as there are numerous moving parts. This device is designed to be easily replaced in the case it does malfunction.

Ce dont vous avez besoin

Outils

  • Phillips #00 Screwdriver
    Phillips #00 Screwdriver
  • Spudger
    Spudger
  1. Toshiba Satellite L45-S7423 Optical Drive Replacement, Battery: étape 1, image 1 de 3 Toshiba Satellite L45-S7423 Optical Drive Replacement, Battery: étape 1, image 2 de 3 Toshiba Satellite L45-S7423 Optical Drive Replacement, Battery: étape 1, image 3 de 3
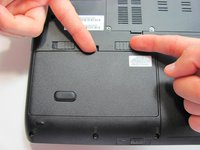
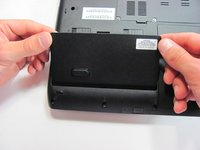
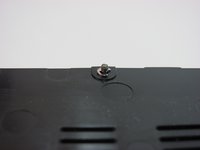
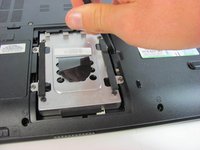
    • Make sure the battery lock switch is switched to the unlocked position.

    • The battery is unlocked when the battery lock switch is slid to the side with an image of an unlocked lock.

  2. Toshiba Satellite L45-S7423 Optical Drive Replacement: étape 2, image 1 de 2 Toshiba Satellite L45-S7423 Optical Drive Replacement: étape 2, image 2 de 2
    • Slide the battery release switch to the left.

    • The switch is spring loaded, so you must hold the switch in place while removing the battery.

  3. Toshiba Satellite L45-S7423 Optical Drive Replacement: étape 3, image 1 de 2 Toshiba Satellite L45-S7423 Optical Drive Replacement: étape 3, image 2 de 2
    • Using a finger, lift up the battery.

    • The battery release switch must be held in place.

  4. Toshiba Satellite L45-S7423 Optical Drive Replacement, Optical Drive: étape 4, image 1 de 3 Toshiba Satellite L45-S7423 Optical Drive Replacement, Optical Drive: étape 4, image 2 de 3 Toshiba Satellite L45-S7423 Optical Drive Replacement, Optical Drive: étape 4, image 3 de 3
    • Remove the two screws holding the hard drive panel down.

    • These screw are permanently fastened to the panel; they are designed to be removed only partially.

  5. Toshiba Satellite L45-S7423 Optical Drive Replacement: étape 5, image 1 de 1
    • Use a finger to lift up on the tab and remove the panel.

  6. Toshiba Satellite L45-S7423 Optical Drive Replacement: étape 6, image 1 de 2 Toshiba Satellite L45-S7423 Optical Drive Replacement: étape 6, image 2 de 2
    • Remove the screw that holds in place the optical drive.

    • One 4.6 mm Phillips screw.

  7. Toshiba Satellite L45-S7423 Optical Drive Replacement: étape 7, image 1 de 2 Toshiba Satellite L45-S7423 Optical Drive Replacement: étape 7, image 2 de 2
    • Locate the small rectangular hole and insert the spudger.

    • Gently slide the metal flange to the right to dislodge the optical drive.

  8. Toshiba Satellite L45-S7423 Optical Drive Replacement: étape 8, image 1 de 1
    • The optical drive will become partially exposed.

  9. Toshiba Satellite L45-S7423 Optical Drive Replacement: étape 9, image 1 de 2 Toshiba Satellite L45-S7423 Optical Drive Replacement: étape 9, image 2 de 2
    • Pull the optical drive to remove it from the computer body.

Conclusion

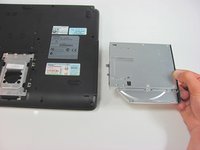
To reassemble your device, follow these instructions in reverse order.

Stephen Sippel

Membre depuis le 04/16/13

194 Réputation

9 tutoriels rédigés

Équipe

Cal Poly, Team 21-54, Johann Spring 2013 Membre de l'équipe Cal Poly, Team 21-54, Johann Spring 2013

CPSU-JOHANN-S13S21G54

4 membres

18 tutoriels rédigés

0 commentaires

Ajouter un commentaire

Nombre de vues :

Dernières 24 heures : 0

7 derniers jours : 0

30 derniers jours : 2

Total : 920