Aller au contenu principal

Toshiba Satellite L455-S5975 Logic Board Replacement

Ce dont vous avez besoin

  1. Toshiba Satellite L455-S5975 Logic Board Replacement, Keyboard: étape 1, image 1 de 2 Toshiba Satellite L455-S5975 Logic Board Replacement, Keyboard: étape 1, image 2 de 2
    • Before repairing your laptop, power down the system, disconnect the charger if necessary and remove the battery.

    • Use the flat edge of the plastic opening tool to pry open the narrow plastic strip above the keyboard.

  2. Toshiba Satellite L455-S5975 Logic Board Replacement: étape 2, image 1 de 1
    • Remove the three 3mm screws with a Phillips#00 Screwdriver.

  3. Toshiba Satellite L455-S5975 Logic Board Replacement: étape 3, image 1 de 1
    • Lift the keyboard away from the top side of the laptop.

    • Do not pull the keyboard away too hard. It is still connected by the fragile ribbon cable (shown in the red square).

  4. Toshiba Satellite L455-S5975 Logic Board Replacement: étape 4, image 1 de 2 Toshiba Satellite L455-S5975 Logic Board Replacement: étape 4, image 2 de 2
    • Disconnect the keyboard cable that is still attached to the keyboard.

    • Unlatch the fastener.

    • Using your hands, pull the keyboard connector out, not up.

  5. Toshiba Satellite L455-S5975 Logic Board Replacement, Fan: étape 5, image 1 de 2 Toshiba Satellite L455-S5975 Logic Board Replacement, Fan: étape 5, image 2 de 2
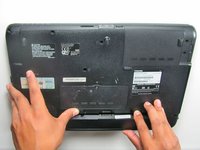
    • Flip the laptop over to access the battery.

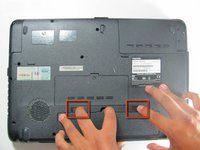
    • Remove the battery by sliding fingers away from each other and lifting up the tab at the same time.

  6. Toshiba Satellite L455-S5975 Logic Board Replacement: étape 6, image 1 de 1
    • Remove the twelve 10mm screws with a Phillips #00 screwdriver.

    • Remove the cover over the hard drive (upper right in photo) and remove the four 10mm screws at the four corners.

  7. Toshiba Satellite L455-S5975 Logic Board Replacement: étape 7, image 1 de 1
    • Remove the three 4mm screws with a Phillips #00 screwdriver.

  8. Toshiba Satellite L455-S5975 Logic Board Replacement: étape 8, image 1 de 1
    • Flip the laptop over so it's in the right-side-up position.

    • Lift the grey plastic casing up and unhook any wires attached to the casing.

    • Remove the five 10mm screws, each with a label 'F10' next to them.

  9. Toshiba Satellite L455-S5975 Logic Board Replacement: étape 9, image 1 de 2 Toshiba Satellite L455-S5975 Logic Board Replacement: étape 9, image 2 de 2
    • Disconnect the flat thin wire connecting the track pad to the motherboard by pulling it straight out.

    • Disconnect the thin red wire on the right side of the motherboard.

  10. Toshiba Satellite L455-S5975 Logic Board Replacement: étape 10, image 1 de 1
    • Remove the two 6mm screws with a Phillips #00 screwdriver.

  11. Toshiba Satellite L455-S5975 Logic Board Replacement: étape 11, image 1 de 2 Toshiba Satellite L455-S5975 Logic Board Replacement: étape 11, image 2 de 2
    • Disconnect the red and yellow wires connecting the fan to the motherboard by pulling the wires straight out.

    • Remove the fan.

  12. Toshiba Satellite L455-S5975 Logic Board Replacement, Logic Board: étape 12, image 1 de 1
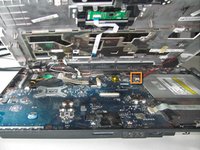
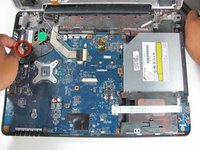
    • Remove the following with a Phillips #00 Screwdriver:

    • Six 7mm Phillips Head screws

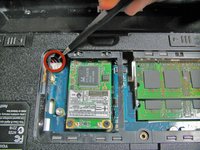
    • One 5 mm Phillips Head screw

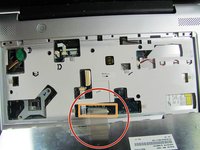
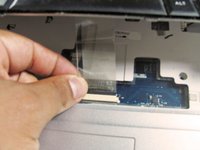
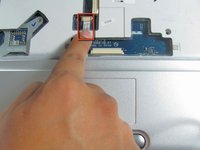
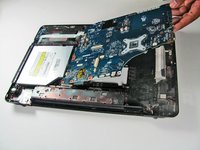
    • Remove the LCD screen tab

  13. Toshiba Satellite L455-S5975 Logic Board Replacement: étape 13, image 1 de 2 Toshiba Satellite L455-S5975 Logic Board Replacement: étape 13, image 2 de 2
    • A red wire connects the motherboard to the computer, so release the wire by pulling it straight out.

    • After all the screws are removed, lift the motherboard up and away from the earphone jacks that are located at the front of the laptop.

Conclusion

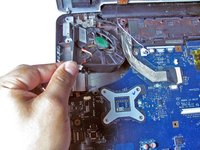
To reassemble your device, follow these instructions in reverse order.

Une autre personne a terminé cette réparation.

Mike Kennedy

Membre depuis le 04/18/13

160 Réputation

4 tutoriels rédigés

Équipe

Cal Poly, Team 2-21, Maness Spring 2013 Membre de l'équipe Cal Poly, Team 2-21, Maness Spring 2013

CPSU-MANESS-S13S2G21

4 membres

5 tutoriels rédigés

0 commentaires

Ajouter un commentaire

Nombre de vues :

Dernières 24 heures : 0

7 derniers jours : 3

30 derniers jours : 8

Total : 3,036