Aller au contenu principal

iMac G4 17 800 MHz EMC 1936 PRAM Battery Replacement

Ce dont vous avez besoin

  1. iMac G4 17 800 MHz EMC 1936 PRAM Battery Replacement, Bottom Plate: étape 1, image 1 de 1
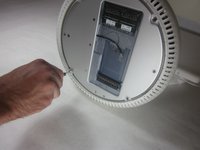
    • Unplug all the cables from the computer, including the power cable. Lay the computer face-down, supporting the neck and base with a soft cloth under the screen.

  2. iMac G4 17 800 MHz EMC 1936 PRAM Battery Replacement: étape 2, image 1 de 1
    • Loosen the four Phillips #0 screws.

  3. iMac G4 17 800 MHz EMC 1936 PRAM Battery Replacement: étape 3, image 1 de 1
    • Carefully remove the base access panel.

  4. iMac G4 17 800 MHz EMC 1936 PRAM Battery Replacement, Bottom Plate Housing: étape 4, image 1 de 2 iMac G4 17 800 MHz EMC 1936 PRAM Battery Replacement, Bottom Plate Housing: étape 4, image 2 de 2
    • Remove the four 25mm T-15 screws.

  5. iMac G4 17 800 MHz EMC 1936 PRAM Battery Replacement: étape 5, image 1 de 2 iMac G4 17 800 MHz EMC 1936 PRAM Battery Replacement: étape 5, image 2 de 2
    • Open the housing plate.

    • Be gentle with the wires still connected to the logic board so as not to ruin the cables.

    • A fixed plug connector between the logic board and upper unit will cause some resistance. Pull gently but firmly.

  6. iMac G4 17 800 MHz EMC 1936 PRAM Battery Replacement, PRAM Battery: étape 6, image 1 de 2 iMac G4 17 800 MHz EMC 1936 PRAM Battery Replacement, PRAM Battery: étape 6, image 2 de 2
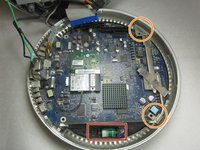
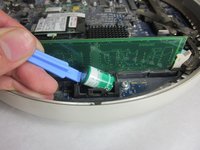
    • Gently remove the battery from its holder using the plastic opening tool.

    • Insert new battery.

    • Clean and re-apply thermal paste to the heat sink areas circled in orange. See Step 15 in iMac G4 17" Model M9168LLA Hard Drive Replacement for better photos and description.

Conclusion

To reassemble your device, follow these instructions in reverse order.

10 autres ont terminé cette réparation.

Justin

Membre depuis le 10/05/11

303 Réputation

3 tutoriels rédigés

Équipe

Cal Poly, Team 21-22, Maness Fall 2011 Membre de l'équipe Cal Poly, Team 21-22, Maness Fall 2011

CPSU-MANESS-F11S21G22

4 membres

13 tutoriels rédigés

7 commentaires

We are not allowed to use screwdrivers to pry open stuff. Unfortunately, that is exactly what we did in step 6 of Dissasembling the back up battery

David Hunter - Réponse

Don't you need to replace the thermal paste?

adoug27 - Réponse

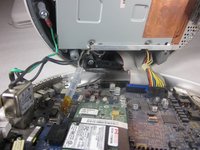
Yes you do in the areas circled in orange. I'd also recommend changing the paste under the heatsink itself as that will probably be dried up.

yotoprules -

I love my very first Mac ever, it is still working. After a couple of time living with its amnesia (forgot time and what else…) I’ve decided to replace the battery. Thanks for this helpful article. It made it easy to me to replace the battery.

Roland Brezina - Réponse

Good guide ! less than 20 minutes to change the battery, cleaning the interior included !!

SURIN Dominique - Réponse

Ajouter un commentaire

Nombre de vues :

Dernières 24 heures : 4

7 derniers jours : 42

30 derniers jours : 147

Total : 11,356