Aller au contenu principal

Changement carte mère iMac Intel 27" Retina 5K 2020

Ce dont vous avez besoin

  1. Changement carte mère iMac Intel 27" Retina 5K 2020, Poser la cale de maintien pour iMac: étape 1, image 1 de 1
  2. Changement carte mère iMac Intel 27" Retina 5K 2020, Insérer l'outil pour ouvrir: étape 2, image 1 de 3 Changement carte mère iMac Intel 27" Retina 5K 2020, Insérer l'outil pour ouvrir: étape 2, image 2 de 3 Changement carte mère iMac Intel 27" Retina 5K 2020, Insérer l'outil pour ouvrir: étape 2, image 3 de 3
    • En commençant à gauche de l'écran, à côté du bouton de marche, insérez l'outil pour ouvrir l'iMac dans l'espace entre la vitre frontale et le boîtier arrière.

    • Le picot de l'outil pour ouvrir vous empêchera d'enfoncer la roue trop profondément. Si vous utilisez un outil différent, enfoncez-le de seulement 9,5 mm dans l'écran. Vous risquez d'endommager les câbles d'antenne et de causer des dégâts sérieux si vous allez au-delà.

  3. Changement carte mère iMac Intel 27" Retina 5K 2020, Trancher l'adhésif: étape 3, image 1 de 3 Changement carte mère iMac Intel 27" Retina 5K 2020, Trancher l'adhésif: étape 3, image 2 de 3 Changement carte mère iMac Intel 27" Retina 5K 2020, Trancher l'adhésif: étape 3, image 3 de 3
    • Utilisez l'outil comme une roulette à pizza. Faites-le rouler le long de la rainure pour couper la mousse adhésive entre le châssis et l'écran.

    • Veillez à ce que la roulette soit toujours devant quand vous appuyez. Sinon, elle risque de sortir du manche.

    • Parcourez le côté gauche de l'écran avec votre outil.

  4. Changement carte mère iMac Intel 27" Retina 5K 2020, Finir de trancher l'adhésif: étape 4, image 1 de 3 Changement carte mère iMac Intel 27" Retina 5K 2020, Finir de trancher l'adhésif: étape 4, image 2 de 3 Changement carte mère iMac Intel 27" Retina 5K 2020, Finir de trancher l'adhésif: étape 4, image 3 de 3
    • Faites à présent le tour du coin supérieur gauche avec la roulette.

  5. Changement carte mère iMac Intel 27" Retina 5K 2020: étape 5, image 1 de 2 Changement carte mère iMac Intel 27" Retina 5K 2020: étape 5, image 2 de 2
    • Commencez à couper l'adhésif le long du bord supérieur gauche de l'écran.

  6. Changement carte mère iMac Intel 27" Retina 5K 2020: étape 6, image 1 de 2 Changement carte mère iMac Intel 27" Retina 5K 2020: étape 6, image 2 de 2
    • Parcourez le bord supérieur de l'écran avec votre outil.

    • Il vous faudra peut-être faire plusieurs allers-retours pour vous assurer d'avoir coupé le plus d'adhésif possible.

  7. Changement carte mère iMac Intel 27" Retina 5K 2020: étape 7, image 1 de 3 Changement carte mère iMac Intel 27" Retina 5K 2020: étape 7, image 2 de 3 Changement carte mère iMac Intel 27" Retina 5K 2020: étape 7, image 3 de 3
    • Faites passer votre outil autour du coin supérieur droit de l'écran.

  8. Changement carte mère iMac Intel 27" Retina 5K 2020: étape 8, image 1 de 2 Changement carte mère iMac Intel 27" Retina 5K 2020: étape 8, image 2 de 2
    • Puis descendez le long du bord droit de l'écran.

  9. Changement carte mère iMac Intel 27" Retina 5K 2020: étape 9, image 1 de 2 Changement carte mère iMac Intel 27" Retina 5K 2020: étape 9, image 2 de 2
    • Arrêtez-vous en bas du côté droit de l'écran.

    • Nous vous conseillons de refaire à présent tout le tour de l'écran pour vous assurer de couper autant d'adhésif que possible.

  10. Changement carte mère iMac Intel 27" Retina 5K 2020: étape 10, image 1 de 3 Changement carte mère iMac Intel 27" Retina 5K 2020: étape 10, image 2 de 3 Changement carte mère iMac Intel 27" Retina 5K 2020: étape 10, image 3 de 3
    Outil utilisé dans cette étape :
    Plastic Cards
    $2.99
    J'achète
    • Même si l'outil pour ouvrir a coupé la plus grande partie de l'adhésif, l'écran adhère peut-être encore légèrement au boîtier. Une carte en plastique sera nécessaire pour finir de le décoller.

    • Posez l'iMac sur une table, l'écran vers le haut.

    • Introduisez une carte en plastique entre l'écran et le châssis, dans le coin supérieur droit de l'iMac.

    • Faites attention à ne pas enfoncer la carte de plus de 9,5 mm. Vous risquez sinon d'endommager les composants internes.

  11. Changement carte mère iMac Intel 27" Retina 5K 2020: étape 11, image 1 de 2 Changement carte mère iMac Intel 27" Retina 5K 2020: étape 11, image 2 de 2
    • Faites délicatement pivoter la carte en plastique de côté pour ouvrir un espace entre l'écran et le châssis et finir de trancher l'adhésif à côté du coin.

    • Si vous forcez, vous risquez de fissurer la vitre. Progressez soigneusement et n'essayez pas de créer un espace de plus de 6 mm.

  12. Changement carte mère iMac Intel 27" Retina 5K 2020: étape 12, image 1 de 3 Changement carte mère iMac Intel 27" Retina 5K 2020: étape 12, image 2 de 3 Changement carte mère iMac Intel 27" Retina 5K 2020: étape 12, image 3 de 3
    • Veillez à vous arrêter avant la caméra iSight, car vous risqueriez de l'endommager.

    • Faites glisser la carte vers le milieu de l'écran pour trancher l'adhésif restant.

  13. Changement carte mère iMac Intel 27" Retina 5K 2020: étape 13, image 1 de 2 Changement carte mère iMac Intel 27" Retina 5K 2020: étape 13, image 2 de 2
    • Remettez votre carte dans le coin de départ et laissez-l'y afin d'éviter que l'adhésif recolle.

  14. Changement carte mère iMac Intel 27" Retina 5K 2020: étape 14, image 1 de 3 Changement carte mère iMac Intel 27" Retina 5K 2020: étape 14, image 2 de 3 Changement carte mère iMac Intel 27" Retina 5K 2020: étape 14, image 3 de 3
    • Introduisez une seconde carte dans l'espace entre l'écran et le châssis, à côté du coin supérieur gauche de l'iMac.

  15. Changement carte mère iMac Intel 27" Retina 5K 2020: étape 15, image 1 de 2 Changement carte mère iMac Intel 27" Retina 5K 2020: étape 15, image 2 de 2
    • Faites délicatement pivoter la carte pour agrandir légèrement l'espace entre l'écran et le châssis.

    • Comme de l'autre côté, soulevez lentement pour donner à l'adhésif le temps de céder et veillez à ne pas forcer sur la vitre de l'écran.

  16. Changement carte mère iMac Intel 27" Retina 5K 2020: étape 16, image 1 de 3 Changement carte mère iMac Intel 27" Retina 5K 2020: étape 16, image 2 de 3 Changement carte mère iMac Intel 27" Retina 5K 2020: étape 16, image 3 de 3
    • Faites glisser la carte vers le milieu et arrêtez-vous de nouveau juste avant la caméra iSight.

  17. Changement carte mère iMac Intel 27" Retina 5K 2020: étape 17, image 1 de 2 Changement carte mère iMac Intel 27" Retina 5K 2020: étape 17, image 2 de 2
    • Réinsérez la carte en plastique dans le coin supérieur gauche.

  18. Changement carte mère iMac Intel 27" Retina 5K 2020: étape 18, image 1 de 3 Changement carte mère iMac Intel 27" Retina 5K 2020: étape 18, image 2 de 3 Changement carte mère iMac Intel 27" Retina 5K 2020: étape 18, image 3 de 3
    • Saisissez les deux cartes insérées dans les coins et faites-les doucement pivoter pour agrandir l'espace entre l'écran et le boîtier.

    • Si l'adhésif semble coller à certains endroits, faites une pause et utilisez une des cartes pour couper l'adhésif restant.

    • Commencez à soulever le bord supérieur de l'écran du châssis.

    • Soulevez l'écran de seulement quelques centimètres. Les nappes d'alimentation et de données de l'écran sont toujours reliées à l'iMac.

  19. Changement carte mère iMac Intel 27" Retina 5K 2020, Déconnecter les nappes d'écran: étape 19, image 1 de 2 Changement carte mère iMac Intel 27" Retina 5K 2020, Déconnecter les nappes d'écran: étape 19, image 2 de 2
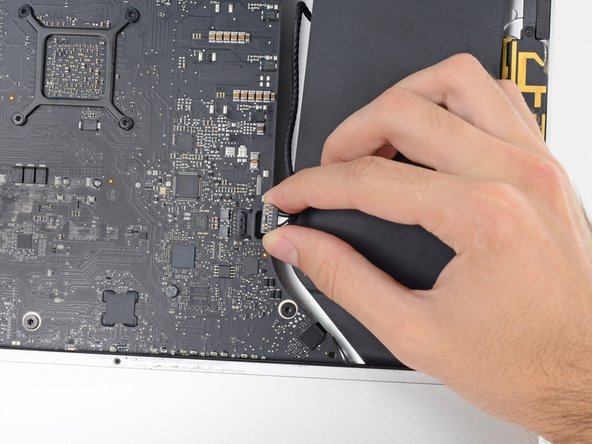
    • Tout en maintenant l'écran d'une main, servez-vous de l'autre pour débrancher la nappe d'alimentation de l'écran.

    • Soulevez l'écran de ce qu'il faut pour accéder facilement aux connecteurs, mais sans tendre les nappes et tirer sur leurs connexions (cela fait environ 20 cm).

    This is not a picture of the 2019 model. On the 2019, the cable is angled and very close to a metal part that looks like it could be a wireless card. This makes it difficult to squeeze in the edges required to release the cable. I was able to unfasten it using my fingernail, doing one side at a time.

    maccentric - Réponse

    Same issue. You can't just pull it out. I used a plastic "spudger" to push the clips in. The photo here shows where to press

    https://www.icloud.com/sharedalbum/#B0qG...

    See also my comment in step 20

    Bill4321 - Réponse

  20. Changement carte mère iMac Intel 27" Retina 5K 2020: étape 20, image 1 de 3 Changement carte mère iMac Intel 27" Retina 5K 2020: étape 20, image 2 de 3 Changement carte mère iMac Intel 27" Retina 5K 2020: étape 20, image 3 de 3
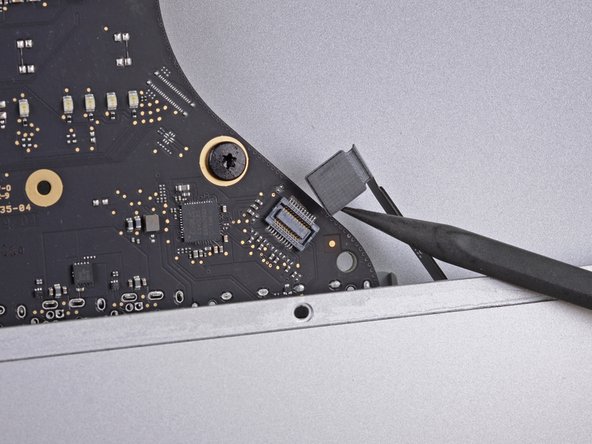
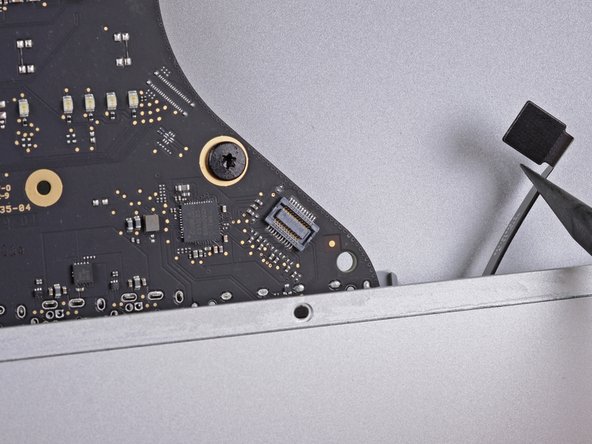
    • Retournez le clapet métallique qui verrouille la nappe de données de l'écran.

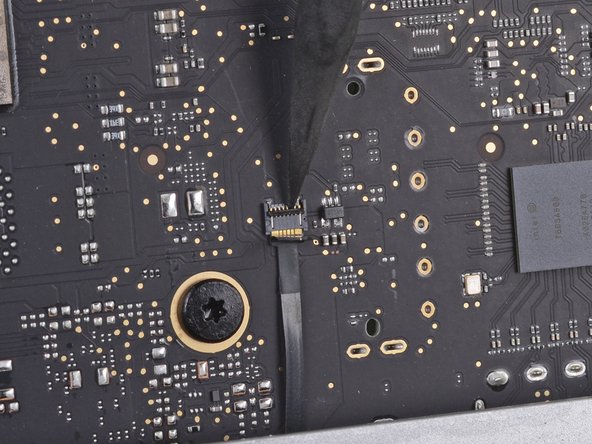
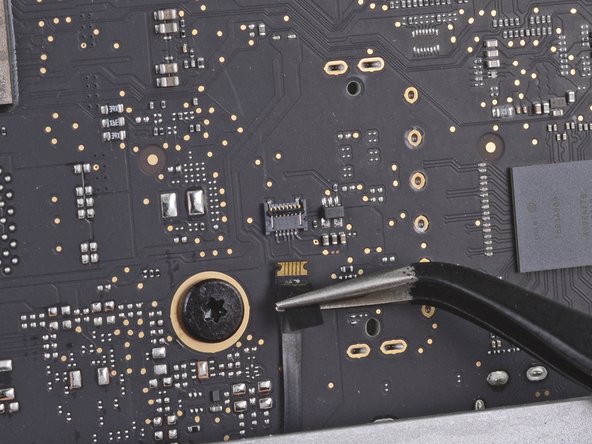
    • Débranchez la nappe de données de l'écran.

    • Il s'agit d'une connexion fragile qui se casse facilement. Veillez à tirer le connecteur tout droit hors de sa prise, vers le haut de l'iMac.

    on the 2020 model there is also a connector from the camera that is connected ted to the screen.

    Erwin Biermans - Réponse

    This isn't the photo of my IMac 27 2019.

    To remove this clip, lift up the plastic tag sticking down & the metal clip will lift too

    https://www.icloud.com/sharedalbum/#B0qG...

    Bill4321 - Réponse

  21. Changement carte mère iMac Intel 27" Retina 5K 2020, Soulever l'écran: étape 21, image 1 de 2 Changement carte mère iMac Intel 27" Retina 5K 2020, Soulever l'écran: étape 21, image 2 de 2
    • Soulevez l'écran presqu'à la verticale.

    • Une bande adhésive relie encore le bord inférieur de l'écran au châssis à la façon d'une charnière. Vous pouvez faire céder cet adhésif en baissant et relevant l'écran plusieurs fois.

  22. Changement carte mère iMac Intel 27" Retina 5K 2020, Finir de décoller l'adhésif: étape 22, image 1 de 3 Changement carte mère iMac Intel 27" Retina 5K 2020, Finir de décoller l'adhésif: étape 22, image 2 de 3 Changement carte mère iMac Intel 27" Retina 5K 2020, Finir de décoller l'adhésif: étape 22, image 3 de 3
    • Faites très attention à ne toucher ni les pattes de condensateur ni les joints de soudure visibles au dos du bloc d'alimentation (entouré en rouge).

    • Saisissez la petite languette au bout d'une des bandes adhésives en bas de l'écran et tirez-la vers le haut de l'iMac pour la décoller.

    • Recommencez pour décoller la seconde bande adhésive.

    • Si une des bandes se déchirent, prenez une carte en plastique pour trancher l'adhésif restant.

  23. Changement carte mère iMac Intel 27" Retina 5K 2020, Enlever l'écran: étape 23, image 1 de 3 Changement carte mère iMac Intel 27" Retina 5K 2020, Enlever l'écran: étape 23, image 2 de 3 Changement carte mère iMac Intel 27" Retina 5K 2020, Enlever l'écran: étape 23, image 3 de 3
    • Faites très attention en manipulant l'écran. Il est encombrant, lourd et en verre. Les bords sont fragiles. Éviter de le tenir dans les coins.

    • Soulevez l'écran du châssis et retirez-le de l'iMac. Posez-le à l'envers sur une surface plate et lisse.

    • Si nécessaire, soulevez-le lentement d'un côté pour défaire l'adhésif restant.

    • L'adhésif décollé ne peut plus être réutilisé pour recoller l'écran. Quand la réparation arrive à son terme, consultez le tutoriel adapté pour votre modèle pour remplacer les bandes adhésives qui fixent l'écran au boîtier arrière.

  24. Changement carte mère iMac Intel 27" Retina 5K 2020, Ôter le support de fixation: étape 24, image 1 de 2 Changement carte mère iMac Intel 27" Retina 5K 2020, Ôter le support de fixation: étape 24, image 2 de 2
    • Avec un tournevis cruciforme, ôtez les neuf vis de 3,2 mm qui fixent le support de fixation.

    • Vous devrez peut-être décoller l'adhésif qui parcourt le bord inférieur du boîtier de l'iMac, pour pouvoir accéder aux vis.

    These are new steps from when I did this on my late 2015 retina iMac so I believe step 25 and 26 are optional (you can cope without doing it).

    Amuseme - Réponse

    I did not find it necessary to remove these screws and this bar

    James Orwin - Réponse

    I lost these 8 during the reassemble. The manual tells I need eight 3.2mm screws.

    Can anyone help to clarify what screws I need. I don't really understand this size. Is this M2x3mm?

    Daniel - Réponse

  25. Changement carte mère iMac Intel 27" Retina 5K 2020: étape 25, image 1 de 1
    • Ôtez le support de fixation inférieur du boîtier de l'iMac.

    No comments on this ?

    It's quite possibly the most difficult part to put back in the entire process

    The screws are tiny and the there is no easy way to line up the holes on the bracket with the screws

    Having got this far - it wasn't even all that necessary to remove this part in the first place

    Severe pain in the neck

    Eoin - Réponse

    After an hour of painstaking mess - I managed to get 7 out of the 9 back in

    By that time I could care less about the remaining 2

    Eoin - Réponse

    With the right tools and technique, the bracket can easily be replaced in under a couple of minutes.

    Use a screwdriver with a magnetized tip which frees up one hand and place a screw on the tip first.

    Then line up the screw hole on just one end of the bracket and using a pair of tweezers from the side, hold the bracket in place while you put in the screw.

    Next, do the same on the other end of the bracket. After that, all of the screws in the middle are quick to replace. I didn't really have to touch the bracket again after the end screws were in place.

    Hope that helps someone else since removing this bracket does make later steps a bit easier.

    Max Z - Réponse

    I used Max Z tweezers technique but screwed one screw in at the end and then worked my way to the other end.

    Stephen B - Réponse

  26. Changement carte mère iMac Intel 27" Retina 5K 2020, Démonter le haut-parleur gauche: étape 26, image 1 de 1
    • Retirez les deux vis T10 de 10 mm.

    I found i didn’t need to remove the speaker nor the hard drive. In fact I managed to remove the old PSU without even removing the chin strap. However, to install the replacement PSU, I had to remove the chin strap. So I would say, remove the chin strap, but you can optionally leave the speaker and hard drive in.

    Cool_Breeze - Réponse

    While you do not need to fully remove the screws as once you loosen them a few turns the speaker becomes free. I found that after the removal of the speaker, I turned it over and popped the screws out as this made it easier to replace it later as I could see the alignment before putting the screws back in. If not you may be off a little and you do not want to force the screw back in.

    James Orwin - Réponse

    I used a pill container that I got from Walgreens to hold all of the fasteners I removed during the disassembly process. The container has 14 compartments (individual compartments for each morning and evening of the week). I put a small piece of paper in the compartment with the fasteners to note the name and step of the procedure and the size of the tool I used. Hopefully this will be useful when I go to put it back together again.

    Dan Smith - Réponse

  27. Changement carte mère iMac Intel 27" Retina 5K 2020: étape 27, image 1 de 3 Changement carte mère iMac Intel 27" Retina 5K 2020: étape 27, image 2 de 3 Changement carte mère iMac Intel 27" Retina 5K 2020: étape 27, image 3 de 3
    • Débranchez le câble du haut-parleur gauche de sa prise sur la carte mère.

    • Libérez le câble de l'interstice entre le disque dur et la carte mère.

    • Si l'espace entre la carte mère et le disque dur est trop étroit pour le câble du haut-parleur, déconnectez-le et laissez-le en place.

    I didn’t unplug and de-route this cable. Later, Step 29, has you remove the left speaker. This isn’t necessary. If you can just move the speaker over to expose the hard drive mounting screws, so if you’re not going to remove the speaker, you don’t need to unplug it.

    Anthony Zimmerman - Réponse

    on the 2019 iMac, it is horizontal not vertical so pull it horizontally out.

    tarex7 - Réponse

  28. Changement carte mère iMac Intel 27" Retina 5K 2020: étape 28, image 1 de 3 Changement carte mère iMac Intel 27" Retina 5K 2020: étape 28, image 2 de 3 Changement carte mère iMac Intel 27" Retina 5K 2020: étape 28, image 3 de 3
    • Veillez à ne pas toucher les soudures à l'arrière du bloc d'alimentation. Les condensateurs peuvent être chargés suffisamment pour provoquer une décharge électrique dangereuse.

    • À l'aide d'une spatule (spudger), débranchez le connecteur du bouton de mise sous tension de sa prise sur la carte mère.

    Can someone explain what are the solder joint? Or tell me what it looks it?

    brianyu - Réponse

    The silver spots on the circuit boards. You may not want to tackle this alone. If you touch these areas, you can possible get a shock -- harming you and your computer.

    Robert -

    there is no need to disconnect the speaker, just unscrew it and move aside slightly to reach the HDD screws (about 5mm) - if you want to replace just the main HDD

    Thomas Webb - Réponse

    Take note of exactly what direction this tiny little wire was.

    Joseph Ashe - Réponse

    The connector has a plain black side and the other side you can see the 2 silver connectors.. the side you can see the 2 silver connectors faces the front.. the plain side is to the back/against the logic board.

    paul.lynch1 -

    If I leave my iMac unplugged for an extended period, say 24 or 48 hours, is it still possible to get an electric shock from the PSU? Do the capacitors eventually discharge?

    Dominic Pettifer - Réponse

    you can do this method, or just wear latex gloves.

    Philip Sedlmair -

    make sure you’ve actually unplugged the mac when running this cable, and not had it plugged in to test the diagnostic LEDs, because one of those wee silver spots is carrying 230v, and its 6mm away from the place the cable runs, So if you have fat fingers like mine, that’s a free wake up zap

    flow in - Réponse

  29. Changement carte mère iMac Intel 27" Retina 5K 2020: étape 29, image 1 de 2 Changement carte mère iMac Intel 27" Retina 5K 2020: étape 29, image 2 de 2
    • Soulevez le haut-parleur gauche en le tenant droit jusqu'à ce que le câble du bouton de mise sous tension soit visible (environ 1,3 cm).

    This is MUCH easier to do if the support bracket along the bottom is removed first. See Changement carte mère iMac Intel 21,5" écran Retina 4K (2017) step 25.

    Use a P00.

    To replace it, introduce it like in the photo at the link to be able to hold the right most holes of the chassis and bracket. Replace the first screw, align the bracket to the horizontal and add the screws from right to left. Each one will bring up the next hole in the bracket close enough to screw through. Reverse those directions if you are a leftie.

    Andrew Gough - Réponse

  30. Changement carte mère iMac Intel 27" Retina 5K 2020: étape 30, image 1 de 3 Changement carte mère iMac Intel 27" Retina 5K 2020: étape 30, image 2 de 3 Changement carte mère iMac Intel 27" Retina 5K 2020: étape 30, image 3 de 3
    • Sortez doucement le câble du bouton de mise sous tension de sa rainure dans le haut-parleur gauche.

    Pay attention: if pulling out the loudspeaker tear off the wire of the power button, Apple have not any service parts except for the whole rear housing!

    Fabio Braga - Réponse

    This is MUCH easier to do if the support bracket along the bottom is removed first. See Changement carte mère iMac Intel 21,5" écran Retina 4K (2017) step 25.

    Use a P00.

    To replace it, introduce it like in the photo at the link to be able to hold the right most holes of the chassis and bracket. Replace the first screw, align the bracket to the horizontal and add the screws from right to left. Each one will bring up the next hole in the bracket close enough to screw through. Reverse those directions if you are a leftie.

    Andrew Gough - Réponse

  31. Changement carte mère iMac Intel 27" Retina 5K 2020: étape 31, image 1 de 3 Changement carte mère iMac Intel 27" Retina 5K 2020: étape 31, image 2 de 3 Changement carte mère iMac Intel 27" Retina 5K 2020: étape 31, image 3 de 3
    • Soulevez le haut-parleur droit en le tenant bien droit et sortez-le de l'iMac.

    • Si l'espace entre le disque dur et la carte mère était trop étroit pour détacher le câble du haut-parleur plus tôt, tirez-le doucement pendant que vous retirez le haut-parleur.

    • Appuyez sur l'extrémité du connecteur tout en tirant sur l'extrémité du haut-parleur, pour faire passer le câble sous le support droit du disque dur.

    I found it wasn't necessary to remove the speaker from the left side to remove the hard drive. You can remove the screws, and then slide it over to the left — giving more than enough room to access the hard drive.

    Robert - Réponse

    me too. don't need to remove it if you only want to change the hd

    Alber Einsten -

    Agreed, wast of time to fully remove the speaker.

    Matthew Gonzalez -

    It is difficult to remove the bottom of the speaker because it bends into the frame. Be careful to remove the power button cable, which also routes in a channel in the bottom of the speaker.

    Eric - Réponse

    easier to remove the speakers if you unscrew the front ‘chin strap’ - 6/9 phillips screws that you can see in the picture hold that aluminum piece in place

    flow in - Réponse

    Agree. This is MUCH easier to do if the support bracket along the bottom is removed first. See Changement carte mère iMac Intel 21,5" écran Retina 4K (2017) step 25.

    Use a P00.

    To replace it, introduce it like in the photo at the link to be able to hold the right most holes of the chassis and bracket. Replace the first screw, align the bracket to the horizontal and add the screws from right to left. Each one will bring up the next hole in the bracket close enough to screw through. Reverse those directions if you are a leftie.

    Andrew Gough -

    The trick with removing the left speaker is that you have to slide it up toward the top of the iMac (continuing to de-route the power button cable carefully as you go) to get it out from under the chin before you lift it up to remove it.

    ace - Réponse

  32. Changement carte mère iMac Intel 27" Retina 5K 2020, Retirer le bloc d'alimentation: étape 32, image 1 de 2 Changement carte mère iMac Intel 27" Retina 5K 2020, Retirer le bloc d'alimentation: étape 32, image 2 de 2
    • Lorsque vous manipulez le bloc d'alimentation, veillez à ne toucher ni les pattes des condensateurs ni les brasages exposés à l'arrière du bloc d'alimentation. Tenez-le toujours par les côtés.

    • Débranchez la nappe de commande de l'alimentation du bloc d'alimentation.

    I found this cable very difficult to disconnect, be very careful because the cable is between a black tape and it's stuck very hard to the logic board and the cable is very short and you don't have space to move and separate it from the connection! Be patient and take the time you need

    MrSchaeffer - Réponse

    I found than putting the flat end of the spudger at the center of the cable, and tilting it got the cable out without an issue.

    jimboom006 - Réponse

    I was able to use the flat end of the spudger on the sides. You can see a tiny little clip on each side. Be very gentle!

    Joseph Ashe - Réponse

    I simultaneously used the fingernails on my 2 index fingers to dislodge the tabs and continue to pull the cable out. It took a couple seconds.

    Eric - Réponse

    ultimately the trick for me was to just pull hard enough, but that part is the scariest part. any tips welcome

    Boris - Réponse

    These connectors seem pretty tough to remove until one understands the latch. Each side of the plug are two little sprung tabs (the tab is part of the spring clip which runs down the side of the plug on each side - makes sense once you see the removed plug!). Squeeze them in towards each other and then gently pull the plug from the socket. No great force, or even the spudger, needed once that is done.

    Pete Mackenzie - Réponse

    One more tip, has worked on other cables for me. Fish the skinniest spudger tip you have under the cable, and with a finger of your other hand put opposite pressure on the cable against the spudger and gently work it out

    Mike Fleming - Réponse

    If u are right handed, i can recomend to use your index left nail to press de bottom sprung, and a flat spudger on the right hand, came off so easy

    Davo Montiel - Réponse

    Davo Montiel's tip worked for me. Use the fingernail on your left index finger to press in the tab on the bottom side of the connector and with the right hand use a flat spudger to press in the tab on the top side of the connector.

    Dan Smith - Réponse

    If you have a insulated long nose pliers along with a splugger and can get underneath the cable WITH the long nose pliers on the RIGHT side of the cable, towards the logic board, with the splugger on the LEFT Side of the cable doing the same, you can get the leverage to GENTLY pull this cable out very easily.

    George Martinez - Réponse

  33. Changement carte mère iMac Intel 27" Retina 5K 2020: étape 33, image 1 de 1
    • Retirez les quatre vis suivantes (T8 ou T10 suivant le modèle exact de votre iMac) par lesquelles le bloc d'alimentation est fixée au boîtier arrière :

    • Deux vis de 23,7 mm

    • Deux vis de 7,3 mm

  34. Changement carte mère iMac Intel 27" Retina 5K 2020: étape 34, image 1 de 3 Changement carte mère iMac Intel 27" Retina 5K 2020: étape 34, image 2 de 3 Changement carte mère iMac Intel 27" Retina 5K 2020: étape 34, image 3 de 3
    • N'essayez pas de retirer complètement le bloc d'alimentation du boîtier, car il est encore relié à la carte mère par deux câbles.

    • Déplacez le bloc d'alimentation vers le bord gauche du boîtier et vers le haut pour le libérer de l'encoche dans la carte mère.

    This is MUCH easier to do if the support bracket along the bottom is removed first. See Changement carte mère iMac Intel 21,5" écran Retina 4K (2017) step 25.

    Use a P00.

    To replace it, introduce it like in the photo at the link to be able to hold the right most holes of the chassis and bracket. Replace the first screw, align the bracket to the horizontal and add the screws from right to left. Each one will bring up the next hole in the bracket close enough to screw through. Reverse those directions if you are a leftie.

    Andrew Gough - Réponse

    The top right screw on the power supply actually screws into a stand-off screw connected to the back of the iMac case. Once you have removed the 4 x Torx 8 or 10 screws you can move the power supply enough to see the upper face of it.

    It has a Torx 25 slot in it and comes out easily. This will give you a lot more room for your fingers in Step 40, depressing the tab on the DC power cable connector to pull it out, and when replacing it on reassembly. You may find it won’t require you removing the support bracket as in the suggestion above.

    John Blagden - Réponse

  35. Changement carte mère iMac Intel 27" Retina 5K 2020: étape 35, image 1 de 2 Changement carte mère iMac Intel 27" Retina 5K 2020: étape 35, image 2 de 2
    • Appuyez sur la languette sur le connecteur du câble d'alimentation CC, puis tirez-le tout droit hors de sa prise au dos de la carte mère.

    • Si le câble est trop difficile à déconnecter, vous pouvez retirer l'alimentation et la carte mère d'un bloc.

    Remember to push in the disconnect tab on the large connector. Carefully insert your finger and push on the tab before you pull on the connector.

    Manuel Collazo - Réponse

    Thank you Manuel, this was a tricky one.

    David Zemsky - Réponse

    Yes, I pulled the whole socket out because I didn’t know about the tab. Fortunately I was able to place it back in. Not sure if it was glued or how it was anchored but it seems to have a solid connection and I can’t easily pull it out by hand. Once I plug the power cable back in should be ok.

    P. Hisada - Réponse

    This connector was very difficult for me to remove (even after pushing the disconnect tab). Eventually I had to use a pair of needle nose pliers to wiggle it back and forth out of the socket. A lot of the cables on the my late 2015 model were very tight and a struggle to get out.

    Anthony Zimmerman - Réponse

    I'm struggling with this step. I presume that the tab to which you are referring is behind the connector. I can see a plastic protrusion there but it does not move when I push it. Just to get my finger behind it requires the power board to be moved quite a bit btw.

    Dave Sands - Réponse

    Pressing on the release on the back with my finger and at the same time using a needle nose pliers to wiggle the connector with my other hand worked for me.

    Kimbo M - Réponse

    i could not get it out by the force of my fingers, so what i did was slightly turn the imac 90 degrees so i could reach the area better, push up (so, vertically) the power control board, push in the tab on the bottom of the connector with my right hand, and slightly wiggle the connector out of its socket with a plier

    Boris - Réponse

    removing the chin strap (the front bit of metal running along the bottom of where the screen was) makes this much easier as you can rotate the board and get to the underside

    flow in - Réponse

    Left index finger pushing on the tab from behind the connector, using needle pliers in right hand to rock up & down did the trick thanks @starfleet_tone

    Frédérick Charette - Réponse

    Just be careful! I’ve seen two systems where the socket was pulled fully off! So the logic board then needs repairs or replacing being just a bit too aggressive!

    Dan -

    Needle nose and wiggling worked for us too. We were stuggling like heck with it when just using hands!

    Mike Manasewitsch - Réponse

    This is MUCH easier to do if the support bracket along the bottom is removed first - more space to angle the board upwards. See Changement carte mère iMac Intel 21,5" écran Retina 4K (2017) step 25.

    Use a P00.

    To replace it, introduce it like in the photo at the link to be able to hold the right most holes of the chassis and bracket. Replace the first screw, align the bracket to the horizontal and add the screws from right to left. Each one will bring up the next hole in the bracket close enough to screw through. Reverse those directions if you are a leftie.

    Andrew Gough - Réponse

    I did as Andrew Gough did, per other videos reviewed. Removed it right away. Just makes things easier, more space for just a few screws :)

    Mike Rehbein - Réponse

    The top right screw on the power supply actually screws into a stand-off screw connected to the back of the iMac case. Once you have removed the 4 x Torx 8 or 10 screws you can move the power supply enough to see the upper face of it.

    It has a Torx 25 slot in it and comes out easily. This will give you a lot more room for your fingers in Step 40, depressing the tab on the DC power cable connector to pull it out, and when replacing it on reassembly. You may find it won’t require you removing the support bracket as in the suggestion above.

    John Blagden - Réponse

    I used your suggestion to remove the stand-off and then used my left hand index finger to press the tab while rocking the connector side to side with a needle nose pliers. Plug came out easily.

    Dan Smith -

    The tab is a pain in the a$$$ to get your finger in there. I was so horrified at the size of the capacitors that I put on gloves to reduce any amount of shock :-) . To get it loose I would pull out carefully the power board as far as I could than I wedge my index finger under and press the tab and slowly pull until I saw a slight gap between the end of the socket and the plug. I than place the flat part of the black spudger or blue one into the gap and use as it as a wedge to help move the plug forward as I kept the tab pressed.

    Andrew Phillips - Réponse

  36. Changement carte mère iMac Intel 27" Retina 5K 2020: étape 36, image 1 de 3 Changement carte mère iMac Intel 27" Retina 5K 2020: étape 36, image 2 de 3 Changement carte mère iMac Intel 27" Retina 5K 2020: étape 36, image 3 de 3
    • Veillez à ne toucher ni les pattes des condensateurs ni les brasages exposés à l'arrière du bloc d'alimentation. Tenez-le toujours par les côtés.

    • Basculez le haut du bloc d'alimentation vers vous, comme pour ouvrir une boîte aux lettres, afin d'accéder au connecteur du câble de la prise CA.

    • Débranchez le connecteur du câble de la prise CA.

    To reassemble, do the same in reverse but keep power supply board more upright than slanted down when re-inserting it in to the lower right corner. The lower right screw post has an protrusion under/behind it and the Power Supply's small 2 wire plug must fit between the front of your Mac and the obstruction. Then it just slides right in and then screw it down.

    Dan H - Réponse

    There is a small release tab on the cable.

    Eric - Réponse

    Wear gloves when doing this to reduce any shock. The size of those capacitors are very unnerving and scary. Also those solder joints.

    Andrew Phillips - Réponse

  37. Changement carte mère iMac Intel 27" Retina 5K 2020, Enlever le haut-parleur droit: étape 37, image 1 de 1
    • Dévissez les deux vis T8 de 9,8 mm.

    These are T10's, not T8's

    loren - Réponse

    I had one shorter one screw, and one screw shorter than the other two equal size speaker screws, but longer than the stubby screw. :) And I can confirm that these are T10s.

    Patrick Vickers - Réponse

  38. Changement carte mère iMac Intel 27" Retina 5K 2020: étape 38, image 1 de 2 Changement carte mère iMac Intel 27" Retina 5K 2020: étape 38, image 2 de 2
    • Faites délicatement jouer le haut-parleur droit vers la droite pour accéder à son connecteur sur la carte mère.

  39. Changement carte mère iMac Intel 27" Retina 5K 2020: étape 39, image 1 de 3 Changement carte mère iMac Intel 27" Retina 5K 2020: étape 39, image 2 de 3 Changement carte mère iMac Intel 27" Retina 5K 2020: étape 39, image 3 de 3
    • Avec une spatule, détachez le connecteur du câble du haut-parleur droit de sa prise sur la carte mère.

    • Tirez le connecteur vers la droite pour le débrancher de sa prise.

  40. Changement carte mère iMac Intel 27" Retina 5K 2020: étape 40, image 1 de 3 Changement carte mère iMac Intel 27" Retina 5K 2020: étape 40, image 2 de 3 Changement carte mère iMac Intel 27" Retina 5K 2020: étape 40, image 3 de 3
    • Soulevez le haut-parleur tout droit vers le haut et ôtez-le de l'iMac.

  41. Changement carte mère iMac Intel 27" Retina 5K 2020, Enlever le ventilateur: étape 41, image 1 de 3 Changement carte mère iMac Intel 27" Retina 5K 2020, Enlever le ventilateur: étape 41, image 2 de 3 Changement carte mère iMac Intel 27" Retina 5K 2020, Enlever le ventilateur: étape 41, image 3 de 3
    • À l'aide de l'extrémité plate d'une spatule, débranchez le connecteur du câble du ventilateur de sa prise sur la carte mère.

  42. Changement carte mère iMac Intel 27" Retina 5K 2020: étape 42, image 1 de 2 Changement carte mère iMac Intel 27" Retina 5K 2020: étape 42, image 2 de 2
    • Décollez légèrement le morceau de bande adhésive noire qui relie le ventilateur au conduit d'évacuation.

    • Laissez l'adhésif en place sur le conduit d'évacuation ; il suffit de le décoller au niveau de la jointure pour détacher le ventilateur.

  43. Changement carte mère iMac Intel 27" Retina 5K 2020: étape 43, image 1 de 1
    • Retirez les trois vis T10 de 12,4 mm par lesquelles le ventilateur est fixé au boîtier arrière.

  44. Changement carte mère iMac Intel 27" Retina 5K 2020: étape 44, image 1 de 2 Changement carte mère iMac Intel 27" Retina 5K 2020: étape 44, image 2 de 2
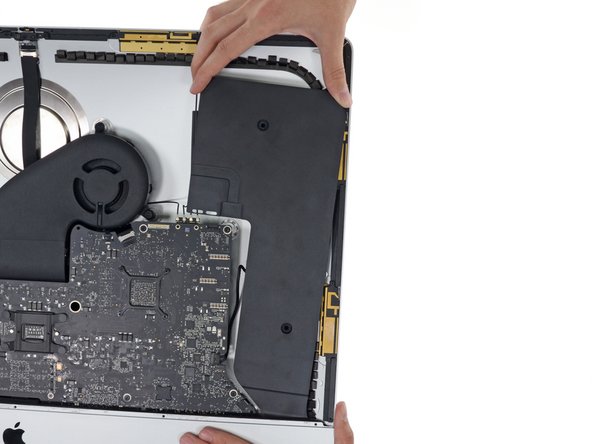
    • Retirez le ventilateur de l'iMac.

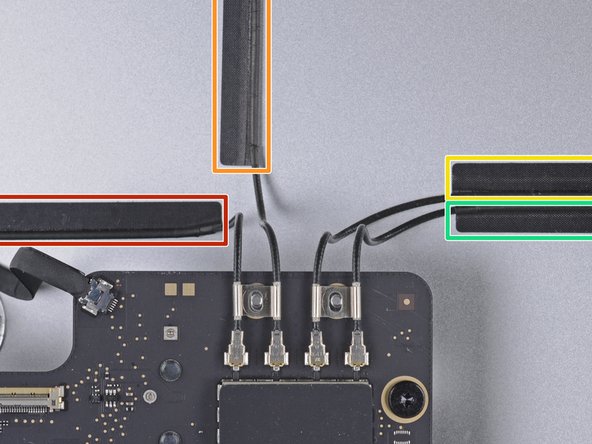
    Use a piece of tape around the antenna cables to keep them in the same order, makes reassembly a little easier.

    Walter Hayden - Réponse

    On reassembly, start the fan power connector into its socket while you slide the fan in.

    ebay - Réponse

    I left the antennas attached to the wifi card and removed the wifi card with wires attached. I accidentally broke one of the connectors on the wifi card and had to replace the entire card....

    S. Baxter - Réponse

  45. Changement carte mère iMac Intel 27" Retina 5K 2020, Retirer la carte mère iMac Intel 27" Retina 5K 2020: étape 45, image 1 de 1
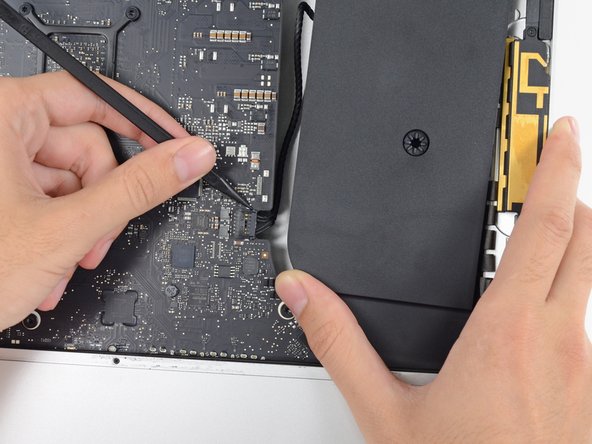
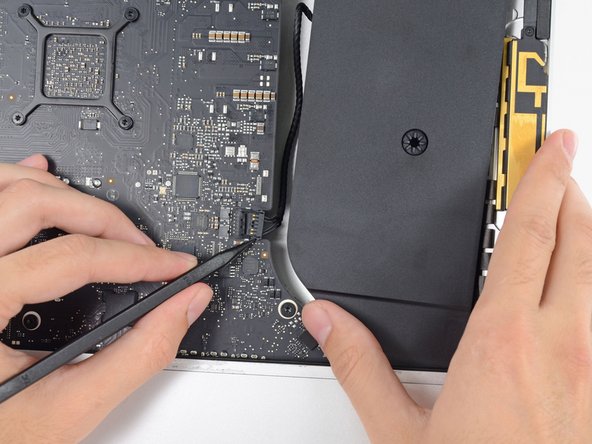
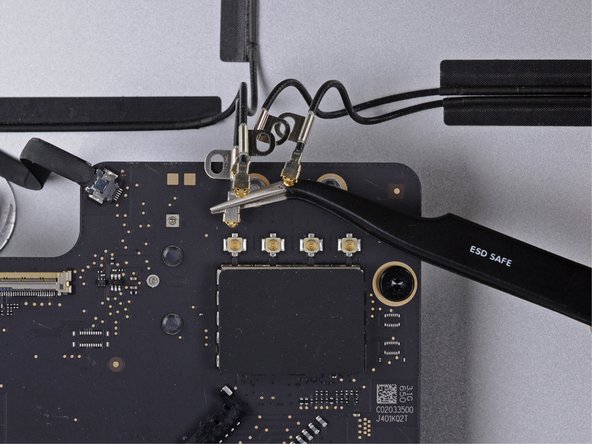
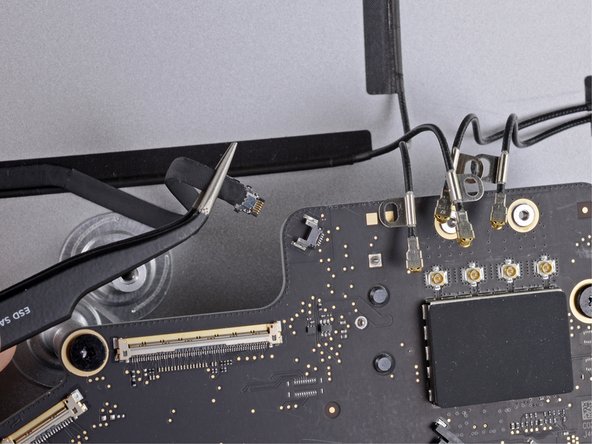
    • Avec un tournevis Torx T5, retirez les deux vis de 4 mm qui fixent les câbles d'antenne AirPort/Bluetooth.

  46. Changement carte mère iMac Intel 27" Retina 5K 2020: étape 46, image 1 de 1
    • Retirez le dispositif métallique qui fixe les câbles d'antenne à la carte mère.

  47. Changement carte mère iMac Intel 27" Retina 5K 2020: étape 47, image 1 de 3 Changement carte mère iMac Intel 27" Retina 5K 2020: étape 47, image 2 de 3 Changement carte mère iMac Intel 27" Retina 5K 2020: étape 47, image 3 de 3
    • Utilisez une pincette pour débrancher les quatre câbles d'antenne de la carte mère.

    • Notez les positions d'origine de chaque connecteur pour rebrancher les câbles lors du remontage. Les antennes sont connectées dans l'ordre suivant (de gauche à droite) :

    • À gauche

    • En haut

    • En haut à droite

    • En bas à droite

  48. Changement carte mère iMac Intel 27" Retina 5K 2020: étape 48, image 1 de 2 Changement carte mère iMac Intel 27" Retina 5K 2020: étape 48, image 2 de 2
    • Avec une pincette ou vos doigts, déconnectez la nappe située à gauche des câbles d'antenne, de la carte mère.

  49. Changement carte mère iMac Intel 27" Retina 5K 2020: étape 49, image 1 de 3 Changement carte mère iMac Intel 27" Retina 5K 2020: étape 49, image 2 de 3 Changement carte mère iMac Intel 27" Retina 5K 2020: étape 49, image 3 de 3
    • Utilisez l'extrémité pointue d'une spatule pour débrancher le connecteur du câble de la prise jack de sa prise sur la carte mère.

    • Repliez délicatement le câble de côté.

  50. Changement carte mère iMac Intel 27" Retina 5K 2020: étape 50, image 1 de 3 Changement carte mère iMac Intel 27" Retina 5K 2020: étape 50, image 2 de 3 Changement carte mère iMac Intel 27" Retina 5K 2020: étape 50, image 3 de 3
    • Utilisez la pointe d'une spatule pour ouvrir le clapet de retenue de la prise ZIF de la nappe du microphone.

    • Veillez à soulever la charnière du clapet de retenue et non la prise elle-même.

    • Utilisez une pincette pour retirer délicatement la nappe du microphone de sa prise.

  51. Changement carte mère iMac Intel 27" Retina 5K 2020: étape 51, image 1 de 1
    • Utilisez un tournevis Torx T8 pour retirer les deux vis de 5,6 mm du haut du conduit d'évacuation du dissipateur thermique.

  52. Changement carte mère iMac Intel 27" Retina 5K 2020: étape 52, image 1 de 1
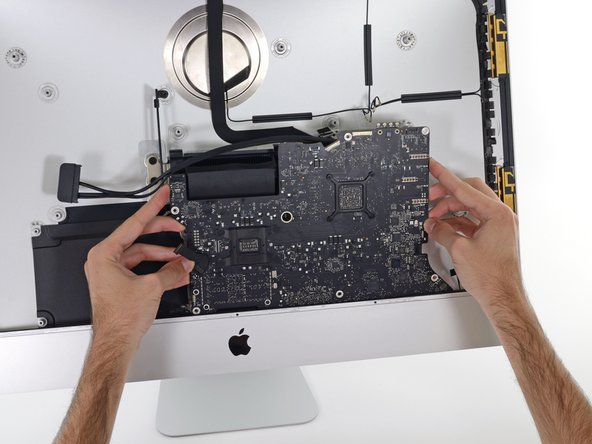
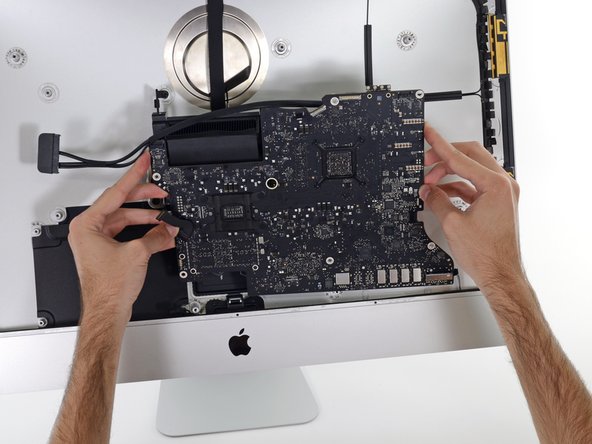
    • Retirez les vis suivantes qui fixent la carte mère :

    • Deux vis T8 de 23,7 mm

    • Une vis d'écartement T25 de 20,1 mm

    • Une vis T8 de 17,6 mm

    • Une vis T8 de 7,2 mm

    • Trois vis T8 de 7,1 mm

    • Une vis T8 captive

    • Cette vis se trouve sous un trou dans la carte mère. Si vous n'utilisez pas un tournevis iFixit, vous aurez peut-être besoin d'une extension ou d'un tournevis avec une tige plus longue.

    Where is the small SSD drive here?

    edo fuenzalida - Réponse

  53. Changement carte mère iMac Intel 27" Retina 5K 2020: étape 53, image 1 de 3 Changement carte mère iMac Intel 27" Retina 5K 2020: étape 53, image 2 de 3 Changement carte mère iMac Intel 27" Retina 5K 2020: étape 53, image 3 de 3
    • Lorsque vous retirez et installez la carte mère, veillez à ne pas endommager la nappe délicate du microphone dans le coin inférieur gauche de la carte.

    • Inclinez légèrement la carte mère vers l'avant.

    • Soulevez la carte mère à la verticale et hors de l'iMac. Veillez à ne pas rester accroché aux montants de vis à l'intérieur du boîtier arrière.

  54. Changement carte mère iMac Intel 27" Retina 5K 2020, Astuce pour le remontage: étape 54, image 1 de 2 Changement carte mère iMac Intel 27" Retina 5K 2020, Astuce pour le remontage: étape 54, image 2 de 2
    • Lorsque vous remontez votre iMac, veillez à aligner correctement les ports E/S extérieurs. La carte mère peut se trouver de travers, même lorsqu'elle est fixée avec toutes ses vis.

    • Vous pouvez utiliser une clé USB ou un câble Ethernet pour vous assurer que la carte mère est bien en place pendant que vous la vissez.

Conclusion

Comparez votre nouvelle pièce de rechange à la pièce d'origine – vous devrez peut-être transférer les composants restants ou retirer les supports adhésifs de la nouvelle pièce avant de l'installer.

Pour remonter votre appareil, suivez les étapes ci-dessus dans l'ordre inverse.

Déposez vos déchets électroniques dans un point de recyclage certifié.

Votre réparation iMac ne s'est pas passée comme prévu ? Consultez notre Forum pour obtenir de l'aide en matière de diagnostic.

2 autres ont terminé cette réparation.

Merci à ces traducteurs :

en fr

100%

Claire Miesch nous aide à réparer le monde ! Vous voulez contribuer ?
Commencez à traduire ›

Sam Omiotek

Membre depuis le 02/25/19

72 896 Réputation

288 tutoriels rédigés

6 commentaires

Are these really pictures of a 2020? I don’t think Apple ever sold any of the 2020 units with a rotational hard drive.

James Muir - Réponse

Correct, this is not a 2020 27-Inch iMac.

enoxseven -

I tested the procedure and found that these iMacs were similar enough that reshooting photos was not necessary. As noted in the introduction, some photos in this guide are from a different model and may contain slight visual discrepancies, but they won't affect the guide procedure.

Sam Omiotek -

Hi all,

Because my iMac A2115 with 512GB SSD has a broken logic board, I am searching for the schematics to be able to see which component needs to be replaced on the logic board.

Hopefully someone here can help me out! :-)

Best regards,

Flo

Flo - Réponse

Is this the same procedure for replacing the logic board on a Mid-2017 iMac? That page doesn't have a repair guide for logic board replacement.

Steve Remich - Réponse

Hi!

Thanks for the post.

Is memory slot only can be replaced? Or do I have to replace the whole logic board?
I own iMac 27-inch 5K Retina 2014. What's the latest logic board I can use, so that I can update the OS to the latest possible?

a a - Réponse

Ajouter un commentaire

Nombre de vues :

Dernières 24 heures : 20

7 derniers jours : 89

30 derniers jours : 378

Total : 11,568