Aller au contenu principal

iPhone 6 Plus Logic Board Replacement

Conditions préalables uniquement
Ce tutoriel est uniquement destiné à être utilisé comme prérequis d'autres tutoriels. Il ne se suffit pas à lui-même.

Ce dont vous avez besoin

  1. iPhone 6 Plus Logic Board Replacement, Logic Board: étape 1, image 1 de 1
    Outil utilisé dans cette étape :
    Standoff Screwdriver for iPhones
    $5.49
    J'achète
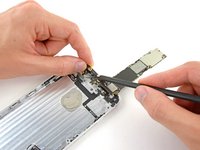
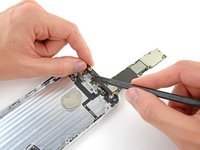
    • Remove the following screws securing the logic board to the rear case:

    • Two 2.4 mm standoff screws

    • Standoff screws are best removed using a standoff screwdriver or bit.

    • In a pinch, a small flathead screwdriver will do the job—but use extra caution to ensure it doesn't slip and damage surrounding components.

    • One 2.1 mm Phillips #00 screw

  2. iPhone 6 Plus Logic Board Replacement: étape 2, image 1 de 1
    • Carefully raise—but do not remove—the logic board, lifting it from the bottom edge nearest the Lightning connector.

  3. iPhone 6 Plus Logic Board Replacement: étape 3, image 1 de 1
    • Do not remove the logic board. At this point it is still tethered to the rear case via an antenna connector.

    • Continue carefully lifting the bottom side of the logic board until it is vertical.

  4. iPhone 6 Plus Logic Board Replacement: étape 4, image 1 de 2 iPhone 6 Plus Logic Board Replacement: étape 4, image 2 de 2
    • Gently lay the logic board upside-down, with the top portion resting against the rear case of the iPhone.

    • Use the flat end of a spudger to disconnect the antenna connector from its socket on the back of the logic board.

  5. iPhone 6 Plus Logic Board Replacement: étape 5, image 1 de 1
    • Lift and remove the logic board out of the iPhone.

Conclusion

To reassemble your device, follow these instructions in reverse order.

Une autre personne a terminé cette réparation.

0 commentaires

Ajouter un commentaire

Nombre de vues :

Dernières 24 heures : 0

7 derniers jours : 0

30 derniers jours : 0

Total : 571