Aller au contenu principal

iPod 3rd Generation Battery Replacement

Ce dont vous avez besoin

  1. iPod 3rd Generation Battery Replacement, Case: étape 1, image 1 de 1
    • Before opening your iPod, ensure that the hold switch is in the locked position. The orange bar should be visible, indicating hold is active.

  2. iPod 3rd Generation Battery Replacement: étape 2, image 1 de 3 iPod 3rd Generation Battery Replacement: étape 2, image 2 de 3 iPod 3rd Generation Battery Replacement: étape 2, image 3 de 3
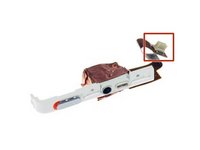
    • Insert an opening pick as far as possible into the seam between the plastic front and the metal rear panel, on the right edge of the iPod.

    • You may need to rock the pick back and forth to slide it in farther.

    • Use the opening pick to pry up against the plastic front panel and release five retaining tabs (seen in the third photo).

    • Slide the pick along the edge of the iPod and continue prying to release the rest of the retaining tabs.

    • After all five tabs along the right side are free, the case should open easily.

  3. iPod 3rd Generation Battery Replacement: étape 3, image 1 de 1
    • The iPod case is now open, but don't separate the two halves just yet. There is still an orange ribbon cable connecting the headphone jack to the logic board.

    • Open the case like a book with the dock connector at the top, and lay the rear panel next to the front half of the iPod.

  4. iPod 3rd Generation Battery Replacement: étape 4, image 1 de 2 iPod 3rd Generation Battery Replacement: étape 4, image 2 de 2
    • Use a plastic tool or your fingernails to carefully disconnect the orange headphone jack cable. Be sure to pull straight up on the connector, not the cable itself.

    • The headphone jack connector is unusually tall. When prying, be careful to not separate the lower, plastic part of the connector from the ribbon cable. Pry between the connector and the socket, not between the two halves of the connector.

  5. iPod 3rd Generation Battery Replacement, Battery: étape 5, image 1 de 1
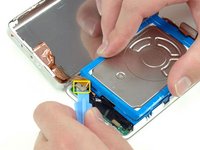
    • Lift up the hard drive with one hand and carefully disconnect the hard drive ribbon from the logic board.

    • Lift the hard drive out of the iPod.

  6. iPod 3rd Generation Battery Replacement: étape 6, image 1 de 1
    • Carefully disconnect the white battery connector from the logic board. Be sure to pull only on the connector itself and not on the cables.

  7. iPod 3rd Generation Battery Replacement: étape 7, image 1 de 1
    • Removing the following screw isn't strictly necessary, but it will make the next step easier.

    • Remove the black T6 Torx screw from near the battery connector on the logic board.

  8. iPod 3rd Generation Battery Replacement: étape 8, image 1 de 1
    • Carefully thread the battery cable around the end of the logic board. Be careful not to pull up on the logic board too much while freeing the battery cable.

  9. iPod 3rd Generation Battery Replacement: étape 9, image 1 de 1
    • Lift the battery up and out of the iPod.

Conclusion

To reassemble your device, follow these instructions in reverse order.

322 autres ont terminé cette réparation.

iRobot

Membre depuis le 09/24/09

1 Réputation

636 tutoriels rédigés

19 commentaires

If you are real careful you don't have to remove the Torx screw to get the battery out.

beekersk8s - Réponse

I found this quite easy. The tools worked great. I agree with Andy, if you push the tool into the groove, then lift or pry it up so the tip of the tool is down inside the back cover, you should be able to slide it across to pop the clips quite easily. Once you get the first two sides open, it goes quick.

I also did this without having to remove the Torx screw. It helped to lift the battery up a bit to give the wires a little slack, and then just feed them around the corner of the motherboard. Putting the new battery in, I just fed the wires around the corner, and used the opening tool to push them the final bit of the way around the corner.

My old iPod is like new now! Hours and hours of battery life, when it would previously die after 5 minutes.

John Maher - Réponse

Changing the battery was simular to when I changed the HD in the same iPod. Quite easy. No need to remove the torx screw, Just be sure where the (lock) button (on the top) is when you close it, this time I didnt forget, as I did replacing the HD :)

Olafur - Réponse

I love iFixit!

I managed to bend the casing out when opening, but bent it back in shape after re-opening. The bend was small, but noticable. Worth reopening it.

One issue - the battery doesn't fully recharge in one go. I have to reconnect the iPod to get it to full charge.

Kit - Réponse

Very simple and clear guide. I managed to replace the battery in the first try and it worked!

I was able to do it without disconnecting the headphone jack and without removing the Torx screw.

I found the replacement battery to be a little thicker than the original battery but there was no issue resealing the case.

glzarifi - Réponse

Ajouter un commentaire

Nombre de vues :

Dernières 24 heures : 34

7 derniers jours : 182

30 derniers jours : 762

Total : 164,352