Aller au contenu principal

The MR-14EX is a 2-piece flash apparatus, designed for close-range macro photography (~1:1 or greater); extreme close-ups, and tiny subjects.

The main controller (DSLR hotshoe mount), and the flash lamps (lens mount), are tethered by a coiled retractile cable.

I decided to make a few personal modifications to my own, so I contacted Canon directly, requesting some information and a service manual. Basically, they refused to co-operate, forcing me to do things the hard way. So now I'm documenting my process; sharing the relevant information with you, as I progress.

Diagrams are adapted from the official spare parts catalogue.

Ce dont vous avez besoin

Outils

Cette vue éclatée n'est pas un tutoriel de réparation. Pour réparer votre Canon Macro Ring Lite MR-14EX, utilisez notre manuel de réparation.

  1. Canon Macro Ring Lite MR-14EX Teardown, Canon Macro Ring Lite MR-14EX Teardown: étape 1, image 1 de 3 Canon Macro Ring Lite MR-14EX Teardown, Canon Macro Ring Lite MR-14EX Teardown: étape 1, image 2 de 3 Canon Macro Ring Lite MR-14EX Teardown, Canon Macro Ring Lite MR-14EX Teardown: étape 1, image 3 de 3
    • Remove four screws from the top of the main control module. One in each corner.

    • Plus one in the middle.

    • And four more (one is obstructed from view in the photo) at the foot of the module.

    • The base will drop out quite easily.

    • Be careful. Only one of these cables is designed to be disconnected from this end. If possible, try to pry it with a tool, rather than tugging it.

  2. Canon Macro Ring Lite MR-14EX Teardown, Breaking the Control Module.: étape 2, image 1 de 3 Canon Macro Ring Lite MR-14EX Teardown, Breaking the Control Module.: étape 2, image 2 de 3 Canon Macro Ring Lite MR-14EX Teardown, Breaking the Control Module.: étape 2, image 3 de 3
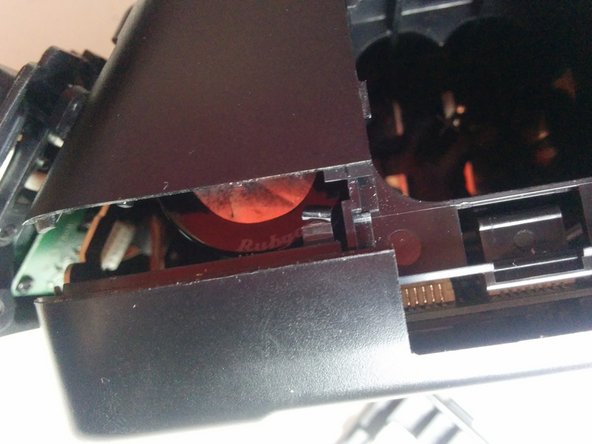
    • The outer shell is held together by internal plastic clips. The two halves come apart at the sides. If you can free a single clip, the rest will slip out, and the rest will fall apart with minimum effort.

    • As you can see, I was a bit rough and broke one of the clips a little bit. I'm not too concerned about it, but try to avoid doing the same if you can help it.

    • Some other pieces may fall out. Including the battery hatch, and some metal pieces. I'm not exactly sure what their purpose is. Perhaps structural reinforcement, or something like that.

  3. Canon Macro Ring Lite MR-14EX Teardown, Disconnect the PCBs.: étape 3, image 1 de 1
    • Unplug the various connectors holding it all together.

    • As you can see, I marked up all the plugs and sockets with colour coded paint pens. I recommend doing the same.

    • Only one end of each wiring loom can be disconnected. Inspect with a lamp or refer to my images to make sure you're pulling the right ends.

    • Don't tug on the wiring looms. Some will be stuck tight. I used a long nose plier & hooked pick/probe/scraper.

tjt263

Membre depuis le 12/30/14

112 Réputation

1 tutoriel rédigé

2Commentaires sur le guide

Hi, I was wondering if you happen to take a photo of the capacitor behind the big black one? Mine leaked and completely disintegrated its cover. I can’t find the size/rating/polarity of that capacitor. Thanks : )

AlphegA - Réponse

The smaller one behind the big one is 25v 220uF

Corey - Réponse

Ajouter un commentaire

Nombre de vues :

Dernières 24 heures : 0

7 derniers jours : 2

30 derniers jours : 27

Total : 1,460