Aller au contenu principal
Acer Chromebook C730-C4V9 Keyboard Replacement

Acer Chromebook C730-C4V9 Keyboard Replacement

Dylan Baldwin

Dylan Baldwin et 2 autres contributeurs

Dernière mise à jour le August 1, 2019

1 - 2 heures
Modérée
Tutoriel réalisé par la communauté

This guide shows the steps on how to replace a keyboard in an Acer Chromebook C730 Series. (C730-C4V9)

PLEASE NOTE: The Chromebook Keyboard isn't supposed to be replaced! This guide involves breaking plastic clips to successfully replace the keyboard! It is recommended to replace individual keys or purchase a new device but if you wish to keep your Chromebook or the keyboard is too far gone, follow this guide.

Ce dont vous avez besoin

Pièces

Outils

Afficher plus…

iFixit touche une commission lorsque vous achetez par l'intermédiaire de ces liens.
  1. Acer Chromebook C730-C4V9 Keyboard Replacement, Rear Cover: étape 1, image 1 de 2 Acer Chromebook C730-C4V9 Keyboard Replacement, Rear Cover: étape 1, image 2 de 2
    • Be sure to have completely shut down the device before attempting to open it.

    • Flip the device over and remove the twelve screws.

    • Using a spudger slowly pry the case open by inserting the plastic opening tool at the hinges and wedging it between the Back cover and the body.

    • Be careful when removing the cover off the device, a ribbon cable is connected to it

  2. Acer Chromebook C730-C4V9 Keyboard Replacement, Ribbon Cable: étape 2, image 1 de 1
    • Remove the USB Ribbon cable by opening the connector on the motherboard and sliding the cable out.

  3. Acer Chromebook C730-C4V9 Keyboard Replacement, Battery: étape 3, image 1 de 1
    • Remove the two screws on the sides of the battery.

    • Carefully slide the battery forward and the lift up

    • Unplug the battery from the motherboard to prevent shortages.

  4. Acer Chromebook C730-C4V9 Keyboard Replacement, Wi-Fi Chip: étape 4, image 1 de 2 Acer Chromebook C730-C4V9 Keyboard Replacement, Wi-Fi Chip: étape 4, image 2 de 2
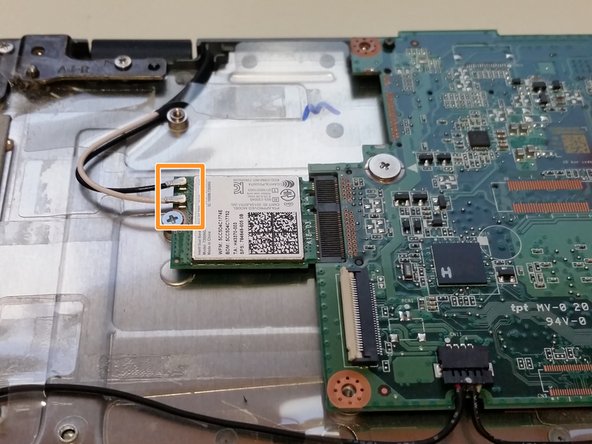
    • Remove the screw from the Wi-Fi chip

    • Unplug the aerials

    • Remember the order of the aerials! (Generally black then white)

    • Slide the chip away from the motherboard

  5. Acer Chromebook C730-C4V9 Keyboard Replacement, Motherboard Cables: étape 5, image 1 de 1
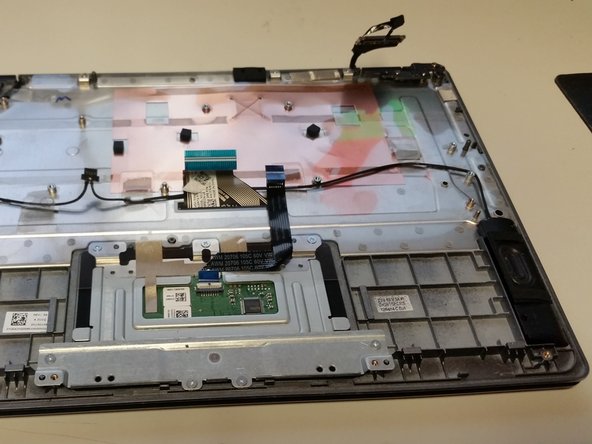
    • Remove the screen cable by using the tab and pulling up.

    • Remove the track pad cable by opening the connector and sliding the cable away from the motherboard.

    • Remove the keyboard cable by opening the connector and sliding it away from the motherboard.

    • The speaker cable can be a bit tricky, with the assistance of the plastic opening tool, pull/pry the plug towards you (Carefully!)

  6. Acer Chromebook C730-C4V9 Keyboard Replacement, Hinges: étape 6, image 1 de 2 Acer Chromebook C730-C4V9 Keyboard Replacement, Hinges: étape 6, image 2 de 2
    • Remove the six screws from the hinges.

  7. Acer Chromebook C730-C4V9 Keyboard Replacement, Motherboard: étape 7, image 1 de 2 Acer Chromebook C730-C4V9 Keyboard Replacement, Motherboard: étape 7, image 2 de 2
    • Using the plastic opening tool, slide it under the right hinge and lift the hinge up so its not sitting on the motherboard.

    • Remove the five screws holding the motherboard in.

    • Lift the motherboard up slowly.

    • Try to lift the motherboard up as straight as possible as there is solid thermal grease on the bottom.

  8. Acer Chromebook C730-C4V9 Keyboard Replacement, Speakers: étape 8, image 1 de 1
    • Using the plastic opening tool, insert it under the speakers in the middle and pry them up

    • The speakers are held on with double sided tape and will be glued back later. (You can use double sided tape if you wish)

  9. Acer Chromebook C730-C4V9 Keyboard Replacement, Remove Screen (Optional): étape 9, image 1 de 2 Acer Chromebook C730-C4V9 Keyboard Replacement, Remove Screen (Optional): étape 9, image 2 de 2
    • This step is optional, I do it because it makes life so much easier!! But its totally up to you.

    • While holding your thumbs on the hinges to keep them in place, open the screen slowly

    • Once the screen is almost flat you should feel the hinges come loose.

    • Lift the screen up from the body and it should separate.

  10. Acer Chromebook C730-C4V9 Keyboard Replacement, Remove plastic pins: étape 10, image 1 de 3 Acer Chromebook C730-C4V9 Keyboard Replacement, Remove plastic pins: étape 10, image 2 de 3 Acer Chromebook C730-C4V9 Keyboard Replacement, Remove plastic pins: étape 10, image 3 de 3
    • The motherboard plate is held onto the frame by plastic pins.

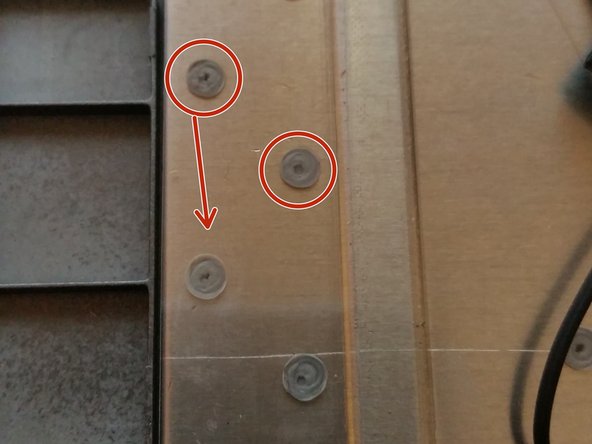
    • Work your way along the edges of the plate and attempt to remove the top off every single pen if possible.

  11. Acer Chromebook C730-C4V9 Keyboard Replacement, Remove Plate: étape 11, image 1 de 2 Acer Chromebook C730-C4V9 Keyboard Replacement, Remove Plate: étape 11, image 2 de 2
    • After removing as many pins as possible work your way around the plate and pry it up.

    • Start working your way under the plate to disconnect it from the keyboard.

  12. Acer Chromebook C730-C4V9 Keyboard Replacement, Remove Keyboard: étape 12, image 1 de 3 Acer Chromebook C730-C4V9 Keyboard Replacement, Remove Keyboard: étape 12, image 2 de 3 Acer Chromebook C730-C4V9 Keyboard Replacement, Remove Keyboard: étape 12, image 3 de 3
    • The keyboard is held onto the frame by plastic pins.

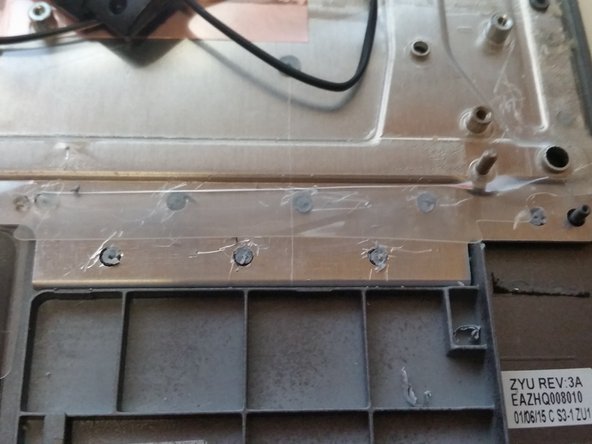
    • Work your way along the edges of the keyboard and attempt to remove the top off every single pen if possible.

    • Do not cut the pins that stick out above the keyboard, these are for the motherboard plate.

    • After you have removed the top off every pin, using the plastic opening tool work your way around the keyboard, it should lift right out.

  13. Acer Chromebook C730-C4V9 Keyboard Replacement, Secure Keyboard: étape 13, image 1 de 3 Acer Chromebook C730-C4V9 Keyboard Replacement, Secure Keyboard: étape 13, image 2 de 3 Acer Chromebook C730-C4V9 Keyboard Replacement, Secure Keyboard: étape 13, image 3 de 3
    • Place the new keyboard in the frame and ensure it is sitting nicely.

    • Once in place, using a hot glue gun start putting small drops of glue on the pins you cut off the keyboard.

    • While gluing, keep a constant pressure on the keyboard to ensure it sets while in its optimal position!

    • Avoid gluing the pins that are risen! This will affect the fitment of the motherboard plate.

    • Do NOT put glue in the keyboard holes that haven't got pins! These holes will leak glue underneath the keys! ONLY place glue on the keyboard pins

  14. Acer Chromebook C730-C4V9 Keyboard Replacement, Secure Motherboard Plate: étape 14, image 1 de 2 Acer Chromebook C730-C4V9 Keyboard Replacement, Secure Motherboard Plate: étape 14, image 2 de 2
    • Work your way around the plate putting glue on the plastic pins.

    • While gluing, keep a constant pressure on the plate to ensure it sets while in its optimal position!

    • Only put glue on the plastic pins you cut the tops off!

  15. Acer Chromebook C730-C4V9 Keyboard Replacement, Secure Speakers: étape 15, image 1 de 1
    • Chose whether to use glue or double sided tape.

    • Put a dab of glue at the top and bottom of the speaker (Where the old double sided tape is)

    • Place speaker into position.

Conclusion

To reassemble your device, follow these instructions in reverse order.

2 autres ont terminé cette réparation.

Dylan Baldwin

Membre depuis le 12/11/18

351 Réputation

1 tutoriel rédigé

Un commentaire

Your detailed and well explained instructions have let me replace the keyboard with success. So many thanks!!!!!

pablofcid - Réponse

Ajouter un commentaire

Nombre de vues :

Dernières 24 heures : 0

7 derniers jours : 2

30 derniers jours : 8

Total : 1,690