Aller au contenu principal

Acer Iconia Tab A500 Power Button/Motherboard Replacement

Ce dont vous avez besoin

  1. Acer Iconia Tab A500 Power Button/Motherboard Replacement, Back Case: étape 1, image 1 de 1
    • To start, gently separate one corner of the case using the black spudger.

  2. Acer Iconia Tab A500 Power Button/Motherboard Replacement: étape 2, image 1 de 1
    • Once you have successfully pried the spudger in between the front case and back case, continue do so around the entire tablet until the back case is completely disconnected.

  3. Acer Iconia Tab A500 Power Button/Motherboard Replacement, Speakers: étape 3, image 1 de 1
    • Locate the 4 screws and cable that hold in the two speakers.

    • Use the Phillips #1 screwdriver to remove these 2mm black screws.

    • Remove the 2mm silver screws.

    • Not all 4 screws are going to be the same kind. This will not affect the speaker replacement.

  4. Acer Iconia Tab A500 Power Button/Motherboard Replacement: étape 4, image 1 de 2 Acer Iconia Tab A500 Power Button/Motherboard Replacement: étape 4, image 2 de 2
    • Carefully remove the connector cable by pushing on the rim of black plastic insert.

  5. Acer Iconia Tab A500 Power Button/Motherboard Replacement: étape 5, image 1 de 1
    • Unfortunately, the top speaker is a wedged under the motherboard.

    • To get this speaker out, use the spudger and gently pry it out.

  6. Acer Iconia Tab A500 Power Button/Motherboard Replacement, Battery: étape 6, image 1 de 1
    • Remove the 5mm screws that are securing the battery to the rest of the tablet.

    • Use the Phillips #00 Screwdriver to remove the 5mm screws.

  7. Acer Iconia Tab A500 Power Button/Motherboard Replacement: étape 7, image 1 de 1
    • Use the sharper end of the spudger to disconnect the battery from the mother board.

    • The battery connector will slide off.

  8. Acer Iconia Tab A500 Power Button/Motherboard Replacement, Power Button: étape 8, image 1 de 1
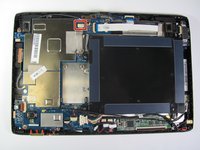
    • Using the Phillips #1 screwdriver, remove the screws near the edges of the tablet.

    • They may be different sizes, the silver are 5mm and the black are 2mm.

  9. Acer Iconia Tab A500 Power Button/Motherboard Replacement: étape 9, image 1 de 1
    • Lift up on the black flaps to release the flat cables.

    • Pull this Connector off.

  10. Acer Iconia Tab A500 Power Button/Motherboard Replacement: étape 10, image 1 de 1
    • Use the spudger to detach the indicated cables.

    • Remove the last motherboard screw under the rightmost cable. It is a silver 5mm.

  11. Acer Iconia Tab A500 Power Button/Motherboard Replacement: étape 11, image 1 de 1
    • Disconnect the two gold connectors by pulling straight up on them with your fingers.

    • Like before, lift up on the black flap to detach the cable.

  12. Acer Iconia Tab A500 Power Button/Motherboard Replacement: étape 12, image 1 de 1
    • Having disconnected all those pesky cables, the motherboard lifts cleanly out.

Conclusion

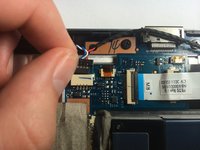
From here, you can solder on a new switch or put in the new motherboard. To reassemble your device, follow these instructions in reverse order.

20 autres ont terminé cette réparation.

Kyle Libby

Membre depuis le 04/07/14

1 006 Réputation

7 tutoriels rédigés

Équipe

Cal Poly, Team 7-23, Regan Spring 2014 Membre de l'équipe Cal Poly, Team 7-23, Regan Spring 2014

CPSU-REGAN-S14S7G23

4 membres

19 tutoriels rédigés

2 commentaires

where can I get the switch?

Dan - Réponse

Thanks from France

Nicolas bacquaert - Réponse

Ajouter un commentaire

Nombre de vues :

Dernières 24 heures : 0

7 derniers jours : 0

30 derniers jours : 6

Total : 14,551