Aller au contenu principal
Boosted Board 1st Generation Belts Replacement

Boosted Board 1st Generation Belts Replacement

Emily Imfeld

Emily Imfeld et 4 autres contributeurs

Dernière mise à jour le November 30, 2016

25 minutes
Modérée

This guide will show you how to remove and replace the belts on your board. The rear motor is load with springs, so be carful and pay close attention to the steps when taking the board apart. If your belt is broken, you will need to buy a new one through Boosted. Happy fixing!

Ce dont vous avez besoin

iFixit touche une commission lorsque vous achetez par l'intermédiaire de ces liens.
  1. Boosted Board 1st Generation Belts Replacement, Rear Wheels: étape 1, image 1 de 2 Boosted Board 1st Generation Belts Replacement, Rear Wheels: étape 1, image 2 de 2
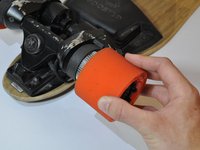
    • Loosen the two 16.74 mm motor mount hex nut screws with a 9/64" Allen wrench.

    • Do Not Remove the Screws.

  2. Boosted Board 1st Generation Belts Replacement: étape 2, image 1 de 1
    • Compress the motor mount back towards the wheel.

    • While keeping the motor mount compressed, tighten one of the hex nuts that you loosened in the previous step.

    • The motor mounts are spring tensioned so it is necessary compress them to loosen the belts.

  3. Boosted Board 1st Generation Belts Replacement: étape 3, image 1 de 2 Boosted Board 1st Generation Belts Replacement: étape 3, image 2 de 2
    • Remove the axel nut with a 1/2" socket wrench

  4. Boosted Board 1st Generation Belts Replacement: étape 4, image 1 de 3 Boosted Board 1st Generation Belts Replacement: étape 4, image 2 de 3 Boosted Board 1st Generation Belts Replacement: étape 4, image 3 de 3
    • Rotate and pull counterclockwise until the wheel comes off the axle completely.

    • The front washer will come off with the wheel.

    • Remove the back washer from the axle.

    • Replacing the wheel requires the bearings to be switched into the new wheel.

  5. Boosted Board 1st Generation Belts Replacement, Belts: étape 5, image 1 de 3 Boosted Board 1st Generation Belts Replacement, Belts: étape 5, image 2 de 3 Boosted Board 1st Generation Belts Replacement, Belts: étape 5, image 3 de 3
    • Compress the motor mount back .

    • Slide the belt off the axle

  6. Boosted Board 1st Generation Belts Replacement: étape 6, image 1 de 1
    • Remove the two hex screws.

    • Remove the front hex screw.

    • When removing the Front hex screw, hold the motor mount and the truck together.

    • The springs inside the motor mount will push the motor out of the casing if they are not held together.

  7. Boosted Board 1st Generation Belts Replacement: étape 7, image 1 de 3 Boosted Board 1st Generation Belts Replacement: étape 7, image 2 de 3 Boosted Board 1st Generation Belts Replacement: étape 7, image 3 de 3
    • Making sure to hold the motor and truck together, lift off the belt casing and take off the belt.

    • Do Not let go of the motor and truck until the new belt is on and the Front hex screw is tightened securely.

    • The springs inside the motor mount will push the motor out of the casing if they are not held together.

Conclusion

To reassemble your device, follow these instructions in reverse order.

4 autres ont terminé cette réparation.

Emily Imfeld

Membre depuis le 10/06/16

532 Réputation

4 tutoriels rédigés

Équipe

Cal Poly, Team 15-7, Livingston Fall 2016 Membre de l'équipe Cal Poly, Team 15-7, Livingston Fall 2016

CPSU-LIVINGSTON-F16S15G7

4 membres

6 tutoriels rédigés

0 commentaires de tutoriel

Ajouter un commentaire

Nombre de vues :

Dernières 24 heures : 0

7 derniers jours : 0

30 derniers jours : 9

Total : 1,672