Aller au contenu principal
Canon PowerShot G1 X View Finder Zoom Replacement

Canon PowerShot G1 X View Finder Zoom Replacement

Joseph Cosgrove

Joseph Cosgrove et 6 autres contributeurs

Dernière mise à jour le June 22, 2022

10 - 20 minutes
Modérée
Photos d’action
Route pittoresque

If the viewfinder wheel on your Canon PowerShot G1 X is broken, use this guide to replace the viewfinder wheel.

The viewfinder wheel is used to adjust the zoom level of the viewfinder. Depending on what part of the wheel is broken the wheel can either spin freely without changing the zoom or not move at all.

Before using this guide, check if debris is preventing the viewfinder zoom wheel from spinning. Use a toothpick or a Q-tip to remove the debris. If the debris cannot be removed follow this guide to remove the viewfinder zoom wheel and clear all the debris.

Make sure to power off your camera completely and disconnect from power before starting this guide.

Ce dont vous avez besoin

Outils

  • Spudger
    Spudger
  • Phillips #000 Screwdriver
    Phillips #000 Screwdriver
  1. Canon PowerShot G1 X View Finder Zoom Replacement, Back Camera Casing: étape 1, image 1 de 2 Canon PowerShot G1 X View Finder Zoom Replacement, Back Camera Casing: étape 1, image 2 de 2
    • To begin removing the back camera casing, unscrew the Phillips screw underneath the panel covering the USB connections on the side of the camera. Use a Phillips Head 00 screwdriver for this screw.

    • Remove the screw located directly beneath the USB cover located in the second photo. Use a Phillips Head 00 screwdriver for this screw.

  2. Canon PowerShot G1 X View Finder Zoom Replacement: étape 2, image 1 de 1
    • After removing the first screw flip to the bottom side of the camera and unscrew the two screws located toward the back side of the casing. The screw on the front side can be left in. Use a Phillips Head 00 screwdriver for both of these screws.

  3. Canon PowerShot G1 X View Finder Zoom Replacement: étape 3, image 1 de 1
    • Now flip to the opposite side of the USB panel screw and unscrew the two screws holding the small speaker cover portion of the camera. Use a Phillips Head 00 screwdriver for both of these screws.

  4. Canon PowerShot G1 X View Finder Zoom Replacement: étape 4, image 1 de 1
    • The last screw is located towards the top side of the back of the camera next to the view finder. Unscrew by using a Phillips Head 00 screwdriver.

  5. Canon PowerShot G1 X View Finder Zoom Replacement: étape 5, image 1 de 1
    • Remove the side panel covering the speaker by gently pulling it away from the camera. You can also use spudgers to create a lever to help remove the panel.

  6. Canon PowerShot G1 X View Finder Zoom Replacement: étape 6, image 1 de 1
    • Remove the back casing by gently pulling. You could also use spudger to create a lever to help pry it off.

    Is there a date/time battery inside this thing?

    Brian L Spilner - Réponse

  7. Canon PowerShot G1 X View Finder Zoom Replacement, View Finder Zoom: étape 7, image 1 de 2 Canon PowerShot G1 X View Finder Zoom Replacement, View Finder Zoom: étape 7, image 2 de 2
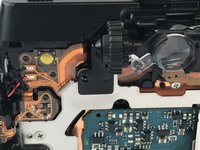
    • Locate the view finder zoom on the back of the camera.

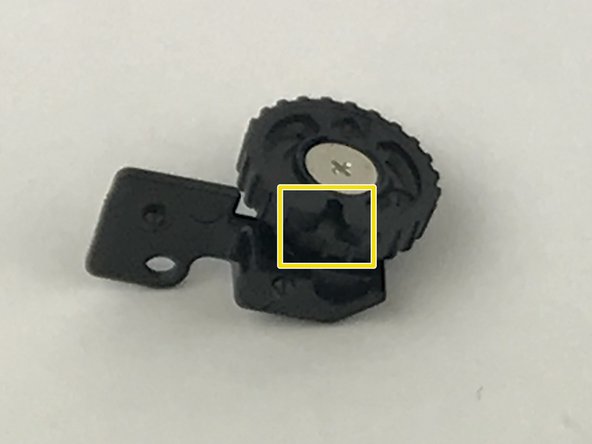
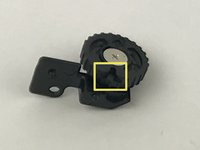
    • Remove the screw using a Phillips #000 screwdriver.

    • Be careful, the viewfinder zoom wheel can fall if the camera is oriented vertically.

    • To remove the viewfinder wheel, pull it to the left and away from the camera.

  8. Canon PowerShot G1 X View Finder Zoom Replacement: étape 8, image 1 de 2 Canon PowerShot G1 X View Finder Zoom Replacement: étape 8, image 2 de 2
    • Locate the viewfinder zoom pin seen in the first image.

    • Orient the viewfinder zoom pin to the same orientation as in the first image.

    • When reinstalling the viewfinder wheel, orient the notch in the viewfinder zoom wheel seen in the second image with the pin seen in the first image.

    • This will allow for the full range of motion of the viewfinder zoom wheel. Improper orientation will lead to a lower range of motion which can cause damage to the viewfinder.

Conclusion

To reassemble your device, follow these instructions in reverse order.

Une autre personne a terminé cette réparation.

Joseph Cosgrove

Membre depuis le 02/12/17

313 Réputation

3 tutoriels rédigés

Équipe

USF Tampa, Team 20-1, Remmell Spring 2017 Membre de l'équipe USF Tampa, Team 20-1, Remmell Spring 2017

USFT-REMMELL-S17S20G1

3 membres

4 tutoriels rédigés

Un commentaire

Do you guys know where I could get the aperture len flex for this model? Thank you!

Gissela Perdomo - Réponse

Ajouter un commentaire

Nombre de vues :

Dernières 24 heures : 2

7 derniers jours : 5

30 derniers jours : 10

Total : 922