
DJI Phantom H3-2D GoPro Camera Installation

Introduction
Passez à l'étape 1Follow this guide to correctly install a GoPro 3/3+/4 camera onto the H3-2D gimbal on a DJI Phantom.
Ce dont vous avez besoin
Outils


Afficher plus…
-
-
Press down on battery door release tab to flip the battery door open.
-
-
-
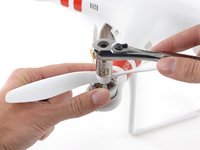
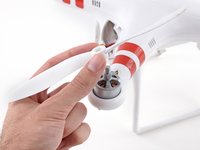
Silver-topped propeller collets unscrew counter-clockwise
-
Black-topped propeller collets unscrew clockwise
-
-
-
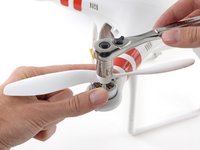
For propellors with silver collets: Use a 12 mm wrench or socket to loosen silver collets in the counter-clockwise direction.
-
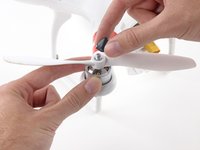
Once free, unscrew and remove the collet.
-
-
-
For propellors with black collets: Use a 12 mm wrench or socket to loosen black collets in the clockwise direction.
-
Once free, unscrew and remove the collet.
-
-
-
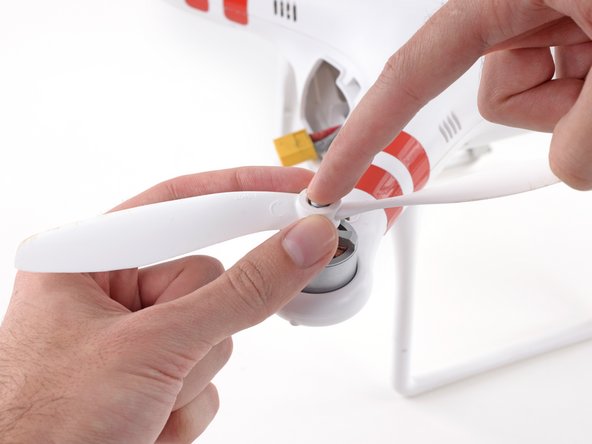
Gently press down the motor shaft and lift the propeller up to remove it.
-
-
-
Remove the following screws from the underside of the drone:
-
Twelve 2.0 mm hex screws
-
Four Phillips #0 screws
-
-
-
-
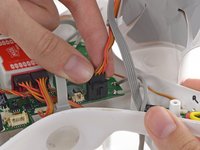
Loosen the cable from the plastic landing gear.
-
Unplug the magnetometer molex connector.
-
-
-
Lift up on the top portion of the shell and set it on its side.
-
-
-
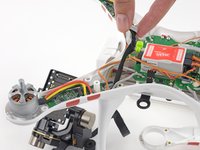
Lift the GPS cable molex connector up out of its socket on the main board.
On the Phantom FCP40 (essentially a Phantom 1), the GPS cable connects directly to the Naza controller box, not to the board as shown here. Also the compass (magnetometer) is connected to the main board, not the GPS unit in the top shell, so you don't need to remove it to remove the top shell.
-
-
-
Gently pull the slack of the magnetometer cable through the case bottom shell.
-
The case top shell should now have enough slack to work on the interior of the Phantom.
-
-
-
Twist the molex and cable as shown to prepare it for insertion through the case bottom shell.
-
-
-
Insert the molex connector through one of the landing gear holes and case bottom shell.
-
Pull the cable through.
-
-
-
Place the H3-2D mounting bracket on the bottom side of the Phantom.
-
Line up the mounting holes and screw in the two bolts to secure the mounting bracket.
-
-
-
Twist the other end of the G8 cable molex connector as shown in order to plug in the H3-2D gimbal.
-
-
-
Pass the G8 molex connector through the side of the H3-2D gimbal.
-
Plug in and firmly secure the connector.
-
-
-
Pull the gimbal wire through the case bottom shell and plug in the connector to the G8 plug on the mainboard.
-
-
-
Place the gimbal on the mount with the front facing the same side as the battery cover.
-
-
-
Mount the four rubber dampers on the gimbal to the mounting bracket.
-
Pinch two sides of the rubber dampers and press it into the mounting bracket holes.
-
-
-
Confirm the dampers are installed correctly by twisting them at least 180 degrees.
-
-
-
Pull the excess slack in the gimbal cable up into the body of the Phantom.
-
-
-
Line up the GoPro camera with the pins on the gimbal mount.
-
Press the GoPro camera firmly against the gimbal and ensure a snug fit.
-
-
-
Place the securing bracket over the camera and line up the bolt holes.
-
Secure the two mounting screws with a Phillips #0 driver.
-


To reassemble your device, follow these instructions in reverse order.
To reassemble your device, follow these instructions in reverse order.
Annulation : je n'ai pas terminé ce tutoriel.
8 autres ont terminé cette réparation.

Équipe

Cal Poly, Team 25-89, Amido Spring 2010 Membre de l'équipe Cal Poly, Team 25-89, Amido Spring 2010
CPSU-AMIDO-S10S25G89
4 membres
61 tutoriels rédigés