Aller au contenu principal

Dell Inspiron 11-3152 USB Port Replacement

Ce dont vous avez besoin

  1. Dell Inspiron 11-3152 USB Port Replacement, Back Panel: étape 1, image 1 de 2 Dell Inspiron 11-3152 USB Port Replacement, Back Panel: étape 1, image 2 de 2
    • Flip the computer over.

  2. Dell Inspiron 11-3152 USB Port Replacement: étape 2, image 1 de 2 Dell Inspiron 11-3152 USB Port Replacement: étape 2, image 2 de 2
    • Remove all nine 5mm Phillips head screws from the back cover using #0 Phillips head.

  3. Dell Inspiron 11-3152 USB Port Replacement: étape 3, image 1 de 1
    • Gently use a spudger to pull the cover away from the rest of the laptop. The cover will come off after you use the tool on two or three sides.

  4. Dell Inspiron 11-3152 USB Port Replacement, Battery: étape 4, image 1 de 1
    • Make sure that the power is off.

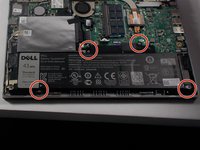
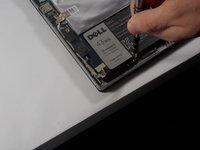
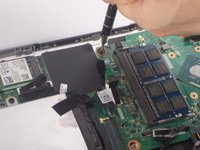
    • After taking off the back panel, you will see the battery located at the bottom of the computer system. It's black and is clearly labeled "dell battery".

  5. Dell Inspiron 11-3152 USB Port Replacement: étape 5, image 1 de 2 Dell Inspiron 11-3152 USB Port Replacement: étape 5, image 2 de 2
    • Locate the battery at the bottom of the computer and remove the four 3mm screws with a Phillips #0 head that hold the battery down.

  6. Dell Inspiron 11-3152 USB Port Replacement: étape 6, image 1 de 1
    • Remove the Solid State Drive wire from the battery clip by detaching the wire.

    • This can be done by gently pulling the connector away from the battery clip.

  7. Dell Inspiron 11-3152 USB Port Replacement: étape 7, image 1 de 1
    • Remove the battery from the computer system by gently lifting it from the side.

  8. Dell Inspiron 11-3152 USB Port Replacement, USB Port: étape 8, image 1 de 1
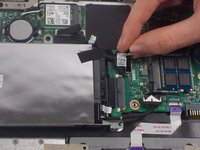
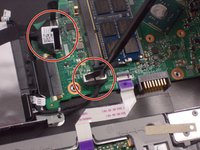
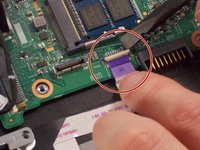
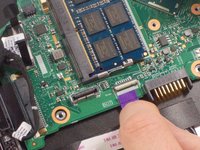
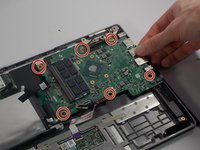
    • Remove the two white power connectors on the bottom right of the motherboard by gently pulling on the tabs backward.

  9. Dell Inspiron 11-3152 USB Port Replacement: étape 9, image 1 de 2 Dell Inspiron 11-3152 USB Port Replacement: étape 9, image 2 de 2
    • Gently peel the tape on top of the power connectors that link the Solid State Drive to the motherboard.

    • Use spudger to lift and detach the power connector from the motherboard.

  10. Dell Inspiron 11-3152 USB Port Replacement: étape 10, image 1 de 2 Dell Inspiron 11-3152 USB Port Replacement: étape 10, image 2 de 2
    • Detach the purple ZIF connector and the white ribbon connector. This can be done by using a spudger to unlock the ZIF connector and pull the cable out.

    • Pull the ribbon cable that connects the keyboard to the motherboard away.

  11. Dell Inspiron 11-3152 USB Port Replacement: étape 11, image 1 de 2 Dell Inspiron 11-3152 USB Port Replacement: étape 11, image 2 de 2
    • Slide the ZIF cord connecting to the Solid State Drive towards itself to detach it from the motherboard.

  12. Dell Inspiron 11-3152 USB Port Replacement: étape 12, image 1 de 1
    • Unscrew the two 2mm screws on the silver brace in the top right of the laptop using a #0 Phillips head.

  13. Dell Inspiron 11-3152 USB Port Replacement: étape 13, image 1 de 2 Dell Inspiron 11-3152 USB Port Replacement: étape 13, image 2 de 2
    • Unscrew six 1mm screws holding down the motherboard using a #0 Phillips head.

  14. Dell Inspiron 11-3152 USB Port Replacement: étape 14, image 1 de 1
    • Lift up the motherboard.

Conclusion

To reassemble your device, follow these instructions in reverse order.

Une autre personne a terminé cette réparation.

Matthew Duncan

Membre depuis le 03/10/16

481 Réputation

4 tutoriels rédigés

Équipe

UMass Dartmouth, Team 4-6, Catania Spring 2016 Membre de l'équipe UMass Dartmouth, Team 4-6, Catania Spring 2016

UMASSD-CATANIA-S16S4G6

3 membres

6 tutoriels rédigés

0 commentaires

Ajouter un commentaire

Nombre de vues :

Dernières 24 heures : 1

7 derniers jours : 4

30 derniers jours : 6

Total : 395