Aller au contenu principal
Dell Inspiron 15R 5537 Wi-Fi Module Replacement

Dell Inspiron 15R 5537 Wi-Fi Module Replacement

Ashton Floda

Ashton Floda et 3 autres contributeurs

Dernière mise à jour le December 12, 2019

10 minutes
Modérée
Tutoriel étudiant vedette

If the Wi-Fi connection to your computer doesn’t hold, you may be experiencing a malfunction of your Wi-Fi module. This guide will show you how to remove the Wi-Fi module for the Dell Inspiron 15R 5537.

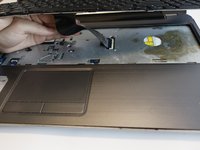
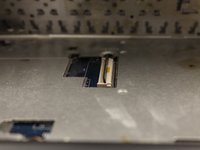
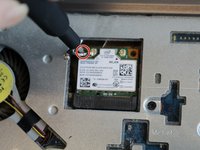
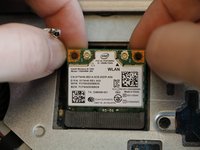
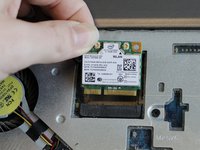
The Wi-Fi module is located underneath the keyboard and is connected by two antenna cables. A malfunctioning Wi-Fi module can result in connection issues to the wireless network. This issue doesn’t completely disable your laptop, however, it does cause an inconvenience. A quick fix can be to use ethernet to connect to Wi-Fi or purchase an external Wi-Fi adapter.

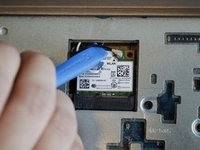
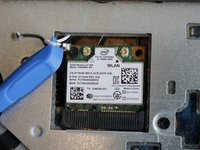
It is important to make sure that the antenna cables are properly connected to your Wi-Fi module and that the wires aren’t frayed.

Before beginning this guide, make sure your laptop is powered off and disconnected from any external power source.

Ce dont vous avez besoin

Outils

Afficher plus…

  1. Dell Inspiron 15R 5537 Wi-Fi Module Replacement, Battery: étape 1, image 1 de 1
    • Before working inside your computer, read the safety information that shipped with your computer.

    • Close the display and turn over the computer to see the battery locking tabs.

  2. Dell Inspiron 15R 5537 Wi-Fi Module Replacement: étape 2, image 1 de 3 Dell Inspiron 15R 5537 Wi-Fi Module Replacement: étape 2, image 2 de 3 Dell Inspiron 15R 5537 Wi-Fi Module Replacement: étape 2, image 3 de 3
    • Pull both of the locking tabs outwards until they both click to release the battery.

    • Pull the battery out by lifting it from the top and sliding it forward.

  3. Dell Inspiron 15R 5537 Wi-Fi Module Replacement, Keyboard: étape 3, image 1 de 3 Dell Inspiron 15R 5537 Wi-Fi Module Replacement, Keyboard: étape 3, image 2 de 3 Dell Inspiron 15R 5537 Wi-Fi Module Replacement, Keyboard: étape 3, image 3 de 3
    • Turn the laptop over so that the keyboard is facing up.

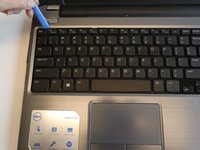
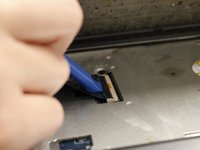
    • Use an opening tool to pry the keyboard from the base of the laptop.

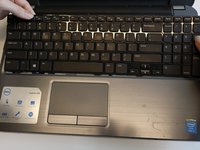
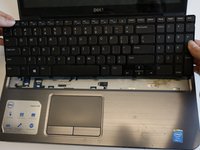
    • Once the top of the keyboard is released, slide the keyboard upwards.

    • Be sure not to pull the keyboard straight up; this could damage the keyboard ribbon cable.

  4. Dell Inspiron 15R 5537 Wi-Fi Module Replacement: étape 4, image 1 de 3 Dell Inspiron 15R 5537 Wi-Fi Module Replacement: étape 4, image 2 de 3 Dell Inspiron 15R 5537 Wi-Fi Module Replacement: étape 4, image 3 de 3
    • Use an opening tool to remove the keyboard ribbon from the latch by lifting the tab on top.

    • Once lifted, disconnect the ribbon and replace with a new keyboard.

  5. Dell Inspiron 15R 5537 Wi-Fi Module Replacement, Wi-Fi Module: étape 5, image 1 de 1
    • Once the keyboard is removed, the Wi-Fi module will be accessible.

  6. Dell Inspiron 15R 5537 Wi-Fi Module Replacement: étape 6, image 1 de 2 Dell Inspiron 15R 5537 Wi-Fi Module Replacement: étape 6, image 2 de 2
    • Use the opening tool to lift both antenna cables upward from the Wi-Fi module.

  7. Dell Inspiron 15R 5537 Wi-Fi Module Replacement: étape 7, image 1 de 3 Dell Inspiron 15R 5537 Wi-Fi Module Replacement: étape 7, image 2 de 3 Dell Inspiron 15R 5537 Wi-Fi Module Replacement: étape 7, image 3 de 3
    • Remove the 3mm Phillips #000 screw securing the Wi-Fi module.

    • Lift the Wi-Fi module up and out of the laptop.

Conclusion

To reassemble your device, follow these instructions in reverse order.

0 commentaires de tutoriel

Ajouter un commentaire

Nombre de vues :

Dernières 24 heures : 0

7 derniers jours : 3

30 derniers jours : 8

Total : 1,123