
Dell Inspiron 17 N7010 BIOS Battery Replacement

Ce dont vous avez besoin


-
-
Remove the single Philips screw securing the disc drive.
-
Pull the disc drive out.
-
-
-
Remove the 22 M2.5x5 Philips screws securing the palmrest to the base.
-
Remove the seven remaining M2x2.5 screws securing the palmrest to the base.
-
Unscrew the two captive screws securing the RAM/HDD door to the base.
-
Under the RAM/HDD door, unscrew the hard drive caddy. Remove the caddy.
-
Remove the three M2.5x5 screws from under where the hard drive was.
From what I understand (and my own experience), the 6 screws on the bottom, closest to the display hinge do not need to be removed for this particular job (BIOS battery replacement). They simply secure the display hinge to the chassis, and are not necessary to take out, unless the display is to be removed, for whatever reason.
-
-
-
-
Pop the four keyboard clips with a plastic spudger. As you do the first one, pry to get under the keyboard with your hand.
-
Remove the keyboard cable from the motherboard connector.
In the process of removing the keyboard I broke one of the keyboard clips. Any suggested quick fixes? I'm thinking of just using tape to hold the left side down but would prefer a less permanent solution.
-
-
-
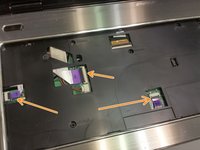
Remove the palmrest cables from the motherboard connectors.
-
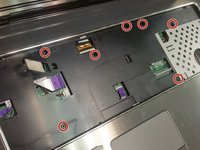
Remove the seven M2.5x5 screws securing the palmrest to the base.
-
Lift the palmrest.
Only the bottom two smaller connectors need to be disconnected. The larger one can remain.
-
-
-
Use a plastic spudger to get under the CR2032 cell and pry it out carefully.
-


To reassemble your device, follow these instructions in reverse order.
To reassemble your device, follow these instructions in reverse order.
Annulation : je n'ai pas terminé ce tutoriel.
14 autres ont terminé cette réparation.

7 commentaires de tutoriel
I’m happy that my guide helped you!
Lot of screws, wouldn’t even tried this without these instruction.
Thank you.
d223e
Thanks for the instructions. Computer starts up great now.
doresc sa comand pentru Dell Inspiron 17 N7010 BIOS Baterie. 1 bucata. cum se procedeaza?
Many thanks for an excellent, clear guide! Successfully followed it earlier.
Thanks, it worked great!