
Dell Inspiron Mini 10 RAM Replacement
Introduction
Passez à l'étape 1This guide will give step-by-step instructions on how to replace the memory card in your device.
Ce dont vous avez besoin


-
-
On the bottom of the laptop locate the removable panel and screw holding it to the body. Loosen the screw and take the cover off.
-
-
Outil utilisé dans cette étape :Tweezers$4.99
-
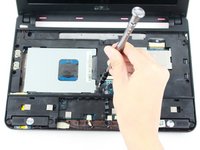
Remove the black and white antenna cable from the wifi adapter by pinching the gold contacts with the tips of your finger, or you can use tweezers, and pull them straight away from the adapter.
-
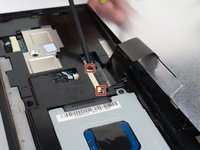
Unscrew the single 5mm Phillips 0 screw on the top right of the adapter. The adapter should start to angle away from the body of the computer. Once the screw is off completely, pull the adapter out of the data slot.
-
-
-
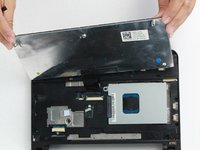
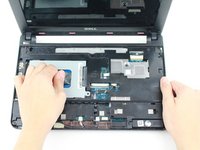
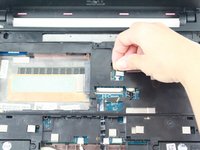
Using a prying tool, gently pry the palm rest off of the palm rest bracket. Start prying from one side and slowly work your way around.
-
-
-
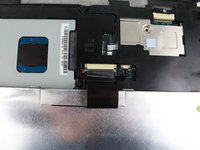
Gently pull the touchpad cable off the palm rest bracket.
-
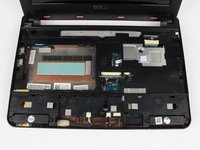
Lift the rest of the palm rest off the computer base.
-
-
-
-
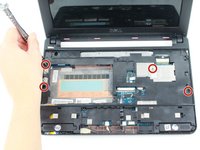
Close the device and turn over.
-
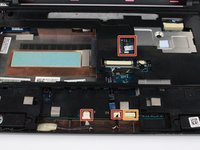
Remove the five 8mm Phillips 0 screws.
-
-
-
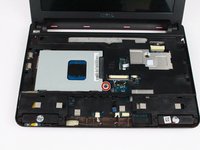
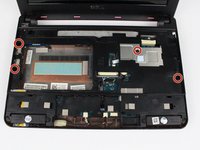
Remove the following:
-
Two 4mm Phillips screws securing the motherboard
-
AC adapter cable
-
USB and SIM card cable connector
-
Display cable connector
-
Carefully lift the motherboard out.
-
-
-
Turn the motherboard over.
-
Push the clips out on either side of the memory card until it pops up.
-
Remove the memory card.
-


To reassemble your device, follow these instructions in reverse order.
To reassemble your device, follow these instructions in reverse order.
Annulation : je n'ai pas terminé ce tutoriel.
3 autres ont terminé cette réparation.
Équipe

UW Tacoma, Team 1-4, Rose Fall 2016 Membre de l'équipe UW Tacoma, Team 1-4, Rose Fall 2016
UWT-ROSE-F16S1G4
4 membres
10 tutoriels rédigés
3 commentaires
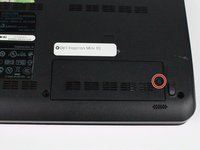
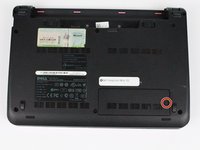
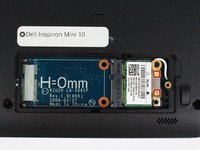
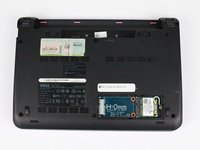
It is possible to upgrade the memory by simply (!) cutting aq hole in the bottom of the computer case. I used the pictures and Vulcan logic to determine the location and dimensions of the required hole. I used a vibrating saw to cut the hole. You need to be careful not to cut too deep. Once you have a square panel cut out, you need to snip through the copper shield covering the memory card. Then it is a simple in and out replacement. I used a leftover 2 Gig memory card from my MacBook Pro.
Mucheasier than taking out all those screws and connectors!
Here’s an easier-but riskier- technique. Cut a rectangular hole in the bottom of your Mini 10V. I did it and it worked. Needles to say, you must be careful not to cut too deep! Measure in from the left side (computer shut, upside down and the empty battery compartment away from you) 3/4 inch, and 4.5 inch (from the edge. the lines you draw will be 3.75 inches apart. measure up from the keyboard edge 2.5 inches and 4.75 inches and draw horizontal lines. The ‘box’ you drew is your cutting template. Once inside you need to cut a copper shield to get to the memory card. From that point on it’s easy. I used the 2 gig memory card from my MacBook Pro. When you’re done, glue the panel you cut out back in place and reinsert battery and you’re ready to go. (For cutting the hole, I used a vibrating multi tool with a saw blade)
Disclaimer: Your mileage may vary. If you brick your Mini 10V, you can buy another on Ebay for ~$75.
Good Luck.
Excellent step-by-step graphical explanation makes it look easy by following the instructions congratulations.