
Dell Latitude 3190 M.2 SSD Replacement
Introduction
Passez à l'étape 1If your Dell Latitude 3190 laptop is showing the black screen of death, taking a long time to startup or is slow to load applications, use this guide to replace or upgrade your M.2 SSD for the Dell Latitude.
An SSD is a solid-state drive that uses flash memory to store data in your computer. An SSD provides the computer with better performance and energy consumption.
The laptop’s SSD needs to be upgraded or replaced if the computer is lacking in performance or it is slow to startup and load.
Before starting this repair, power off your device and unplug from the charger.
Ce dont vous avez besoin
Kits de réparation
Ces kits contiennent toutes les pièces et tous les outils nécessaires à la réalisation du tutoriel.


Pièces


Outils


Afficher plus…
-
-
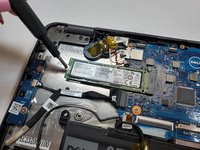
Use a Phillips #0 screwdriver to remove the seven 7 mm screws securing the back case.
-
-
-
-
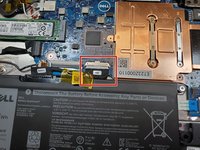
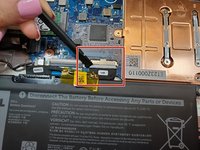
Use a spudger to disconnect the battery cable from the motherboard located at the top of the battery.
-


To reassemble your device, follow these instructions in reverse order.
To reassemble your device, follow these instructions in reverse order.
Annulation : je n'ai pas terminé ce tutoriel.
Une autre personne a terminé cette réparation.
Équipe

Gateway, Team 1-5, Saknee Fall 2021 Membre de l'équipe Gateway, Team 1-5, Saknee Fall 2021
GCC-SAKNEE-F21S1G5
3 membres
9 tutoriels rédigés
1 commentaire de tutoriel
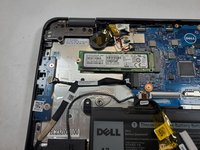
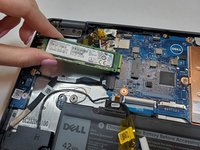
It's worth noting that some Latitude 3190s use eMMC storage, and these lack the M2 socket on the motherboard, although it would be possible to solder one on (the 80mm standoff and screw are present!)