
Dell Latitude E4300 Hard Drive Replacement
Introduction
Passez à l'étape 1Is your laptop out of storage or not reading files correctly? Consider using this guide to replace the hard drive of your laptop.
Ce dont vous avez besoin


-
-
-
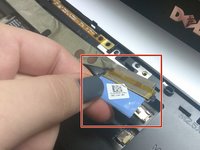
With your Phillips 1 screwdriver, unscrew the five M2.5x5-mm screws and the five M2.5x8-mm screws that lie underneath the keyboard panel.
-
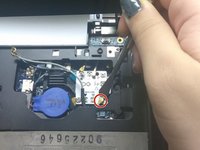
Be aware there are two deeply recessed screws on both sides to the rear of this panel. There are also two screws externally on the rear face either side of the battery that hold the monitor on and pass through this panel, support the screen when you remove these. There are also two screws above the hard drive bay that need to be removed.
-
-
-
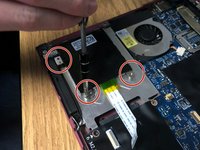
Unscrew the three screws located on the top of the component.
-
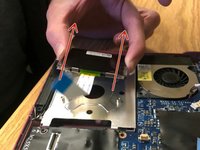
Lift the hard drive out of its holding in an outward motion and remove it from the device.
-


To reassemble your device, follow these instructions in reverse order.
To reassemble your device, follow these instructions in reverse order.
Équipe

University of North Texas, Team S6-G5, Thompson Fall 2018 Membre de l'équipe University of North Texas, Team S6-G5, Thompson Fall 2018
UNT-THOMPSON-F18S6G5
4 membres
5 tutoriels rédigés
3 commentaires
What!?! You can simple remove the hard drive by undoing two screws on the bottom of the laptop. Then you can remove the bezel from the laptop by undoing one more screw. It’s detailed in the service manual on the Dell website.
I agree with Rob. It’s been made very easy. Pretty much the same as model E4310 here Dell Latitude E4310 Hard Drive Replacement.
OK well, there’s no any need for such a BIG job actually! :)