Aller au contenu principal

Dell Precision 7560 Solid-State Drive (SSD) Replacement

Ce dont vous avez besoin

  1. Dell Precision 7560 Solid-State Drive (SSD) Replacement, Battery: étape 1, image 1 de 3 Dell Precision 7560 Solid-State Drive (SSD) Replacement, Battery: étape 1, image 2 de 3 Dell Precision 7560 Solid-State Drive (SSD) Replacement, Battery: étape 1, image 3 de 3
    • The screws holding the back cover in place can not be removed.

    • Use a Phillips #0 screwdriver to loosen the the eight 5 mm captive screws in the bottom cover.

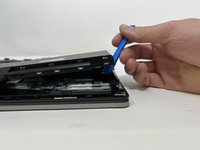
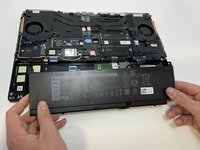
    • Remove the back cover by lifting at the corners.

  2. Dell Precision 7560 Solid-State Drive (SSD) Replacement: étape 2, image 1 de 3 Dell Precision 7560 Solid-State Drive (SSD) Replacement: étape 2, image 2 de 3 Dell Precision 7560 Solid-State Drive (SSD) Replacement: étape 2, image 3 de 3
    • Unscrew and remove the five 2 mm screws that secure the battery.

    • Locate the battery connector.

  3. Dell Precision 7560 Solid-State Drive (SSD) Replacement: étape 3, image 1 de 3 Dell Precision 7560 Solid-State Drive (SSD) Replacement: étape 3, image 2 de 3 Dell Precision 7560 Solid-State Drive (SSD) Replacement: étape 3, image 3 de 3
    • Pull the connector towards you to disconnect it.

    • Use your fingers or a plastic opening tool to pry the battery up and remove it from the laptop.

  4. Dell Precision 7560 Solid-State Drive (SSD) Replacement, Solid-State Drive (SSD): étape 4, image 1 de 2 Dell Precision 7560 Solid-State Drive (SSD) Replacement, Solid-State Drive (SSD): étape 4, image 2 de 2
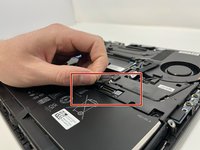
    • Unscrew and remove the two 3 mm screws that secure the solid-state drive.

  5. Dell Precision 7560 Solid-State Drive (SSD) Replacement: étape 5, image 1 de 2 Dell Precision 7560 Solid-State Drive (SSD) Replacement: étape 5, image 2 de 2
    • Remove the top cover of the Solid State Drive by lifting up from the corners.

    • Notice that the Solid State Drive is located underneath the cover.

    • Pull the Solid State Drive gently towards you from its exposed end to disconnect it.

    • With an appropriate replacement part, exchange the old SSD with a new one.

Conclusion

To reassemble your device, follow these instructions in reverse order.

Hector

Membre depuis le 02/14/23

249 Réputation

2 tutoriels rédigés

Équipe

Utah Tech University, Team 1-1, McMurrin Spring 2023 Membre de l'équipe Utah Tech University, Team 1-1, McMurrin Spring 2023

UTAHTECH-MCMURRIN-S23S1G1

3 membres

6 tutoriels rédigés

0 commentaires

Ajouter un commentaire

Nombre de vues :

Dernières 24 heures : 0

7 derniers jours : 4

30 derniers jours : 32

Total : 438